In this Stripe Payment Links tutorial, we’re going to show you how you can use Stripe payment links to sell your products or services online.
If you don’t already know, Stripe is a free, easy-to-use online payment processing software used by all types of businesses worldwide.
So, how can you use Stripe payment links to create a payment landing page and sell your products or services online?
Let’s find out.
Quick Summary
- With Stripe’s payment links feature, anyone can easily set up, customize, and share their own landing page with customers to start collecting payments in under 10 minutes.
- Stripe’s payment link landing feature is free to set up, but you will need to pay per each successful transaction when you start receiving payments.
- Click here to follow our step-by-step video guide on creating a free payment landing page with Stripe.
How To Use Stripe Payment Links?
In this brief Stripe tutorial, we’re going to share how to create a free (to set up) payment page within Stripe.
This is through Stripes ‘Payment links feature’ which was launched in 2021.
With Stripe’s payment links feature, anyone can simply create payment pages to list their products and services.
Are you ready to start collecting payments online?
Let’s go ahead and show you how to create a payment page with Stripe payment links!
1. Getting Started With Stripe

In order to create a landing page with payment gateway Stripe, you’ll need to head over to their website through your browser or click here.
If you currently do not have a Stripe account, we recommend checking out our beginner guide on how to use Stripe before continuing with this tutorial on how to create a Stripe payment link.
In terms of pricing, Stripe uses a ‘pay as you go’ pricing model.
You only pay 2.9%, plus 30 cents per successful transaction
Go ahead and sign up to Stripe for free, and we’ll meet you inside your Stripe dashboard!
Also read: How To Collect Online Donations On Any Website
2. Stripe Payment Links

Since this tutorial is solely focused on how to use Stripe payment links and how to create a free payment page with Stripe, let’s head straight over to ‘Payment links’.
To find ‘Payment links’:
- Simply navigate over to and click on ‘More’.
- Navigate down and click on ‘Payment links’.
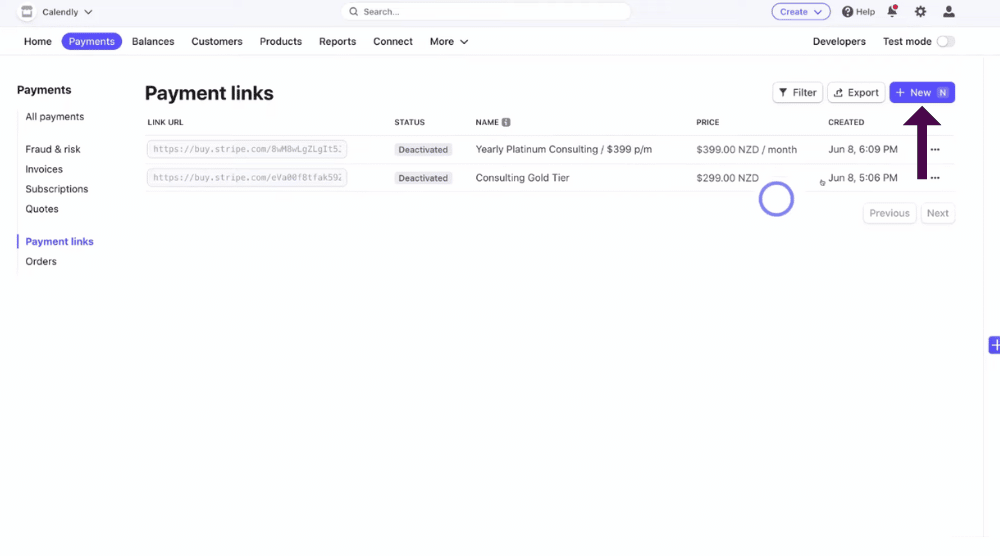
To create a Stripe payment link (a landing page with payment gateway) that you can send to your customers:
- Simply navigate up to and click on ‘+ New’ on the right-hand side.
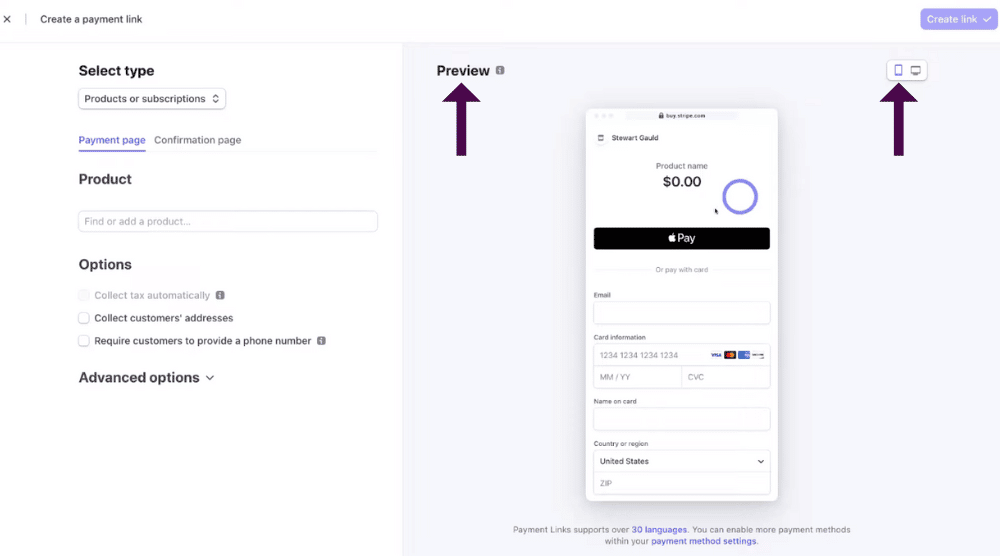
You can now see what your payment landing page will look like under ‘Preview’.
You want to make sure your landing page is mobile responsive.
- Navigate over to the ‘Mobile’ icon.
Also read: How To Use PayPal to easily send and receive online money
3. How To Customize Your Free Stripe Payment Page

This is also where you can customize your landing page and add the different products that you want to offer on your landing page.
- Navigate over to the left-hand side of the screen.
- Simply navigate over and click on ‘Products or Subscriptions’.
- Make sure you keep ‘Products or subscriptions’
This is best for eCommerce or software as a service (SAAS) products.
Basically, this is best for teams that either offer a physical product or a digital product or teams that sell a service (for example, a form of consulting).
If this is you, then this is the option you want to select when creating payment pages with Stripe!
Alternatively, you can select ‘Customers choose what to pay’.
This is best for tipping, donations, or pay-what-you-want.
For example, if you run a not-for-profit organization and you want to collect donations, you’d select this option so you can start collecting donations.
If you provide free services or education of some form, you can choose this method for collecting tips.
For the purpose of this stripe payment links tutorial, we’re going to go ahead and click on ‘Products or Subscriptions’.
Once you’ve clicked on that:
- Navigate down to underneath ‘Product’.
- Click on ‘Find or add product’.
This is where you can choose an existing product or service that you’ve already listed on Stripe or add a new product.
Also read: How To Set Up Recurring Payments in PayPal
4. How To Add a New Product To Stripe

If you currently don’t have a service or a product:
- Simply click ‘+ New product’.
- Go ahead and name your new product under ‘Name’
This can be any type of commercial offering.
For example, we offer different types of Consulting to our clients, so we’re going to go ahead and type in ‘One-on-one online Consulting’.
- Navigate over and select ‘Upload’ to add an image of your product or service.
- Type a description of your product in the ‘Description’ box.
- Come down and add a price underneath ‘Price’.
- Ensure you have the right currency selected.
- Select ‘+ Add additional currencies’ if you like.
- Select ‘Recurring payments’ or ‘One time’.
If you want to learn more about setting up recurring payments within Stripe, you can check out our beginner’s how-to guide here.
Basically, this sets up a subscription model for your products.
For example, we could turn this ‘One-on-one online consulting’ service into a recurring monthly subscription, and we could offer a one-hour strategy session every month for 12 months.
However, if it’s just a one-off purchase for a product or service, keep ‘One time’ selected.
- Come down and click on ‘Additional options’ and add a price description.
Once you’re happy with how your product or service looks:
- Click ‘Add product’.
If you want to add additional products:
- Navigate up to ‘Add another product’ and follow the same process.
We’re going to go ahead and add these different products that we added in a previous tutorial.
We will also add one more.
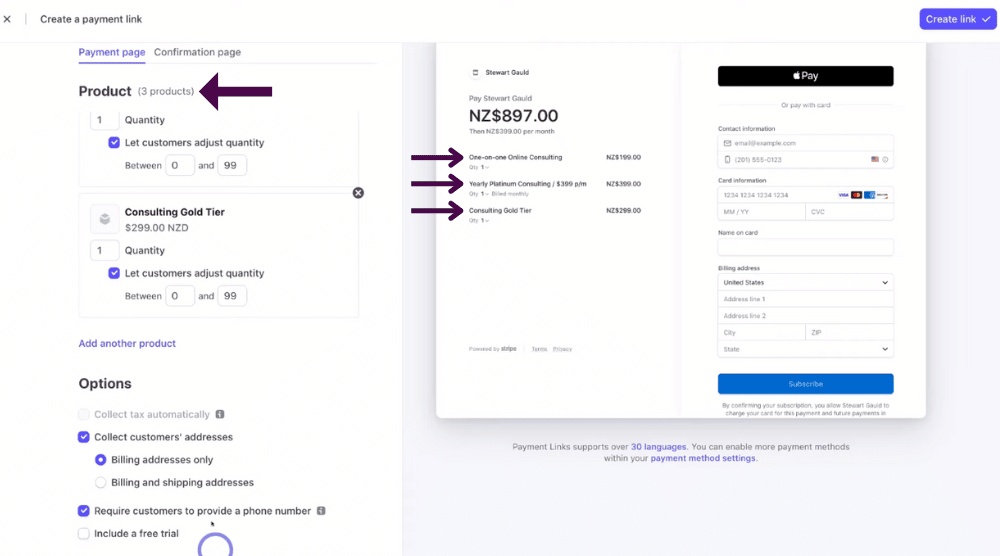
As you can see, we’ve added these three products.
Over on the right-hand side, if you look at our landing page, you can see that each of these 3 products has been added and the total price is up here.
Once you’ve added your products:
- Under each product (on the left side of your screen) tick ‘Let customers adjust the quantity’.
Additionally, follow these steps:
- Navigate down to ‘Options’.
- You can choose to tick ‘Collect customers address’ if you like and tick your shipping preferences.
We’re going to select ‘Billing and shipping address’.
- Click on ‘Select the shipping countries’.
This is if you sell a physical product.
However, we’re going to cancel that as we’re selling a service.
Let’s go ahead and change our shipping preferences to ‘Billing address’.
- Come down and select ‘Require customers to provide a phone number’.
This means that you want their billing address and their phone number.
- You also have the option to tick ‘Include a free trial’.
This can be selected or deselected, depending on the nature of the product that you’ve added.
Now that you’ve learned how to create a stripe payment link, it’s time to customize it!
5. Customize The Confirmation Page

- Navigate back up to the top.
- Select ‘Confirmation page’ (next to ‘Payment page’).
- You have the option to show a confirmation page
- Click on ‘Replace default with custom message’.
You can then type here to add a relevant message that you want your customers to see once they’ve made a purchase.
Remember, this is a confirmation message.
Depending on the nature of your product or service, make sure that you have the correct information or instructions that follow the successful transaction.
It could even be a link to a specific destination.
For example, because we’re offering consulting, we could add an online destination or a booking form where people can book that strategy or online consulting with us.
We could use a tool like Calendly to book those consultations.
You can read the beginners guide on How to use Calendly
You also have the option to:
- Tick ‘Don’t show confirmation page’.
If you tick this, your customers will just be redirected to your website after a successful transaction.
This is where you just need to add the landing page (your own landing page) where you want your customers to arrive once they’ve made a payment through this form.
For the purpose of this Stripe payment links tutorial, we’re going to navigate back and click on ‘Show confirmation page’.
We’re happy with the default custom message over here.
Once you’re happy with your new payment page:
- Simply navigate up to ‘Create link’.
6. Share The Stripe Payment Page Link

And just like that, as you can see, we’ve gone ahead and created our Stripe payment link and our free landing page with a payment gateway!
Follow the steps below to share your payment page link:
- Click ‘Copy’ next to your link to copy your link.
You can now share this link online!
On the right-hand side Stripe also offers some tips for sharing and using your link that are very useful.
7. Add Payment Methods

Let’s click on the last tip ‘Additional payment method’.
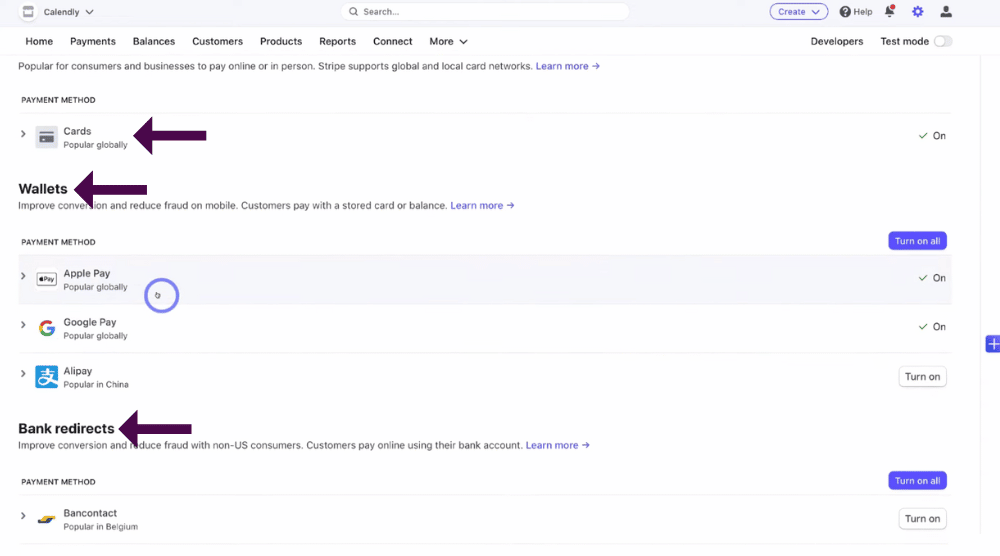
This is where you can ensure that you have multiple payment methods enabled to make it a lot easier for your customers to convert.
For example, we’ve already got cards enabled.
- Navigate down to ‘Wallets’.
- Click ‘Turn on’ for both Apple Pay and Google Pay if you want to enable those payment methods.
We’ve already enabled the ‘Apple pay’ and ‘Google pay’
- Again, click ‘Turn on’ next to ‘Alipay’ if you want to enable Alipay.
- Navigate down further to ‘Bank redirects’.
- ‘Turn on’ any of those payments if you like.
Basically, the more payment options you have enabled, the easier it is for your customers to convert!
- Head back to your payment link.
8. Add Stripe QR Code

As we mentioned, you can:
- Copy the link.
- Click on ‘QR code’ (see screengrab).
- Click ‘Copy to clipboard’ or
- ‘Download image’.
This allows you to create or download a QR code that you can then add to different business materials.
You can also embed it on your website.
This means your potential customers can use their smartphones to scan this QR code which will then take them directly to your landing page.
You can Read our beginner guide on How to create a QR code for free.
Alternatively, you can also have a read on How to create a QR code with Canva.
- Exit out of that.
- Click the three little dots next to ‘QR code’ for more options.
- Click on ‘Change name’ to change the name of your payment link.
- Click on ‘Edit’ to edit your link.
- Select ‘Add note’ to add a note to your payment link.
9. Customer Perspective Of Your Stripe Payment Link

We have almost come to the end of this tutorial on how to create a free payment landing page with Stripe!
However, before we finish, we’ll show you what your free payment page looks like from the perspective of a customer:
As you can see, when a customer scans the QR code or clicks on your link, that’s going to take them to this payment page
They can then:
- Navigate up to the three different products that we’ve added.
- Navigate over to ‘Quantity’ and select the quantity that they want to order
They can also remove the different product items if they like by:
- Coming down and simply clicking ‘Zero’.
- Clicking ‘Confirm remove’.

As you can see, they now only have two products (see screengrab).
All your customers need to do then is:
- Add their contact information and their billing information.
- Come down and click ‘Subscribe’.
Then when your customers subscribe, they’ll see a confirmation message (either a custom confirmation message or a default custom message), depending on the settings you chose.
Remember, instead of a confirmation message, you can send your customers to a custom landing page on your website.
So as you can see, Stripe makes it easy for anyone to create payment landing pages and payment links for you to collect payments online and sell your products or services!
That is all we wanted to cover in this Stripe payment link and free payment page tutorial for beginners.
We hope you gained value and now feel confident in this process!
Create a Free Payment Landing Page with Stripe (Video Guide)
Feel free to watch our full video tutorial on how to use Stripe payment links and how to create a free payment landing page using Stripe below.
Frequently Asked Questions
Can You Make A Landing Page With Stripe?
By using Stripe’s payment link feature, you can easily set up, launch, and customize your payment gateway landing page for free to start collecting payments.
Is Stripe Payment Pages Free?
Stripe is completely free to set up, and there are no monthly fees or hidden costs.
However, Stripe’s pay-as-you-go pricing means you’ll pay 2.9% and an additional 30 cents every time someone purchases your product or service.
Can You Use Stripe For Small Business?
Absolutely! Stripe is the perfect payment processing solution and payment landing page gateway for small businesses.
Why? It’s easy to use, integrates with many online eCommerce platforms, and offers a seamless payment experience for customers.
