Linktree is a useful ‘Link in bio’ tool or dynamic landing page builder that allows you to simply display all your important links on one visually engaging landing page!
In a nutshell, Linktree makes it super easy and convenient for your audience to access all your important online resources from one convenient online destination.
For this Linktree tutorial for beginners, we will share how you can set up, use, and grow your business with this free link-in bio software.
You can also easily download Linktree on both iOS and Android mobile devices!
During this Linktree review and tutorial, we will walk you through step-by-step of how to use Linktree, including the initial setup of your Linktree account on a desktop (using the web version of Linktree).
Following this, we’ll navigate through how to use Linktree on the mobile app (as Linktree is built for mobile devices), including the process of further customizing your Linktree profile, all for free!
This is because the majority of social media channels such as Instagram, Twitter, and TikTok that you use on a daily basis to create content for your business only have one place to embed and add a link.
By adding your single Linktree link across all your different channels, your visitors can simply click on your Linktree link and that’s going to take them to a visually engaging landing page where you have displayed all your important links.
These could be links to your products or the services that you offer, as well as other online destinations like events, blogs, videos, other social media channels, and more.
And that is Linktree! “Everything you are in one simple link”
Linktree is essentially a very powerful free link in bio software and a platform that you can use for directing traffic to places that matter.
Read more: How to Create an Instagram Business Account.
How To Use Linktree?
Let’s get you up and running and launch into this tutorial on how to use Linktree!
1. Getting Started With Linktree

With that covered, let’s go ahead and get started.
To get started, you’ll first need to create a free Linktree profile.
- Simply navigate over to your browser and type in ‘linktr.ee’ or click here
That’s going to take you directly to their web page.
2. Create a Free Linktree Account

Once you’ve arrived at Linktree:
- Simply navigate down to ‘Claim your Linktree’.
Next to ‘Claim your Linktree’, add your business name or your brand name.
For the purpose of this tutorial and the initial setup, we’re going to add our business name ‘Syndeo media’ (see screengrab).
Once you’ve added your business name follow these easy steps:
- Navigate across and click on ‘Claim your Linktree’.
- Make sure that your Linktree name is available.
- Come down and simply add your email and password.
- Tick that you agree to the terms and conditions.
- Come down and click on ‘Sign up with email’.
We’re going to quickly go ahead and add our details.
Once you’ve gone ahead and added your personal information
- Simply click on ‘Sign up with email’.
This will take you to the ‘Tell me about yourself’ page.
- Under ‘Tell us your name’, type in your name.
If you’re running a personal brand, then go ahead and add your name.
However, if you have a business and you’re using Linktree for your business profile, then go ahead and add your business name.
- select one category that best describes your Linktree.
We’re going to go ahead and click on ‘Business’.
- Navigate down and select another category (This is optional).
we’re going to select ‘Agency’ and ‘Consulting’.
Once you’ve selected your categories:
- Click ‘Continue’.
3. Linktree Pricing Options

That’s going to take you to the pricing options.
We’re going to focus on Linktree’s ‘Free forever’ plan only in this Linktree tutorial.
- Navigate down to view some of the key benefits (see screengrab).
With the free plan, you can add Unlimited links, social media icons, videos, and more.
You can also customize your Linktree landing page the way that you like, view basic analytics about your account including clicks and views, and collect payments, tips, and donations.
This plan enables you to easily use this link in the bio tool all completely for free!
This is more than sufficient enough for small businesses, entrepreneurs, and creators.
And as your business grows, you can always upgrade to a premium plan (at any time) to access more advanced features!
- Navigate down and click on ‘Get free’.
And just like that, you’ve created our free Linktree account!
All you need to do now is verify your account.
- Head over to your email inbox and locate the verification email.
- Simply click ‘Verify email’.
- Click ‘Sign in to continue’.
- Go ahead and log into your new Linktree account by adding your username and the password that you created earlier.
- Click ‘Login’.
4. How To Use Linktree (Web App)

Here we are inside our Linktree account!
Before we go ahead and dive into the mobile app and walk you through the process of customizing your Linktree profile, let’s quickly go ahead and navigate through the web application.
Follow these steps to navigate through the Linktree web application:
- Navigate up to ‘Links’. You can see that we currently have ‘Links’ selected (see screengrab).
This is where we can add links to our profile.
- Click on ‘Add new link’ to add your first link.
We’re going to call this ‘Our website’.
- Below ‘Title’, add the URL that will take people to your website.
If you don’t currently have a website for your business, you can check out our Top 10 Website builders here.
- Under this, there are some features that you can add to each link (see screengrab).
- You can temporarily send all your visitors straight to a link instead of your Linktree through redirection
However, you can only access this if you upgrade to a paid plan.
If you navigate across you will find Thumbnail.
This allows you to add a thumbnail, an image, or an icon that represents this link.
This will give visual context to your link.
You can click here to draw attention to your most important link.
Again, you cannot access this with the free plan.
If you don’t want your links to display on your profile just yet, you can always add those later by scheduling those links to be active later on.
However, this is another feature that you can’t access on the free plan.
If you add a link under ‘Lock’, your visitors can only access this specific link by filling out certain criteria.
- Next to ‘Lock’, you can see Basic analytics.
Additionally, over on the right-hand side of this page, you can preview what your Linktree profile will look like from the perspective of your visitors.
To add additional links, all you would do is:
- Click ‘Add new link’.
- Fill out the ‘Title’ and ‘URL’ information for that link.
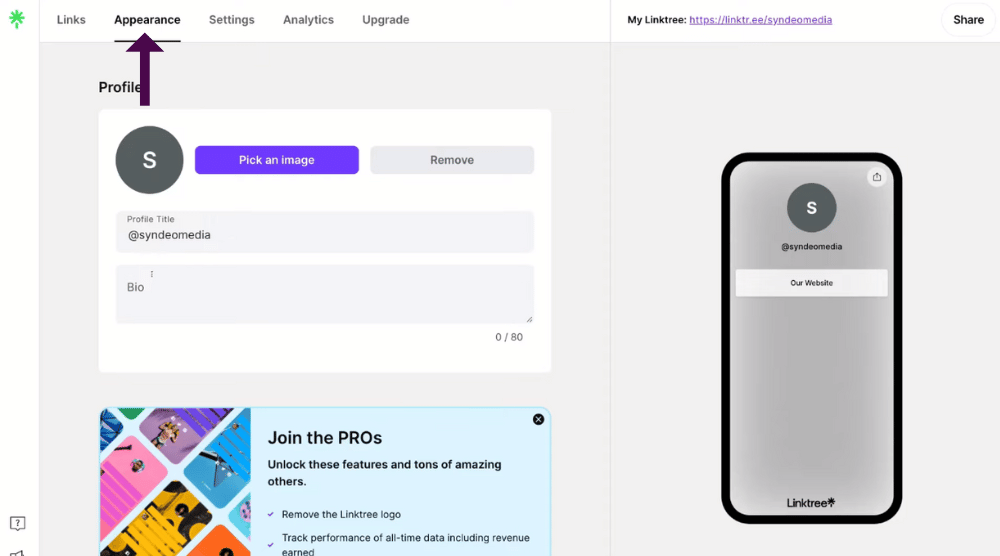
Next to ‘Links’, you’ll see ‘Appearance’.
This is the overall look or the theme of your Linktree profile. To edit your profile, follow these steps:
- Under ‘Profile’ you can click ‘Pick an image’ to add a profile image.
This could be a logo for your business or your personal brand.
- Below this, you can add a brief description of your business and your profile under ‘Bio’.
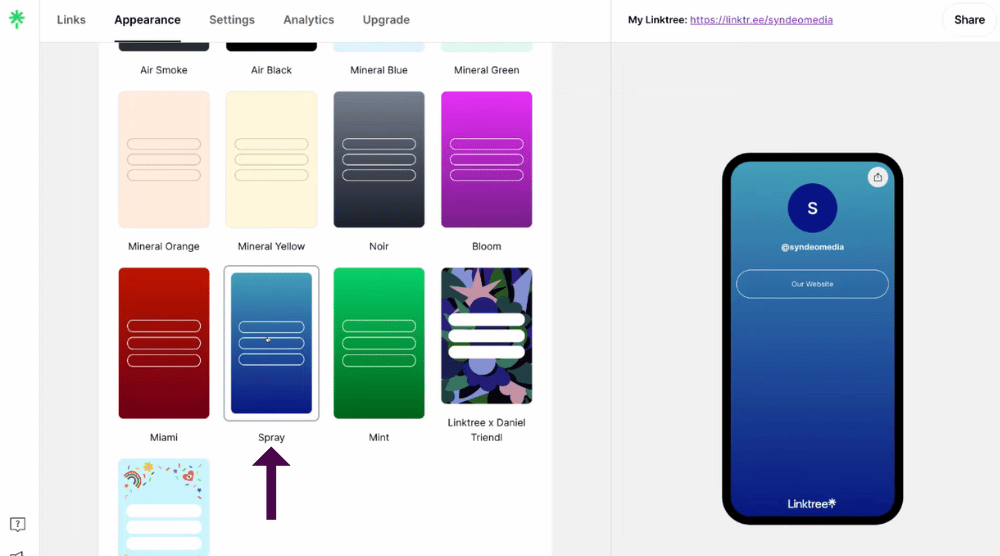
- Scroll down for more customization options.
- Here you can select and create your own custom theme.
We’re going to scroll down and pick this ‘Spray’ theme (see screengrab).
We like the look of this blue minimalistic look.
You can go ahead and pick a theme that you like.
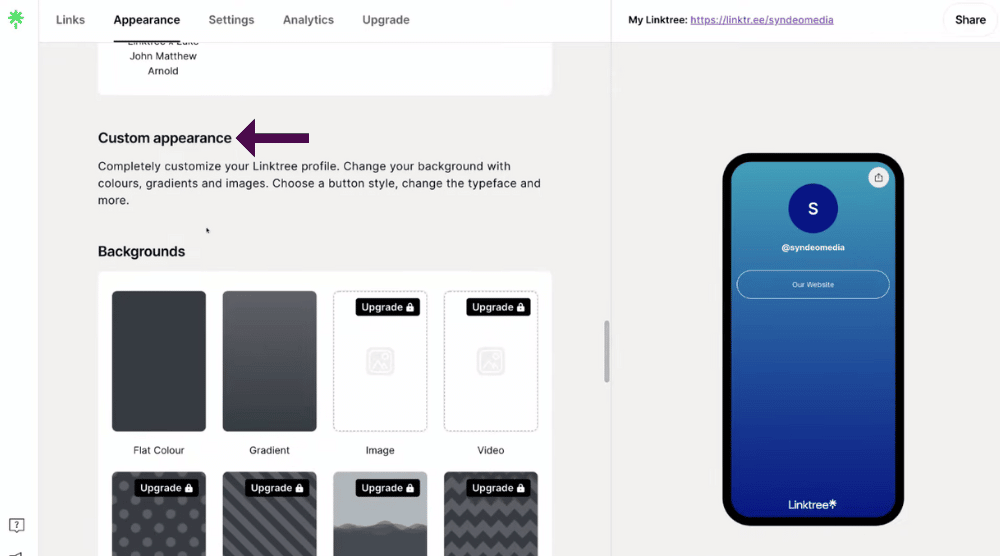
If you scroll down further, you’ll see ‘Custom appearances’.
You can customize:
- The background.
- The look of the buttons on your profile.
- Color options and font options for your buttons.
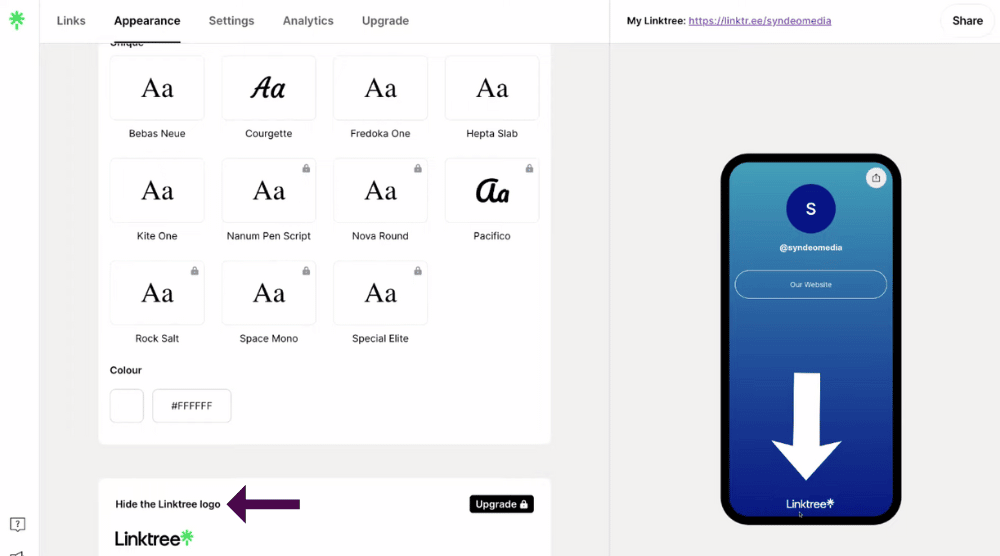
If you navigate down all the way to the bottom of the page, you’ll see the option to hide the Linktree logo.
At the bottom of your profile, your visitors will always see the Linktree logo (see screengrab).
You’ll need to upgrade to a paid plan to remove this logo.
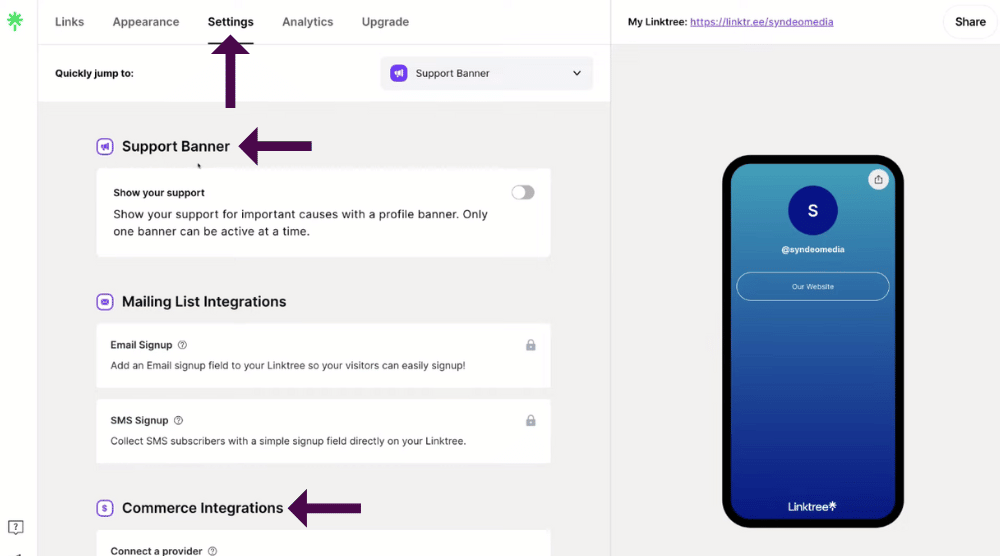
Next to ‘Appearance’, you have ‘Settings’. Follow these steps to navigate your way through the settings of your Linktree account:
- Navigate up to and click ‘Settings’.
With the free plan, most of the settings are limited. However, we’re going to cover all the free options.
- You can select to either enable or disable the ‘Support banner’.
This allows you to show support for important causes with a profile banner.
- Navigate down further to access ‘Commerce integrations’.
This is where you can start collecting tips and payments, or sell products and services (and more!) on platforms like PayPal or Shopify.
You can do this completely for free with your Linktree profile.

- Scroll down past all the premium settings to find ‘Social icons’ at the bottom of the page.
This is where you can display links to your email, social media profiles, and more. (We’ll show you an example of this shortly).
What you want to do here is:
- Add all your links to all your different social media channels as you can see from the example here (see screengrab).
- Add all the important links that you want your visitors to click on under ‘Links’.
Think about all the important links that you want to add to your profile.
- Next to ‘Settings’, you’ll find ‘Analytics’.
This is where you can see basic analytics in terms of how your profile is performing
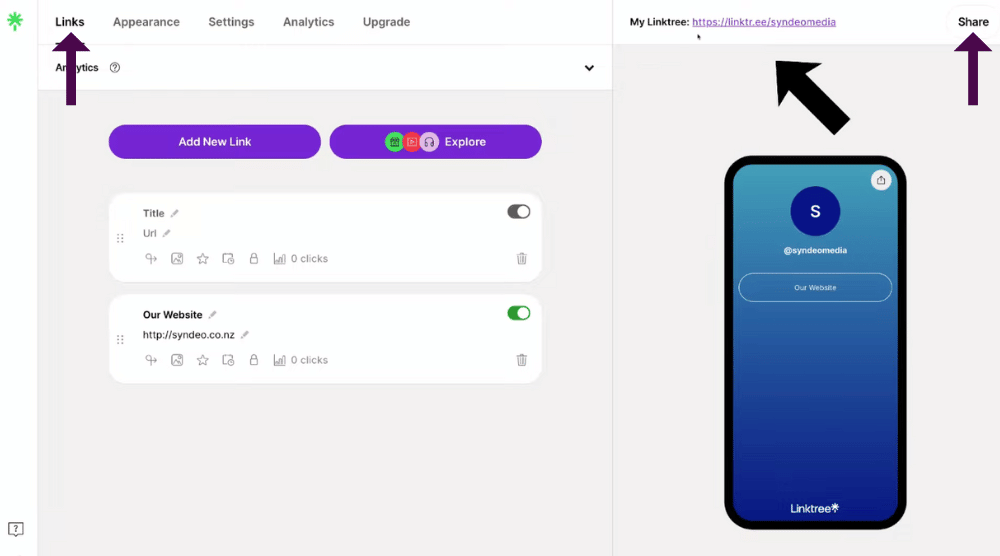
- Head back over to ‘Links’.
Follow these steps on how to share and copy your Linktree link:
- Navigate over to the far right-hand side where we can preview what your Linktree profile will look like from the perspective of our visitors.
- Up above this, you can see our single link profile (see screengrab).
This is the link that you can copy and add to all your different social media channels, as well as other online destinations where you can drive traffic to your Linktree account.
- Simply navigate over to ‘Share’.
This will bring up a pop-up window with different sharing options (and the option to copy your link).
- Navigate down and click on ‘Copy’ to copy this link.
You can also access your Linktree QR code by:
- Clicking on ‘My Linktree QR code’ under ‘Share’
This will then bring up a QR code. (see screengrab).
- You can then select ‘Download PNG’ or ‘Download SVG’ to download your Linktree profile QR code.
You can also embed this QR code on physical marketing activities as well as online content on social media posts so that your visitors can use their smartphone to simply scan the QR code and click through to your profile.
You can read the beginner’s guide on How to create HQ codes for free.
- Head back by clicking the ‘<’ button on your QR code pop-up window.
You can also simply share your Linktree profile across different channels.
- Select ‘Share my Linktree to…’ under ‘share’
You can share on a variety of different social media channels such as Facebook, Linkedin, Twitter, and more.
- Select the ‘<’ arrow again to take you back to the ‘Share your Linktree’ pop-up window.
To add your Linktree profile to different social media channels:
- Select ‘Add to your social’.
You can see all the different options of social media channels that you can simply add to your Linktree profile (the single link) into the bio or description of your social media channels.
And that wraps up how to use Linktree on the desktop version!
Read more: How To Use PayPal to easily send and receive online money
5. How To Use Linktree On Mobile

To continue with this Linktree tutorial and review, let’s dive into how to use the mobile app version of Linktree.
We will guide you through their mobile app with an already set-up Linktree account.
As you can see, we’ve already gone ahead and downloaded the Linktree mobile app onto our phones.
Go ahead and download the Linktree mobile app, then follow these steps:
- Click on the app.
- That’s going to take you to all your links.

Let’s take a look at our links as an example (see screengrab).
- The first link that we’ve added to our Linktree profile is an embedded Youtube video.
- Below this, we have our website.
- Next, we have a one-on-one strategy consultation. This will take people to our consultation page on our website.
- Below that, we have the business group membership. People can click on this link to take them to the landing page where they can sign up for our group membership.
- Under this, we have ‘Join my email list’, where people can click this link to take them to a landing page where they can sign up for our email list.
- Next, we have our agency. This link is going to take people to our digital media and marketing website.
Below all of these links is where you can navigate your way through the mobile app and make changes to your Linktree profile.
At the moment we’re on ‘Links’.
This is where you can add new links to your profile.

Next to that, you’ll see ‘Appearance’.
Again, similar to the web version, this is where you can add your image, your logo for your Linktree profile as well as your profile title and your bio.
Under this, you can choose your theme and customize the background.
This is the same as the web version.
You can take the time to customize and edit your profile the way you want similar to the web version.
Once you’ve finished editing under ‘Appearance’:

- Navigate across and click on ‘Preview’.
This is going to give you the mobile preview of the tree of your Linktree profile.
This is how we’ve set up our Linktree profile
We have our profile image as my name (because this is a personal brand).
Below that, we’ve added our bio.
Below the bio, we have links to our social media channels.
Remember you can add those links under ‘Settings’.
Next, we have six important links that we want to display on our profile.
Each link will take people to specific locations.
The first link we’ve embedded is a Youtube video.
As you can see, if we click here that’s going to generate the Youtube video.
The rest are just normal links.
The best thing is, you can do all this using Linktree’s completely free link in bio software!
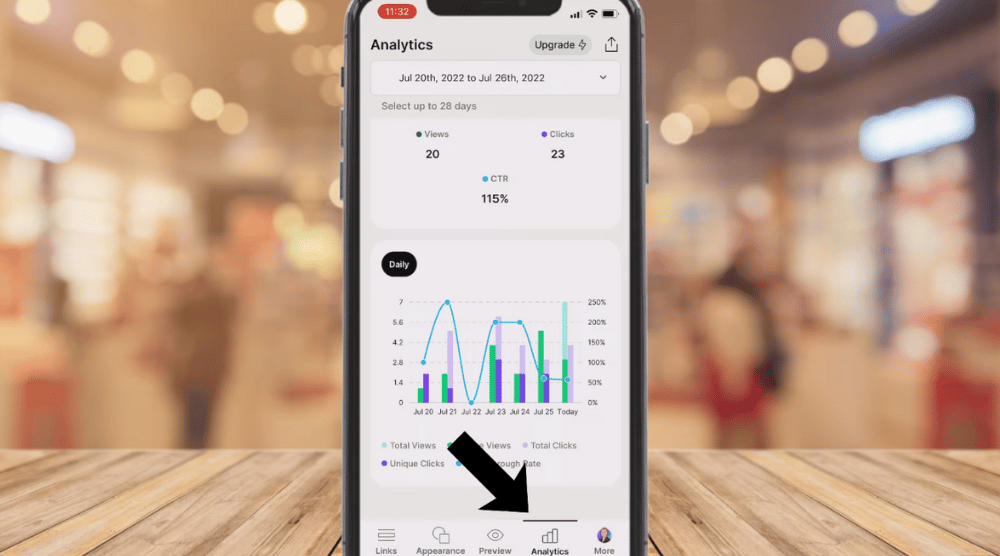
- Next to ‘Preview’, you’ll see ‘Analytics’ for a visual representation of your analytics.

- If you navigate across to ‘More’, this is where you can access your Linktree settings and then your account information down here.
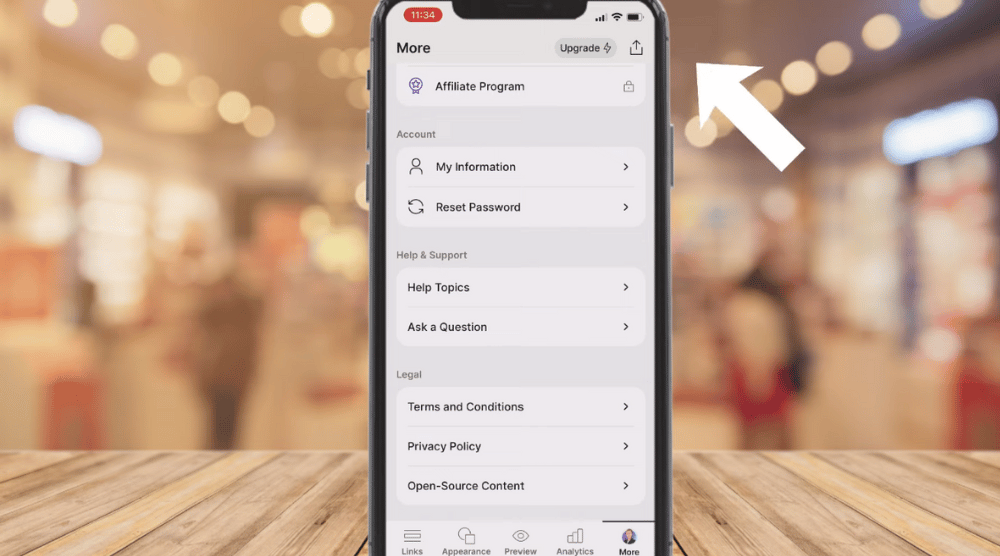
To copy your single profile link:
- Simply navigate up to the top right-hand corner and click.
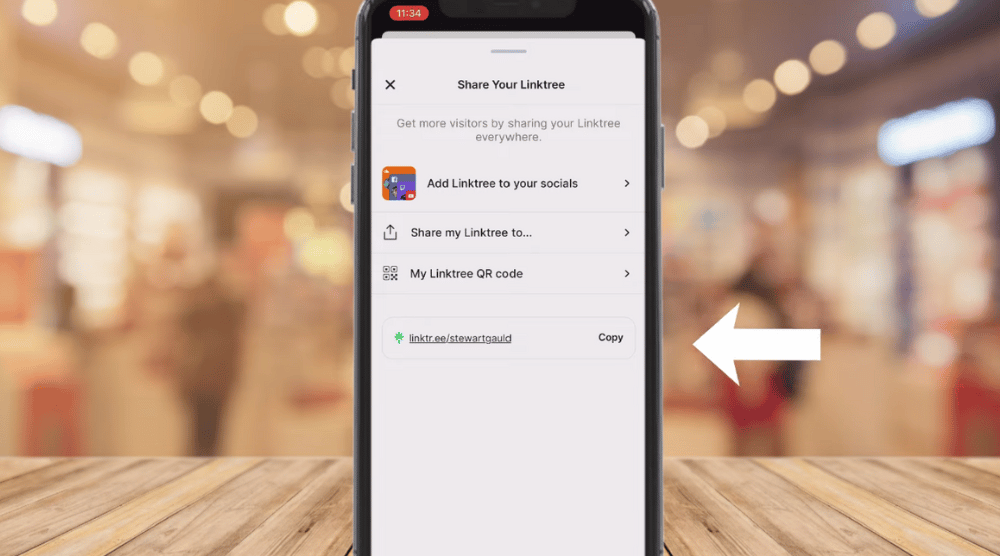
These are the same options we mentioned on the web version.
To copy your link and add this single link across all your different social media channels:
- Navigate down and click on ‘Copy’ to copy your link.
This will ultimately drive more traffic to your important links!
6. Linktree Instagram Example

For example, here is an Instagram profile (a personal brand) that uses Linktree in their profile
Let’s click on their Linktree profile in their bio.
That’s going to take us to all their important links
Read more: How To Connect Twitter to Instagram
7. Linktree TikTok Example

Another example is TikTok.
As you can see, in their bio they have a Linktree URL
If we click on this link, that’s going to take us to all their important links.
This could be a small business owner.

As you can see, they’re selling retro toasters and you can also shop for scrunchies.
They also have an Amazon storefront.
TikTok is another important social media platform where you can create business video content to help you grow your business and brand.
You can go ahead & create business videos & also know How to Advertise on TikTok to promote your business
So think first about your business and your brand.
Think about the important links and destinations where you want to send people.
What are the products or services that you offer?
As we’ve mentioned, Linktree is ideal for sharing across all your different social media channels!
Think about the products and services that you talk about on your different social media channels.
Remember, you can only add a single link in your bio with this link in the bio tool.
However, if you’re talking about an event, product, or service that you offer, you can simply tell people to click the link in your description across all your different social media channels.
That single link (which is your Linktree profile) will host all the different links to your product, services or event pages that your visitors can easily find.
So again, take the time to customize your Linktree profile and think about the important online destinations that you want to share with your audience.
As you can see, Linktree is a powerful platform that you can use with your social media channels to ultimately grow your business!
That concludes this brief Linktree tutorial for beginners on how to use Linktree!
We hope you enjoyed it, and can now confidently set up and use Linktree for your business.
Linktree Review and Tutorial (Video Guide)
If you’d like a more detailed and visual step-by-step guide on how to set up and use Linktree, check out the video below!
