What is MailChimp?
In this Mailchimp automation tutorial, we’ll explain how to launch email automation in a matter of minutes using MailChimp’s customer journeys.
Mailchimp is a popular all-in-one marketing platform with power-packed features that allow you to create email automation and launch them with ease.
What is email automation?
Email automation is essential for driving specific actions and events, such as increasing customer engagement, recovering lost customers, cross-selling, nurturing relationships and more.
However, before we get started, it’s important to note that you’ll need a paid Mailchimp account to engage in multiple email automations sequences.
The free version only allows a single automated email.
For example, this could be a welcome email sent automatically when a visitor subscribes to your newsletter.
However, this tutorial is about creating an automated email sequence.
This feature is known as ‘customer journeys’ in Mailchimp.
Don’t have a MailChimp account?
Check out our complete MailChimp beginners guide here, then continue with this tutorial.
How to Create Email Automations with Mailchimp?
Let’s meet you inside the Mailchimp dashboard to understand more about email automation!
Access Customer Journeys within Mailchimp
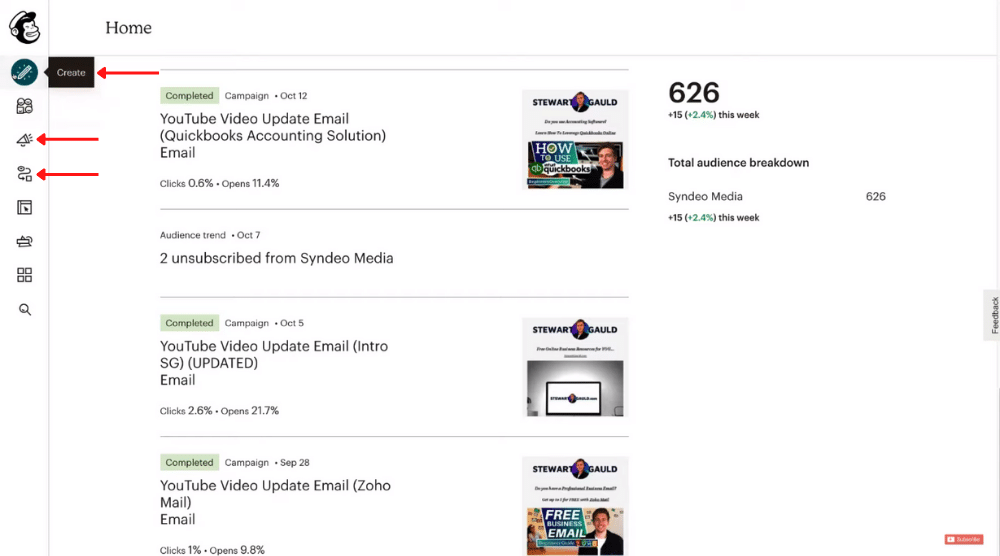
To access email automation:
- Navigate over to and click on ‘Automations’, ‘Campaigns’.
- Or simply click ‘Create’ on the top-left.
For this Mailchimp automation tutorial, we’ll click ‘Create’.
Now follow these steps below:
- Select ‘Customer Journeys’ from the menu on your left.
- Click ‘Start Creating’.
- You’ll then be taken to the newest version of customer journeys within Mailchimp.
- However, if you’re an old user and prefer the classic version, click on ‘Classic Automations’ in the upper-right corner.
It’s highly likely that the classic version is going to be phased out soon, so in this Mailchimp automation tutorial, we will proceed with ‘Customer Journeys’.
Note: If you’ve already email sequences, you’ll find them under ‘My Journeys’.
Choose an Email Sequence Template
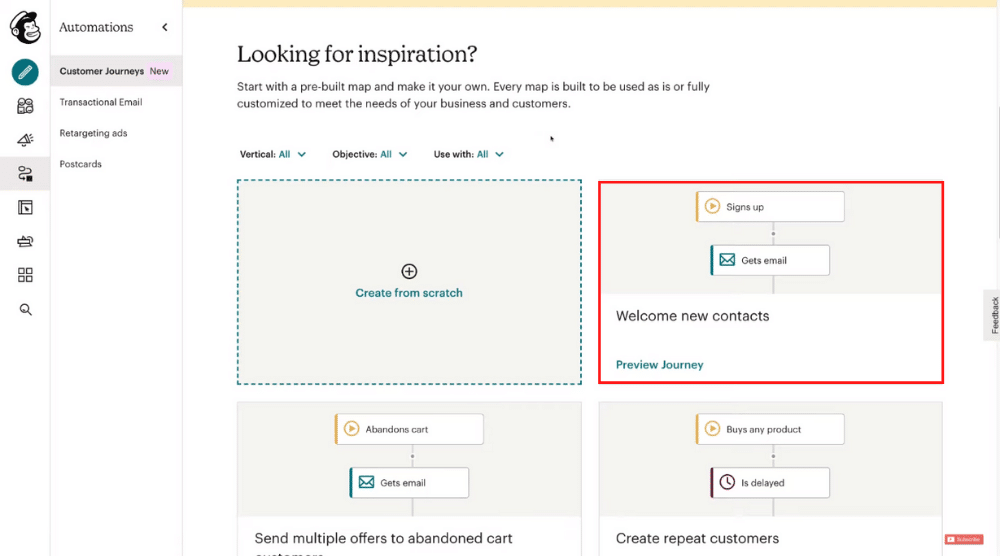
To find email sequence templates offered by Mailchimp:
- Scroll down until you find a section titled ‘Looking for inspiration?’
- You can also create an email automation from scratch if you like.
However, for this tutorial on how to use Mailchimp automations, we’ll opt for a template instead.
- Pick an email sequence template that aligns with your goal.
Mailchimp offers various templates depending on what your goals are.
For example, your goal could be to:
- Recover lost customers.
- Welcoming new contacts.
- Promote cross-sell opportunities.
- Remind customers to reorder …and more!
In this tutorial, we’ll choose a premade template named ‘Welcome new contacts’ and start customizing it.
The customer journey objective here is to nurture relationships.
You can see what the customer journey looks like right now (refer to the screengrab).
Start by:
- Clicking on ‘Build a Journey’.
- Then select your audience from the drop-down menu.
- Once you’ve selected your audience, click ‘Continue’.
- On your right, you can see the current automated email sequence.
It’s important to know that if you upgraded to the Essentials plan, you can only access four points in your customer journey.
However, if you have the Standard plan, you can access up to 10 points within your customer journey!
Let’s go ahead and break down this email sequence that’s designed to welcome your contacts.
Read More: How To Use MailChimp
Understanding the Customer Journey
Below, we’re going to explain the customer journey step by step:
Step 1: Audience Building
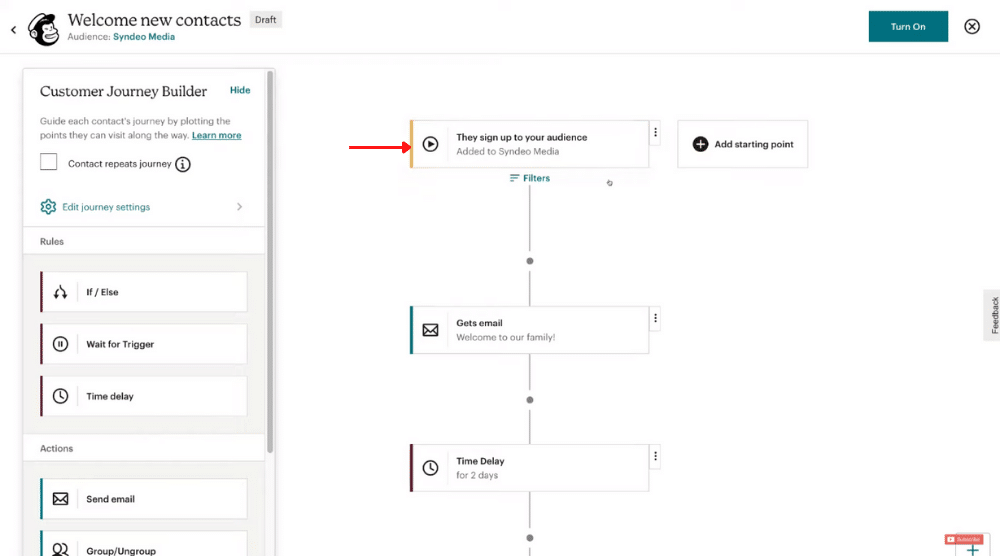
When visitors sign up to your email list, they’ll be added to this email sequence.
This means that if you have Mailchimp integrated on your website and someone subscribes to your email list, then they’ll be added to an audience called ‘Syndeo Media’ (an example for this tutorial).
You can also build landing pages within Mailchimp to capture your audience, then add those to your email list (again, our email list for this tutorial is called ‘Syndeo Media’).
Once a visitor signs up from our website or a landing page, they’ll be sent the first email instantly.
Watch: How to create a landing page with MailChimp
Step 2: Customizations
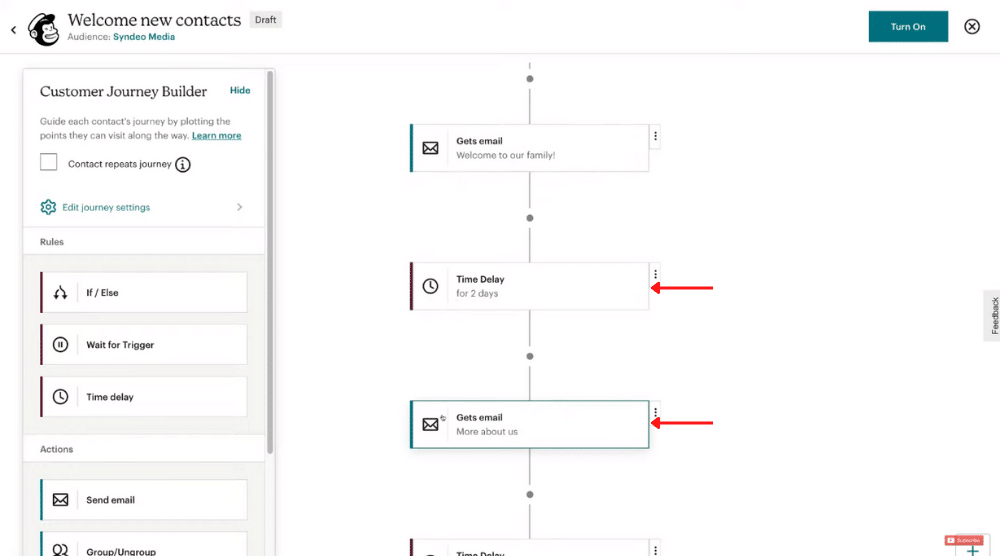
As you can see from the email sequence, the subscriber will receive the second email in our sequence two days later.
This email will have more information about the business.
You can customize the look, feel and content of each of these emails in your sequence using the drag and drop email builder.
We will talk more about customizing your emails soon!
Step 3: Conditions
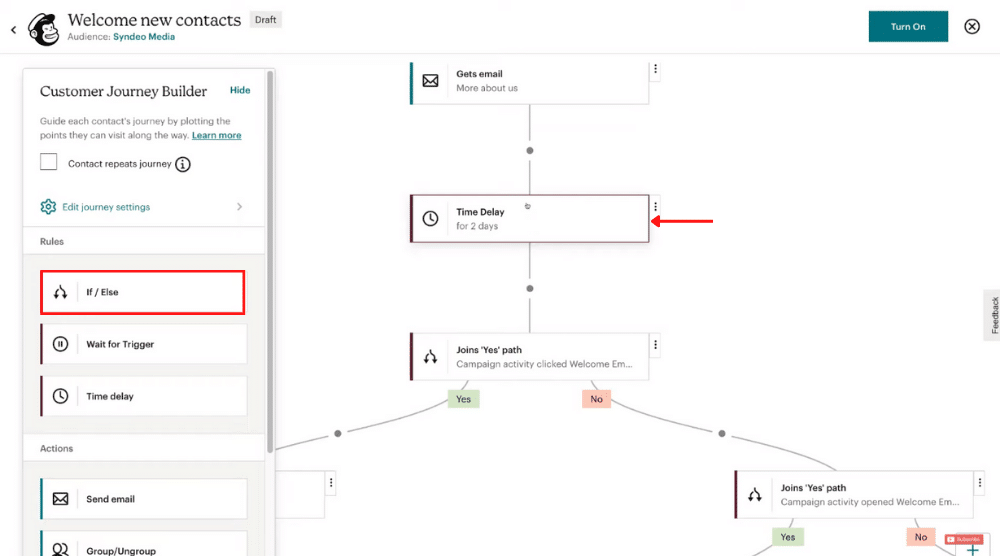
After a delay of two days, you can see that the sequence has an if/else rule.
Your contact will join the ‘yes’ path if they meet your conditions.
The conditions chosen for this Mailchimp automation tutorial are ‘clicked’.
Therefore, if the visitor clicks the first email, they will be added to the ‘Yes’ path and then receive the second email two days later.
The same condition is set for Welcome Email 2.
If needed, you can add additional conditions or changes if you like.
Step 4 (a): “Yes” Path
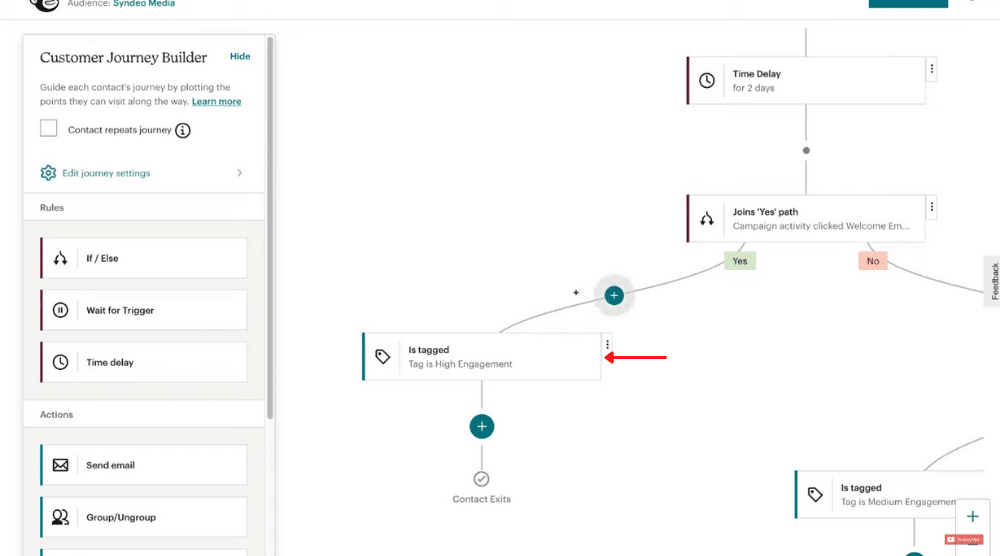
Any subscriber added to the ‘Yes’ path will be tagged as a ‘high engagement’ contact.
Tags are used to basically group your audience.
You can have multiple tags within your email list, so that you can target different groups within your audience.
Step 4 (b): “No” Path
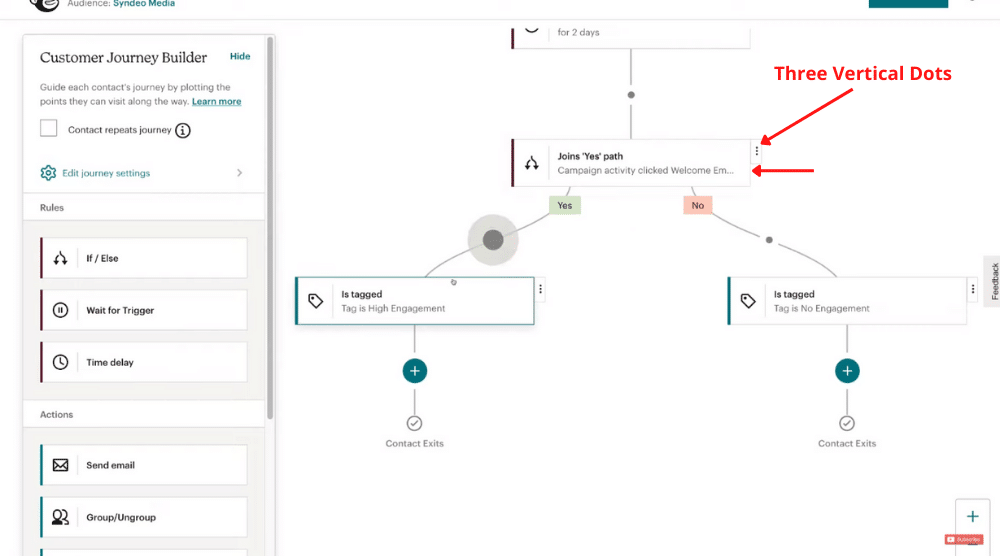
If a visitor doesn’t click on the ‘welcome email’ or the ‘More about us’ email, they will be added to the ‘No’ path.
And they will then be tagged as ‘No Engagement’.
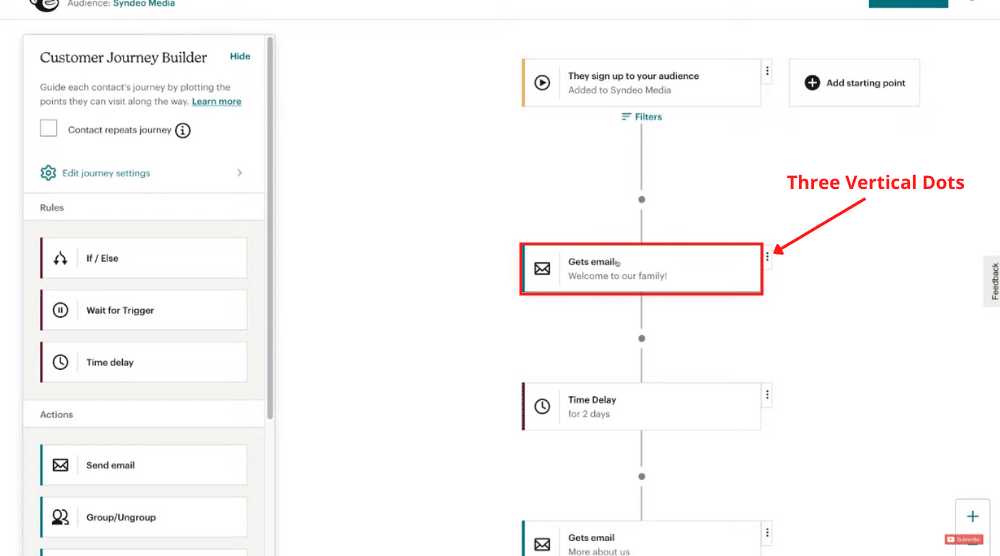
By clicking the three vertical dots next to a journey, you can either edit a journey or delete it.
Read more: Top 10 must have digital tools for small business
Customize Each Email
Remember when we mentioned that you can customize each of these emails in the sequence?
It’s time to understand how in this Mailchimp automation tutorial:
- Click on the three dots next to your welcome email and select ‘Edit Journey Point’.
- You can now proceed to change the subject line (the first thing that your contact would see), preview text, and schedule.
You’ll now need to design your email.
- Click on ‘Select a Template’.
- Pick an appropriate layout.
Read more: How to connect MailChimp to WordPress
Use Mailchimp Email Builder
Mailchimp is a leading email automation platform that allows you to create personalized emails using its simple email builder.
Follow the steps below to learn how to use it:
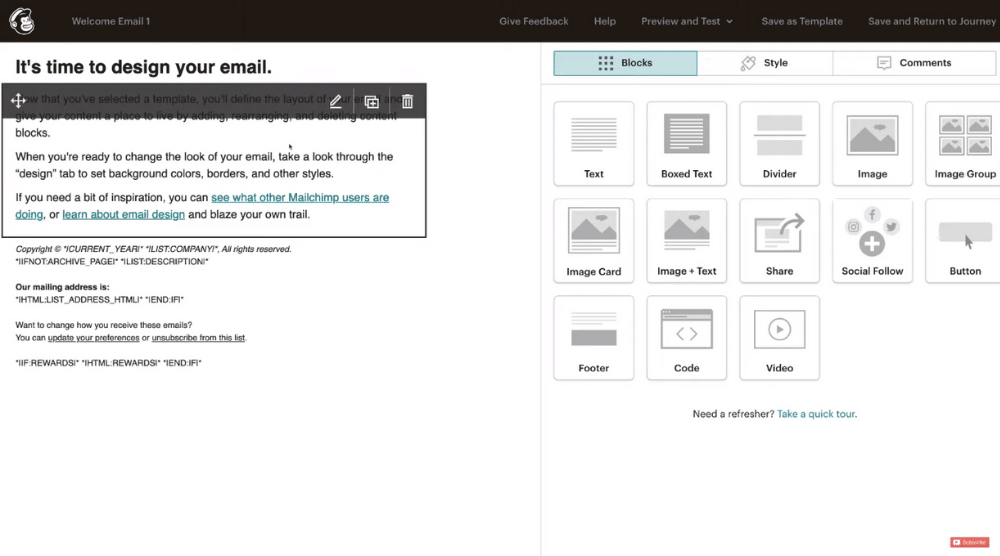
- On the right-hand side, you have different blocks (like text, boxed text, divider, image, image group, image card, image text, and more).
- You can easily drag and drop these blocks over to the left-hand side of your email.
- You can also remove the existing blocks by clicking the bin icon.
- By clicking the pencil icon, you can start customizing each of these blocks.
- The formatting options are on your right.
Here, you’ll find various editing options under content, style, and settings.
When you’ve finished formatting:
- Click ‘Save & Close’.
If you want to save this template for the future:
- Click ‘Save as Template’ in the top-right corner.
- Name your template.
- Hit ‘Save’.
To head back to your email sequence:
- Click ‘Save and Return to Journey’.
Also Read: Top 5 FREE Email Marketing Software
Set Rules: Time Delay
Want to use an old campaign as a template for your new email?
Well, you can!
- Simply choose ‘Use a Previous Campaign as a Template’ when you edit the next email.
To set a different time delay:
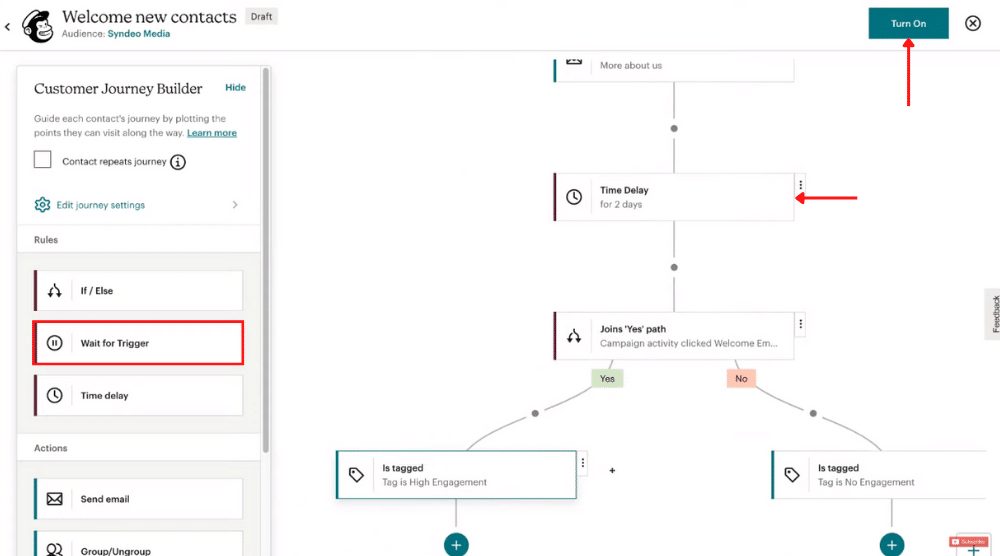
- Click on ‘Time Delay’.
- You can choose to delay your next email by as many days, weeks, or hours as necessary.
- When you’ve set the rule, click ‘Save’.
Additionally:
- On your left, you can see other rules such as ‘Wait for Trigger’.
- Drag-and-drop it to your email to add the rule.
- Below the Rules, you’ll notice down certain ‘Actions’.
- Using the same drag-and-drop feature of Mailchimp, you can add actions to your email sequence.
For example, under the ‘No’ path, you can drag and drop the ‘Unsubscribe’ action.
Feel free to go through each action on your left and add the one that makes sense to you.
When you’re ready to activate the email automation:
- Click ‘Turn On’ in the upper-right corner.
Your new email sequence is now live!
- Navigate over to ‘My Journeys’, to see your newly created email sequence.
- Click the three dots next to it.
- You can also either replicate your journey or simply view it.
Also Read: BEST Email Marketing Software
Mailchimp Automation Tutorial (Video Guide)
That is everything we wanted to cover in this Mailchimp automation tutorial!
If you’re a beginner and want to have a more detailed visual walkthrough then we have a video tutorial below to guide you through the MailChimp automation process. Enjoy!
