Table of Contents
What Is Basecamp Project Management?
If you’re looking for more than just a project management tool, then Basecamp could be for you.
Not only can you manage projects with your team and clients but also chat in real-time, store files, automate schedule events, and more.
You do not need to pay for independent productivity apps and tools as Basecamp offers all these important features in one easy-to-use platform.
We’ll launch into this simple Basecamp walk-through in this post to help you utilize its key features completely for free.
The free plan offers 1 GB of storage, 3 projects, and 20 users which is ideal for small teams.
How to use Basecamp?
Let’s learn step-by-step how to use Basecamp to make project management more of a breeze:
1. Exploring Basecamp Pricing
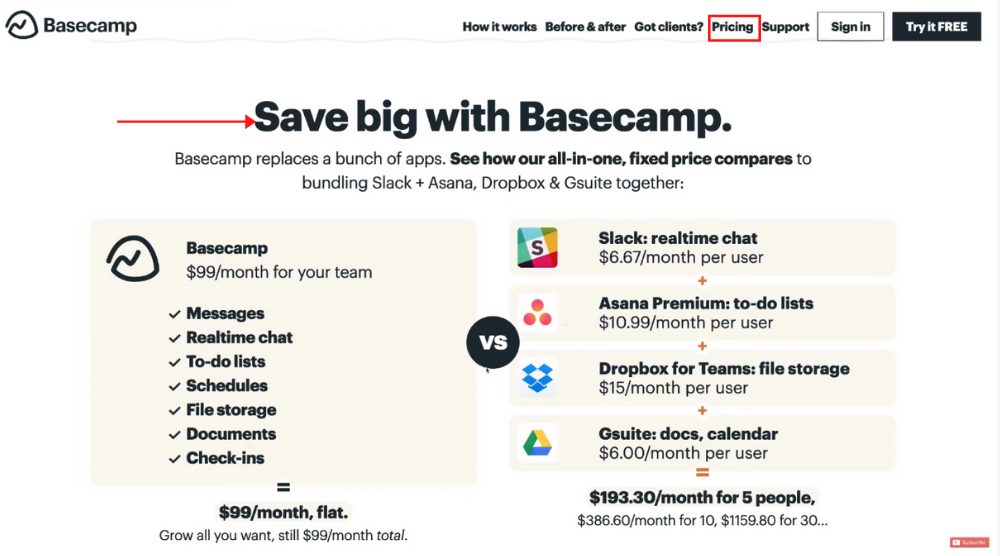
Scroll down to the bottom of the page until you find ‘Save big with Basecamp’.
Rather than using premium productivity apps and tools like Slack, Asana, Dropbox, G-suite, and others, you can save a lot of money just by signing up with Basecamp.
Many of these features that these premium apps provide can be accessed via Basecamp.
For example, Slack is designed to move you away from messy email chains. On Basecamp, you can engage in chat through a feature called ‘Campfire’.
With Asana, you have to-do lists which you also get in Basecamp.
When it comes to Dropbox, you do have to pay for large amounts of storage.
However, with the paid plan of Basecamp project management software, you have access to 500 GB of storage space.
That removes the need for a cloud-based storage software like Dropbox or Google Drive.
If your business engages in all these different activities that these premium apps and tools provide, consider looking into Basecamp as an all-in-one place that provides all these essential features.
The great thing with Basecamp is that they have one flat plan of $99 per month.
You can see the features of their premium plan at the top that include:
- Unlimited projects
- Unlimited users
- Company HQ
- Unlimited clients, and more
Apart from that, you also have access to a personal plan (free) that allows up to 3 projects, 20 users, and 1 GB storage space. This is ideal for small businesses.
For this Basecamp tutorial for beginners, we’re going to dive into the 30-day free trial of the paid plan.
This way we can explore all the paid features that Basecamp has to offer. Now, you don’t have to stick to the paid plan. Before your 30-day trial, you can downgrade to the free personal plan. Depending on your business size and requirements, the free Basecamp plan might be sufficient for your needs.
Also read : A Beginner’s Guide To ClickUp
2. Getting Started with Basecamp
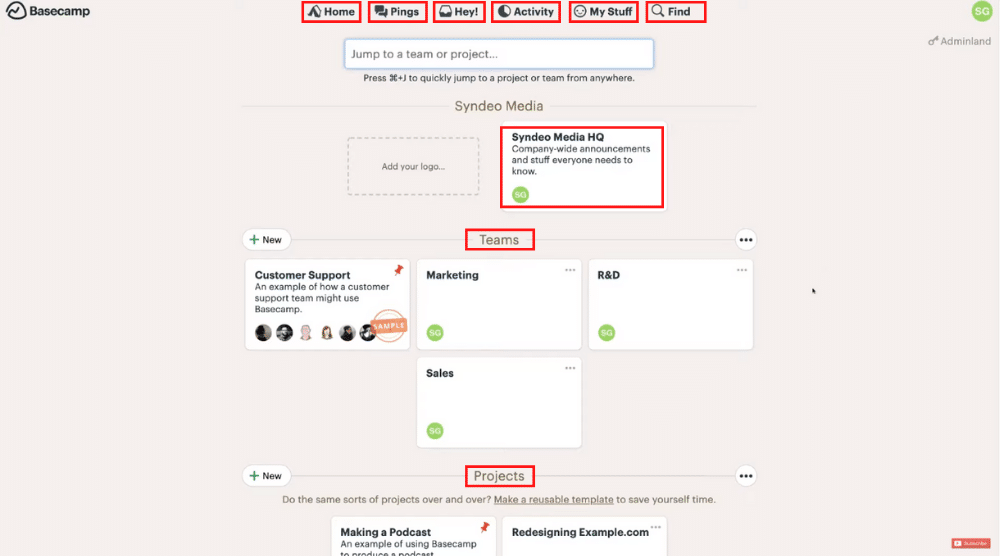
Once you’ve signed up, you will arrive at Basecamp’s dashboard. Here, you can see your operations where you can manage all your projects and teams.
Clicking on ‘Home’ on top-left is going to take you to Basecamp’s dashboard.
Next to that, we have ‘Pings’. Privately chat with individuals using this feature. You also have ‘Hey!’ where all your notifications will appear.
Under ‘Activity’, you’ll notice all activities happening within Basecamp. Next to ‘Activity’, we have ‘My Stuff’.
This is essentially where you’ll find all the activities that you’ve engaged in, including:
- My Assignments
- My Bookmarks
- My Schedule
- My Drafts
- My Recent Activity
- My Boosts
We’ll circle back to ‘My Assignments’ later in this Basecamp tutorial. At the moment, we have nothing under ‘My Stuff’.
Next to it, we have ‘Find’. Here, you can search for keywords related to your projects, team members, or anything that you’re looking for within Basecamp.
If you navigate back to Home, you can see that your dashboard is broken down into HQ. You can see that ‘Syndeo Media’ is the name of our business.
Below it, we have teams and projects. What we’re going to do is dive into our company HQ.
Also read: How To Use ProofHub
3. Adding People to Company HQ
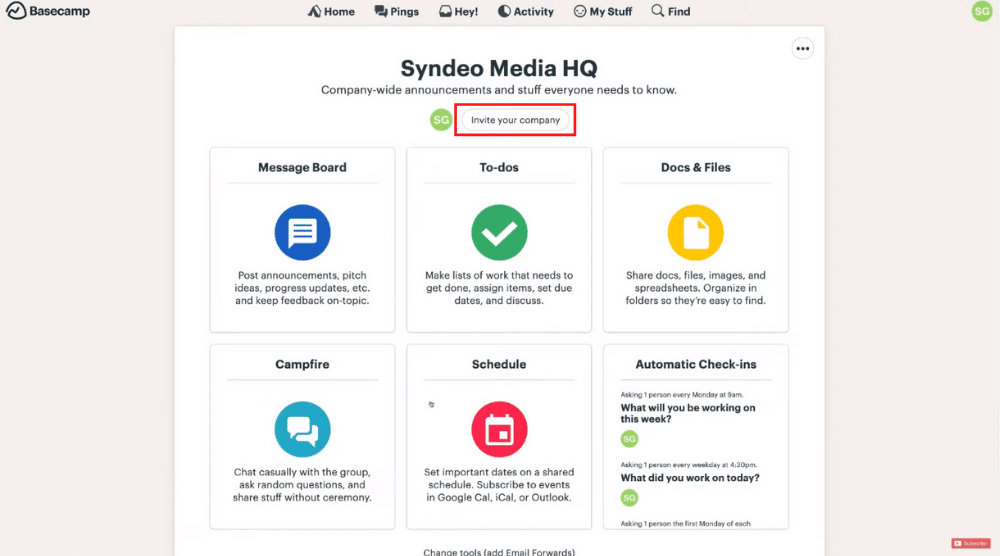
Within your HQ, this is all the information that everyone within your company needs to see. In the next step, we want to invite people to our company by clicking ‘Invite your company’.
Select ‘Add people’ and fill out the information of each individual (name, email, title, company).
When you send the information, you can also add a personal note. Once you’ve added the information, go ahead and send the email.
For this Basecamp tutorial, we have added one person to the company HQ. Since you’re the admin, you can remove people from the HQ anytime you want.
Also read: Monday.com Project Automation Tutorial
4. Understanding Basecamp Features
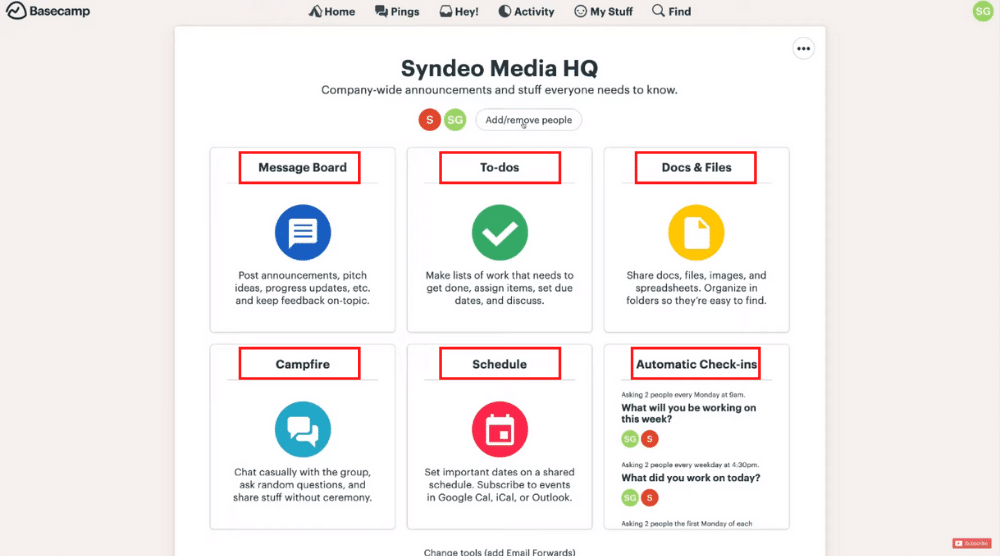
Message Board, for example, allows you to communicate with everyone on your team. You’ll see different formatting options here.
Add a title, message, and then either click ‘Save as a draft’ or ‘Post this message’.
If you click on ‘Syndeo Media HQ’, you’ll find yourself back at the company HQ. Next to ‘Message Board’ we have ‘To-dos’.
For the entire company, what things do we need to be completed goes here in the form of to-do lists. Under ‘Docs & Files’, you can upload and store folders, files, documents, multimedia, or anything that’s relevant to everyone within our HQ or organization.
You just have to click ‘New’. Next, we have one of the most powerful and exciting features that Basecamp provides – ‘Campfire’. This is a live chat feature that allows you to collaborate with your team.
Many project management tools out there don’t provide this essential feature. Businesses have to use Slack for communicating with teams in real-time.
However, with Basecamp, you get this feature built-in.
Next to ‘Campfire’, we have ‘Schedule’. This is where we can schedule an event by just clicking ‘New event’, selecting the dates, and adding the event name.
Following this, you can:
- Choose if the event should repeat ‘Forever’ or till a specific date.
- Add notes or attach a file.
- Choose who to notify – everyone.
Hit ‘Save changes’ and post the event.
Back to the company HQ and next to ‘Schedule’, we have ‘Automatic Check-ins’. This allows you to create automatic check-ins, questions to see people’s progress, and boost team engagement. It helps you ensure that people stay productive throughout.
You can always add new questions and set the frequency (to once a week, for instance).
Apart from that, you can also select the time (or a custom one) of the day when you want to ask these questions.
Select people who you want to ask these questions and click ‘Start collecting answers’. And everyone will be notified of this question at your selected time and day. You can also look at some of the options in the top-right corner.
Also read: How to use Asana
5. Adding a New Team
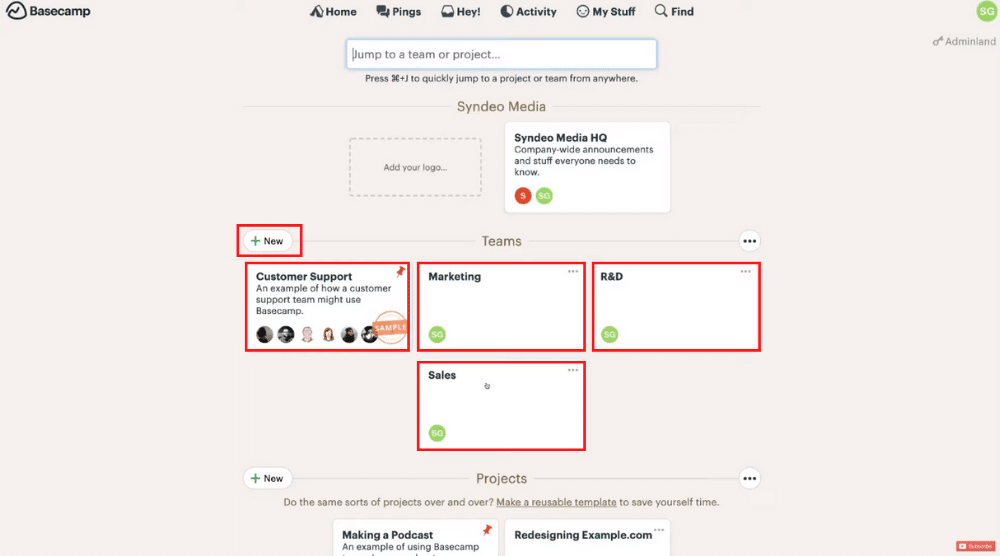
By clicking the three dots on any of these, you can rename the team, pin, archive, or delete it.
To create a new team, however, you have to click ‘New’. Come down and name your team before you hit ‘Save’.
Now, when you select a specific team, you’ll notice that the layout is similar to the company HQ i.e ‘Syndeo Media HQ’ that we discussed before.
So, you can try out all the features by following the same process.
Also read: Slack Tutorial for Beginners
6. Creating Projects and To-dos
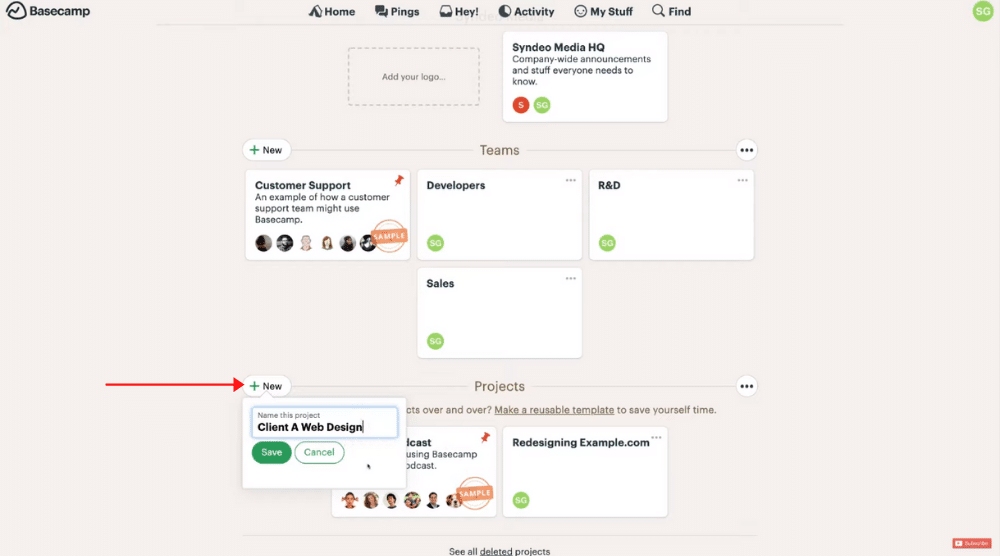
Navigate up to ‘New’ and add a project name. In this Basecamp tutorial, we’re going to name it ‘Client A Web Design’ and click ‘Save’.
Now, the first thing we want to do is invite people to this project by following the same process we explained in step 4.
What we want to state here is that you can not only add team members to Basecamp but also your clients.
This is important, especially if you want your clients to be able to monitor your progress on specific projects.
In most projects, our main focus will be on ‘To-dos’. This is a list of tasks that need to be completed to finish the project. Select ‘To-dos’ and name the list ‘Website Pages’.
We’ll then add a to-do named ‘Create all 10 website pages’ under this task.
You can go ahead and assign this to-do to a team member under ‘Assigned to’.
Next, you can select a deadline under the section ‘Due on’.
Before selecting ‘Add this to-do’, you can enter additional details under ‘Notes’ if you like.
Rather than creating one to-do for 10 website pages, you can create 10 to-dos for each website page. Similarly, you can add another task named ‘Website Branding’ and multiple to-dos under it.
Once we’re done with a to-do, all we would do is check the box in front of it.
Hence, Basecamp keeps projects extremely simple by breaking them down into to-dos.
If you select ‘View as’ on top-right, you can view your to-dos as either a list or cards.
Besides, under each project, you’ll be able to see project activities with their timelines.
Head back to Basecamp Home and select ‘Activity’ on the top. This is where you can see the latest activity – everything that’s happening on Basecamp project management software.
Under ‘My Stuff’, you can now see two assignments(‘Website Pages’ & ‘Website Branding’) that we’ve just created.
Also read: Asana Tutorial for Beginners
7. Adminland
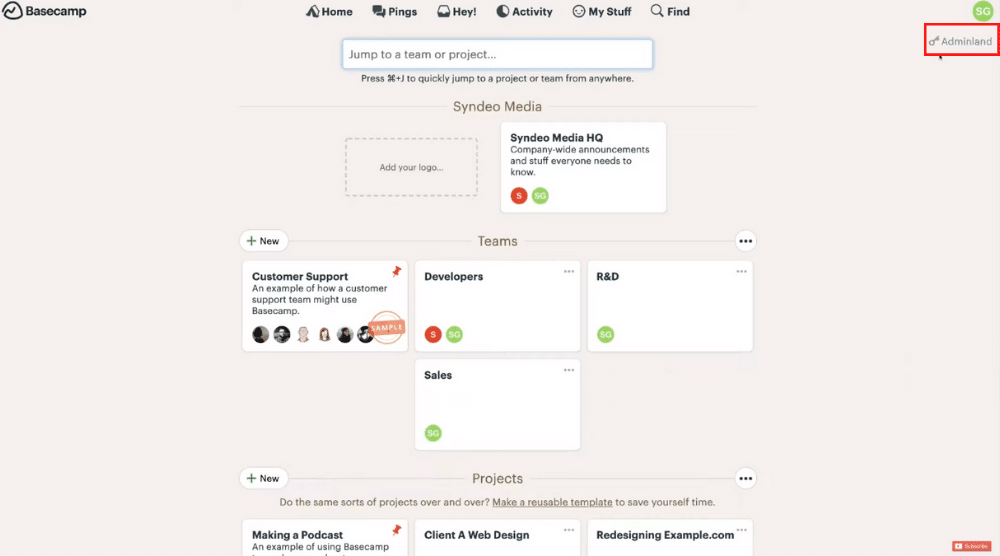
This allows you to manage and customize your Basecamp account.
Take the time to go through these basic account settings. For example you can upgrade to a paid Basecamp account or you can cancel it.
You’ll also be able to see your initials in the top-right corner. If you click there, you can customize your profile under ‘Personal Settings’.
Besides, you can also download it on your iOS and Android.
These allow you to stay up-to-date with projects, activities and you can communicate with your team through Basecamp mobile app. You can also log out from here if you like.
Also, read: Monday Tutorial for Beginners
Basecamp Project Management Software (Video Guide)
That is everything we wanted to cover in this Basecamp tutorial.
This will help you get started with team project management activities. If you are a beginner and want to master the Basecamp basics, we have a video tutorial on Basecamp.
Check out our video tutorial below.

