
Table of Contents
We’re all familiar with the importance for small businesses to transition online.
However, did you know that all small business owners should also have a professional, physical business card?
Undoubtedly, giving a physical business card is sure to leave a strong first impression for potential clients.
For this guide, we’re going to use a free all-in-one graphic design tool that we love and use often called Canva.
With Canva, anyone can simply create anything from presentations, logos, flyers, social media content, websites and more.
Additionally, Canva makes things easy with their simple and easy-to-navigate interface and pre-designed fully customizable templates.
Canva really does make designing a breeze!
Make Professional Business Cards with Canva!
In this Canva tutorial for beginners, we’re going to share how to make business cards quickly and easily without needing any previous design experience.
Let’s go ahead and dive into Canva!
Step 1: Get Started with Canva
Get started with Canva for FREE here
*The link above is an affiliate link, which means we will get a commission if you upgrade to a paid plan (with no extra cost to you). This helps support our education-based website and we thank you in advance!
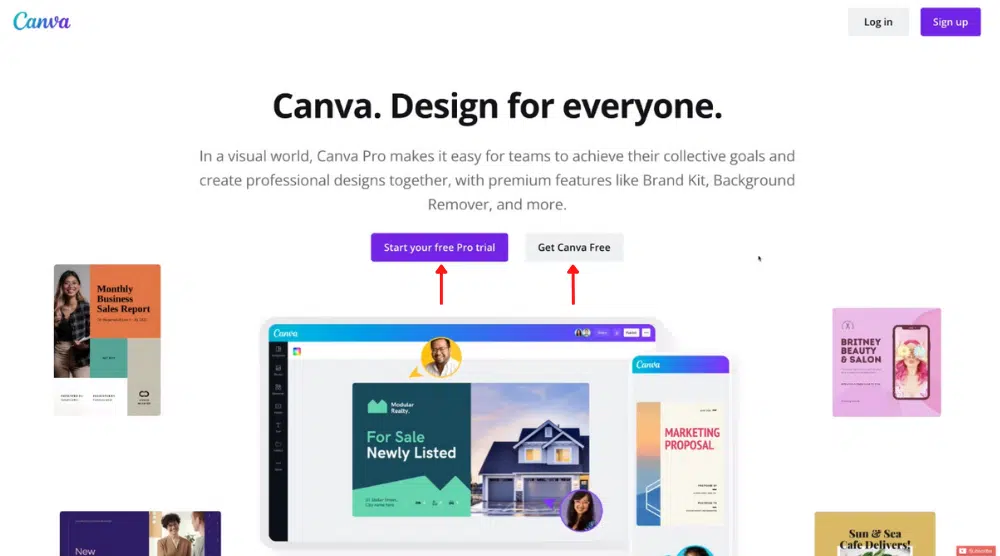
First things first – you’ll need to jump over online to Canva sign up or sign in.
Next, you’ll have to choose a plan option:
- Click ‘Start your free Pro trial’ to begin your 30-day free trial.
- Alternatively, click on ‘Get Canva Free’.
It’s important to mention that if you want to access paid photos and media, you’ll need to upgrade your plan (which you can do at any time).
Once you complete the sign-up, you’ll be taken to the Canva dashboard.
Let’s learn how to design business cards!
Completely new to Canva? Check out our complete Canva tutorial here.
Step 2: Select a Business Card Template

Before you start with your business card design, you’ll need to pick a template.
To do that:
- Head over to the search bar and type ‘business cards’
- Scroll through over 3500 premade business card templates to find the one you like the look of.
- Alternatively, you can create a blank business card (refer to the screengrab).
We always recommend that beginners stick with a template and customize it first before building from scratch.
As you can see, we have ‘Templates’ selected on the left-hand side.
- Next, type a specific keyword in the search bar to search for specific templates related to the business card you want to create.
For example, if your brand’s theme is orange and you want your business card to represent your brand and its theme, simply type ‘Orange’ in the search bar.
Canva will then generate dozens of templates with an orange theme!
Now because you’re designing a business card, it’s important you choose a template with two pages for both sides of the business car.
If you see a ‘pro’ icon next to a template, this means you need a premium plan to use this template (but remember you get a free trial, so utilize it!)
Step 3: Customize Templates

One of the things we love about Canva’s templates is that they’re fully customizable, meaning you can customize each element on the front and back of your business card.
To change a text element on your template:
- Select the text element you want to change.
- Type in a new text (refer to the screengrab).
- Drag the corners of the text box to change the size of the text element.
- Up above your template, simply further modify your text using the formatting options.
- Drag and drop your element to where you want to place it.
Similarly, you can customize other text elements too in the same way.
Step 4: Add Business Info

A typical business card should have a logo, company name, your name, job title, website, and contact details (email, phone & address).
You can also add social media icons (in a clickable format).
Simply add your name, phone number, and website to your business card.
However, adding your email address is slightly more tricky as you have to add the email icon first.
To do that:
- Click on ‘Elements’.
- Type in ‘email’ in the search bar next to it.
- Select an icon that you like and choose an appropriate color to match your theme.
- You’ll find colors right next to the search bar on the Canva dashboard.
If you find it difficult to resize an element, just zoom in on the template.
Step 5: Add Elements in Your Business Card

For this Canva tutorial, we’re also going to add a line element.
To do that:
- Click the phone number element.
- Hold Shift and select the line element below it.
- Right-click and select ‘Copy’.
- Next to the email icon, right-click and select ‘Paste’.
- Drag the elements to where you want them to go.
- In the copied element, delete the phone number and paste your email address.
Next:
- Highlight all the elements to group them together.
- Drag the corners of the entire box to resize all the elements at once.
- Drag and drog the box to change the position of the box on your template.
Step 6: Add Your Business Logo

The next step in this Canva tutorial for beginners is to add your logo!
For that, you’ll need to:
- Click on ‘Uploads’ on the left-hand side menu.
- Select ‘Upload media’ to upload your logo.
- Click ‘Open’.
- Drag-and-drop to place the logo on the business card template.
- Resize the logo if nits too big or small.
Don’t have a business logo? Watch this tutorial on how to create one completely for free using Canva.
Read More: Canva Free Logo Maker
Step 7: Add Social Media Elements

Add Social Media Elements
The next step is to add in social media elements so your clients or potential clients know where to find you on social media.
To add social media elements:
- Make sure you move your text elements a bit above to make room for social media elements.
- Keep ‘Elements’ selected and type in ‘Facebook’.
- Select the Facebook icon in the blue color.
As the theme for our business card is orange, we’re going to change our Facebook icon from blue to orange by clicking orange under ‘Document colors’.
However, if you can’t find the color you’re looking for:
- Navigate over to the text element.
- Click on color (the ‘A’ symbol at the top).
- Under ‘Document Colors’, click the ‘+’ icon this time.
- Right-click the color code.
- Click Copy.
- Select the Facebook icon.
- Under ‘Document Colors’, click the ‘+’ icon again.
- Paste the color code you just copied.
Next:
- Resize your Facebook icon element.
- Place it at the bottom left of your business card.
- Go ahead and do the same for Twitter, LinkedIn and any other social media channels you have for your business.
Step 8: Add or Change Image

To change the default image on the template:
- Click on ‘Photos’.
- Type in a keyword related to the photo you want to add in the search bar.
- Select an image you like.
- Drag-and-drop the image to the area where the default image is.
And your new image has now been added!
- Moreover, you can undo/redo any change from the upper-left corner if you need to.
Before you download or print your business card, make sure you customize the back, replace all the default elements with your own and upload your own logo.
Step 9: Download and/or Print Your Business Card

Now you’re ready to download your business card!
To do this:
- Navigate over to ‘Download’ (the downward arrow in the upper-right corner).
- Go ahead and download your business card.
We suggest doing this before printing your business card in case you need to change anything.
After incorporating those changes (if any), you can print your business card by following the below:
- Click ‘Print Business Cards’ in the upper-right corner.
- Ensure you have ‘Double sided’, the number of pages (2), printing options, and the quantity selected.
- Make sure all elements are away from the danger zone (refer to the screengrab), which otherwise might get cut off.
- Click ‘Continue’.
- Select ‘Continue’ again.
- Next, add your shipping details.
- Choose the best delivery option for you.
- Click Continue’.
We hope by now you have a clear idea of how to make business cards.
However, this wraps up our Canva tutorial for creating professional business cards.
How to make business cards (Video Tutorial)
If you’re a complete beginner, the video tutorial below will guide you through this process with a detailed explanation of creating and designing your own business cards with Canva.
