Table of Contents
Build a Sales funnel for free for most business owners who are becoming aware of the sense of urgency and importance of shifting their businesses online.
However, there is an overwhelming number of tools, apps, and software that you need in order to successfully transition your business online.
This process can be expensive, time-consuming, and complicated.
Think about it like this… to start generating sales, you need a website or sales funnel with a payment gateway like Stripe or PayPal.
Additionally, you need to engage in email marketing activities to start building relationships, provide ongoing value and sell your products or services to your audience.
Moreover, if you’re looking to sell online courses or build a membership site, you need a dynamic platform that can handle all these online activities for your business.
Well, what if I told you there is one incredible product that allows you to engage in all these activities for free! Let me introduce you to Systeme.io
How to Build a Sales Funnel for Free using Systeme.io?
In this blog, we’ll introduce you to an all-in-one marketing platform that allows you to engage in all the online business activities mentioned above completely for free (yes free! The only tool you need to get started online).
Get started with Systeme.io for FREE here
*The link above is an affiliate link, which means we will get a commission if you upgrade to a paid plan (with no extra cost to you). This helps support our education based website and we thank you in advance!
This impressive all-in-one tool is called systeme.io.
Today, I will guide you through how to build a sales funnel for free using Systeme.io.
I will also discuss the following activities and features you can get involved in with Systeme.io:
- How to create an online course.
- How to create a simple sales funnel.
- How to create an email campaign.
- How to set up email sequences (email automations).
- How to create a blog (introduction in our video guide linked below).
Essentially with this tool, you can run your entire business online!
What makes Systeme.io different?
Systeme.io is a free sales funnel builder that offers many complimentary features like email marketing, a website builder, marketing automation, affiliate program management, online courses, and more.
Most tools that offer these features and activities are tools that require a paid subscription.
Conventionally, you’d need several tools with paid subscriptions to launch your business online. But you get all these business features and activities for free with Systeme.io.
There is nothing else on the market quite like Systeme.io.
Getting started with Systeme.io
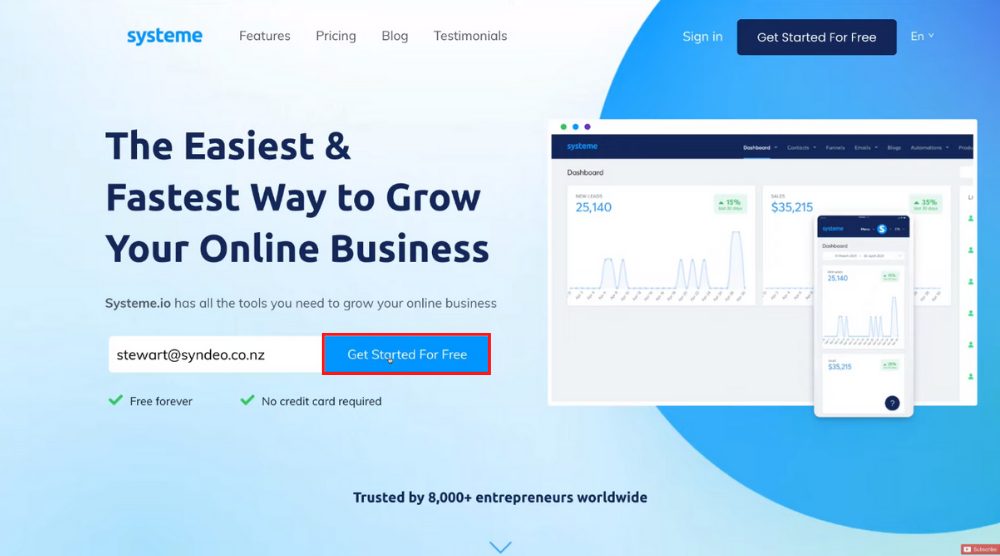
For this Systeme.io tutorial, we’ll create an online course as well as a sales funnel to sell our online course and then an email campaign to engage with our new customers and community.
Read more : How To Create an Online Course for FREE
Learn how to set up payments in Systeme.io
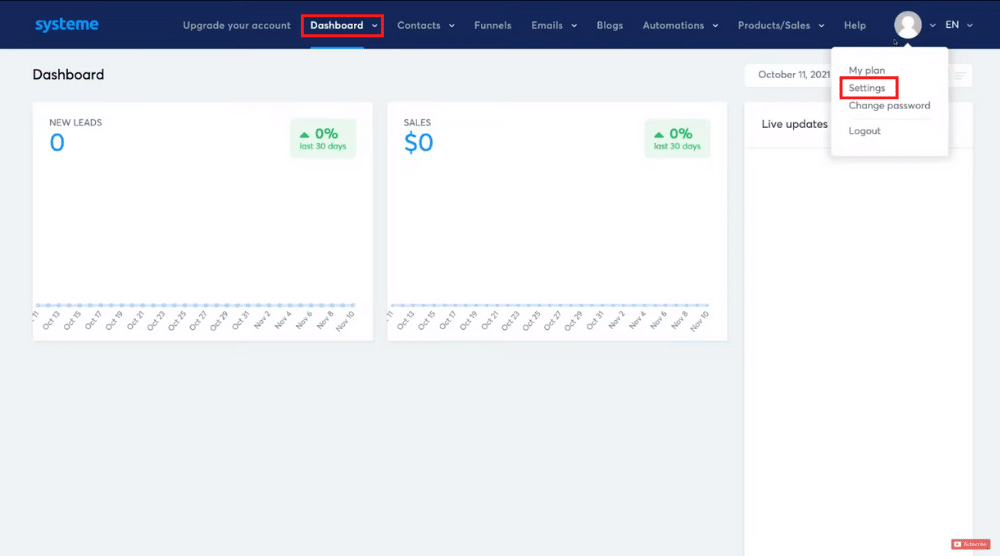
This is why we’re going to set up payments in this section. To do that, simply navigate over to settings (top-right hand corner).
Now, follow the steps below:
- Fill out your name, phone number, address, and other information
- Click ‘Account settings’ on your left
- Add your business name (or personal brand) under ‘Subdomain’
- Verify the time zone, date format, and time format
- Hit save
- Navigate over to ‘Payment gateways’ and connect PayPal and Stripe (simple step by step process)
We’re not going to cover the other settings in this tutorial (you can take the time to go through those in your own time).
Now, click ‘Dashboard’ at the top, and select ‘Main dashboard’ to head back to your Systeme dashboard.
Create an online course
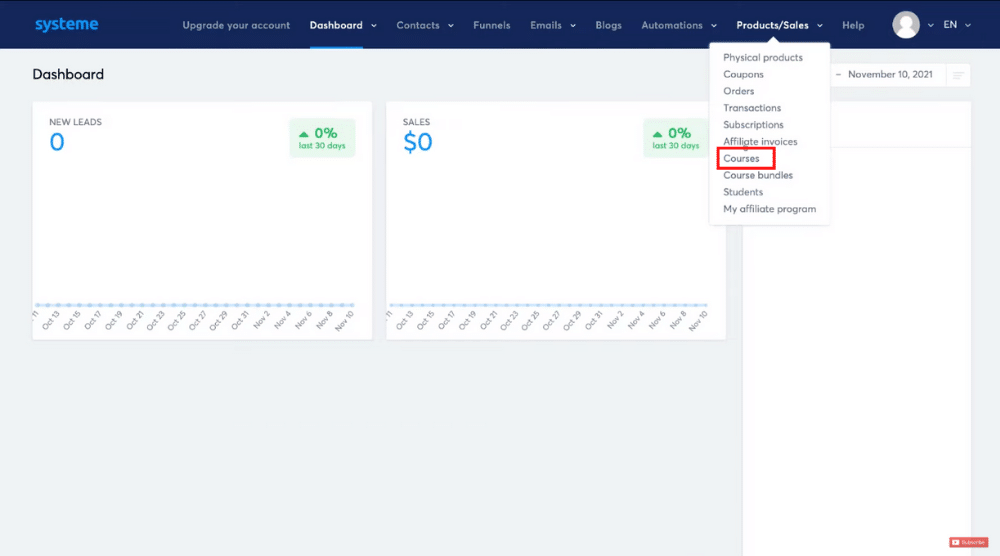
Click on it and select ‘Courses’. Start by selecting ‘Add a new course’.
Proceed to fill out the information related to your course. Notice that you can shorten the URL path if needed.
Remember to hit ‘Save’ when you’re done. You can add a product or service if you like to sell through your sales funnel.
However, for this tutorial, we are going to add an online course to sell through our sales funnel.
Create modules & lectures
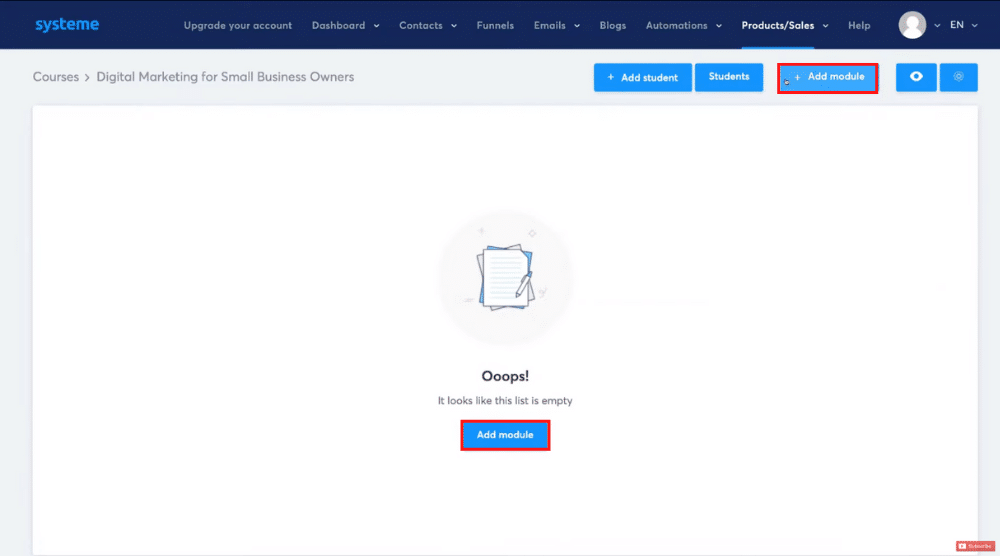
Listed below are the next steps:
- Click ‘Add module’
- Name it, we’re going to name our module ‘SEO for Beginners’
- Hit save
Following the same process for creating another module named, we’re going to name this ‘Google Ads for Beginners’.
Within each module, you can simply add lectures. If you want to roll out lectures gradually instead of giving full access to your customers when they convert through your sales funnel, you can do that too.
Now, you will want to customize the look, style, and content for each lecture, by clicking ‘customise’ you can select a page template or a course structure.
Customize lecture pages
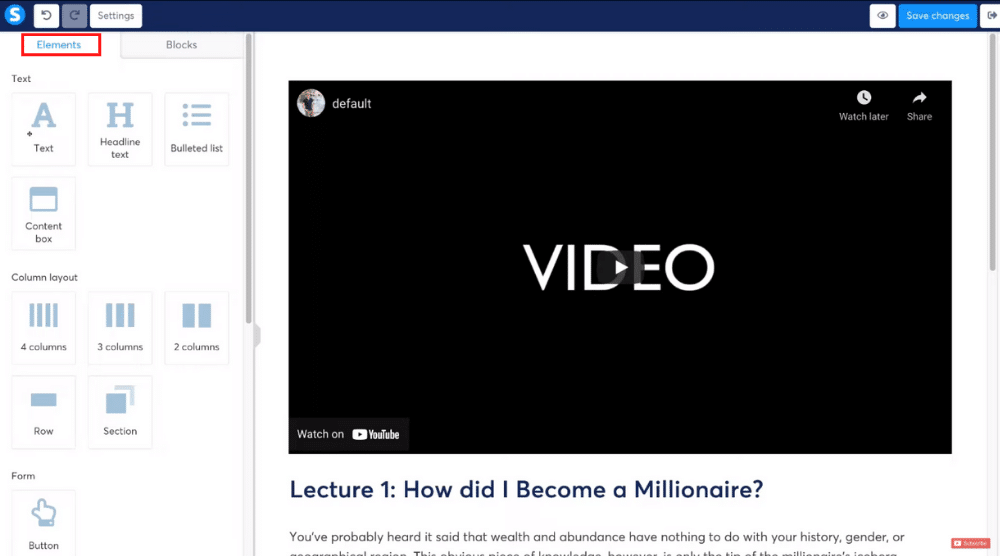
Start by changing the content that you see on the right-hand side of your screen. The elements on the left can be simply dragged and dropped onto the right-hand side (your lecture).
Whether you want to build a blog, website, email campaign, or sales funnel, this block drag-and-drop builder is consistent across Systeme.io.
Text Module
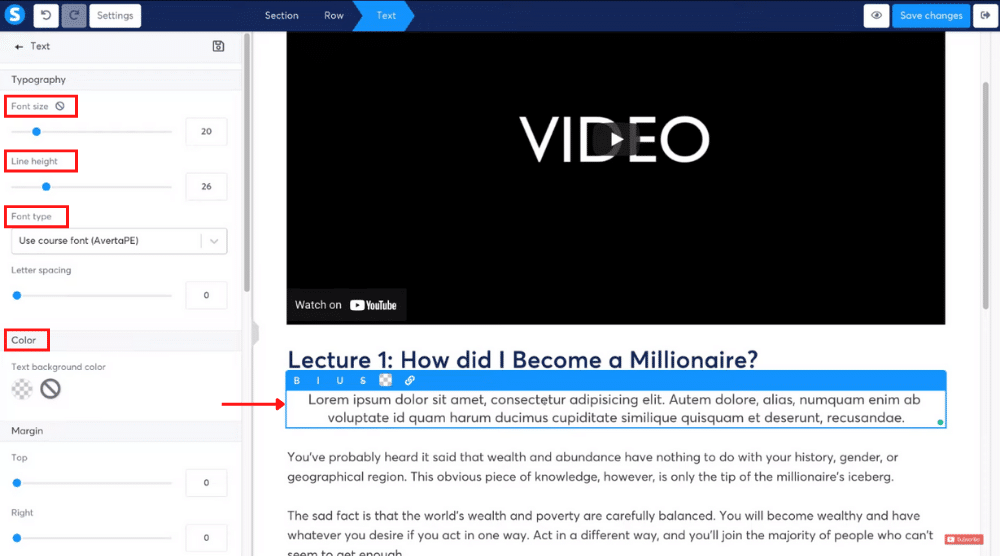
When you click on it, the editing options will appear on your left.
From there, you can change the font size, line height, font type, text color, and more. (Refer to the screengrab).
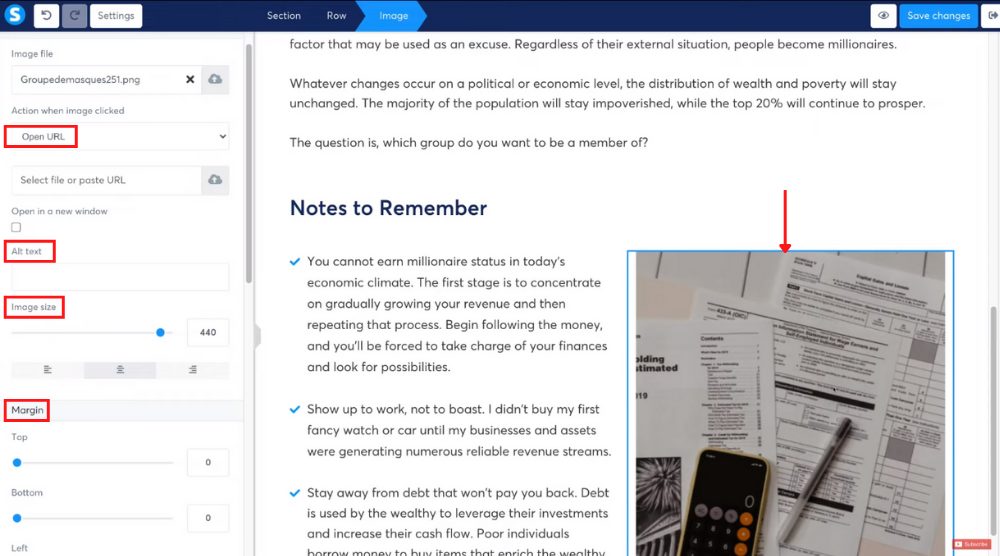
Image Module
Video Module
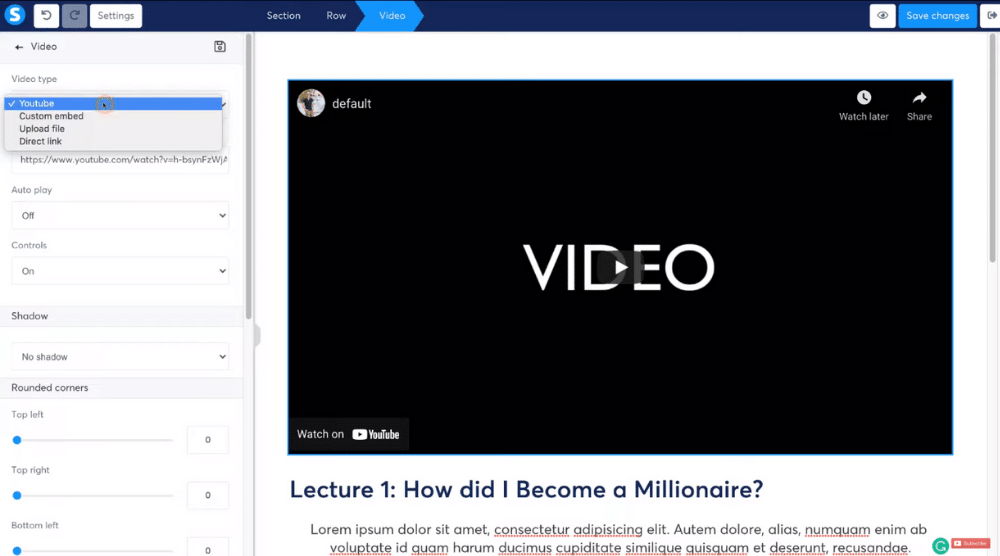
Under ‘Video Type’, you can choose:
- YouTube
- Custom embed
- Upload file
- Direct link
For this Systeme.io tutorial, we’re going to keep ‘YouTube’ selected and add a YouTube video that explains what SEO is all about.
Feel free to play around with other options like forms, audio, carousel, layouts, social media links, and more.
Now, next to ‘Elements’, we have ‘Blocks’.
You can, for instance, add a block for customer testimonials on your lecture page and customize it.
Use arrows to move each section up or down the page (refer to the screengrab). Also, you can delete, duplicate, or save a section anytime.
Preview

You’ll also find the option to preview the page there. If you head back to the lecture page, you’ll find a preview button on the bottom-left corner as well.
Use it to see what your lecture page would look like on mobile devices and desktops.
Then, by clicking the exit button in the top-right corner, you can head back to the Systeme.io dashboard.
Now, you can delete, edit, preview, or duplicate a lecture when required. Duplicating is an extremely useful feature here.
Rather than building each lecture page from scratch, you can duplicate the design and just change the content on those particular pages.
Create a sales funnel
Basically, a sales funnel (also known as a purchasing funnel) is a multi-step page website with a single-focused CTA (call-to-action). Typically, a sales funnel is aimed at driving conversions by taking your potential customers through a journey of steps (funnel).
A sales funnel can be used to sell physical/digital products or services, up-sell build loyalty with your audience, capture contacts and more.
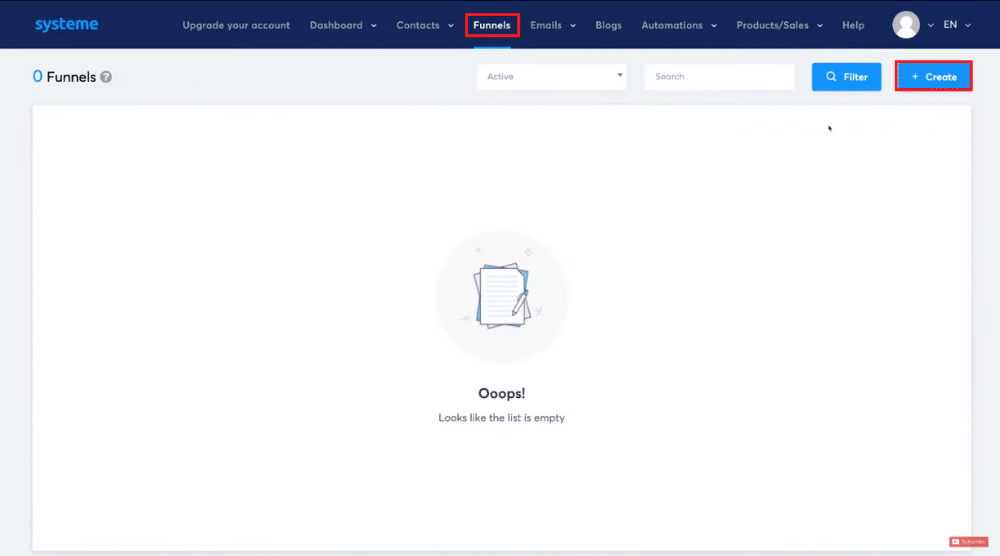
It’s time to learn how to build a sales funnel for free. Navigate over to ‘Funnels’ (at the top) and click ‘Create’.
To build a sales funnel:
- Name your sales funnel
- Choose a goal for creating this sales funnel – for this tutorial, we’ll select ‘Sell’ since we’re selling a course here.
- Choose a currency and hit ‘Create’
On the left, you’ll notice the steps generated for your new sales funnel. At present, we have the ‘Order Form’ and ‘Thank You Page’.
Go ahead and add other steps to the funnel if needed.
We’ll keep things simple for this tutorial and not add additional steps. But feel free to browse around.
Now, select (and preview) a template (on the right) for your order form, name it, establish a URL path, and set up an affiliate commission and payout delay (applicable if other people are promoting and selling your course).
Add a resource (the product or service you want to sell)
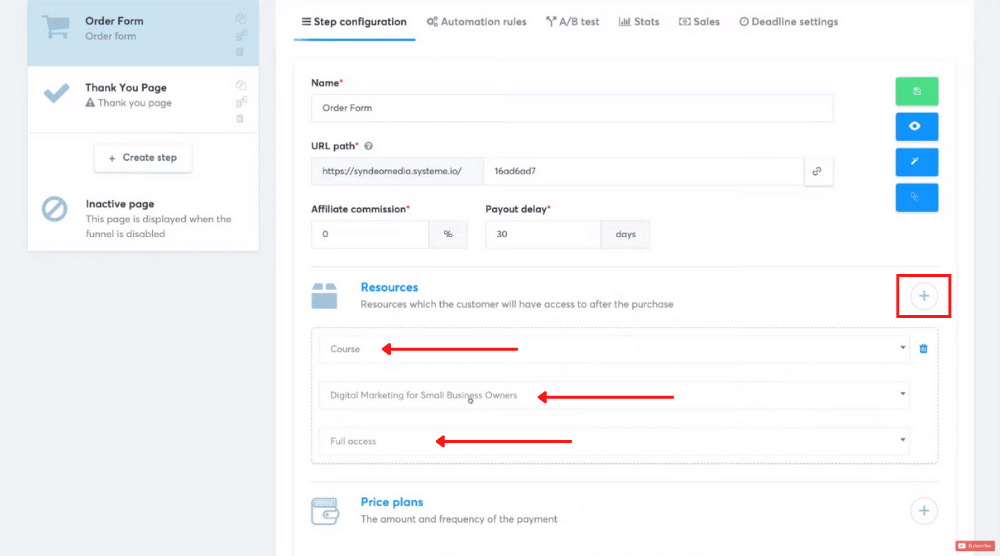
Now, choose the course we’ve just created from the drop-down. Next, choose the access type (full access/drip content). For this Systeme.io tutorial, we want to allow full access to this course.
Choose a price plan (how much you want to charge)
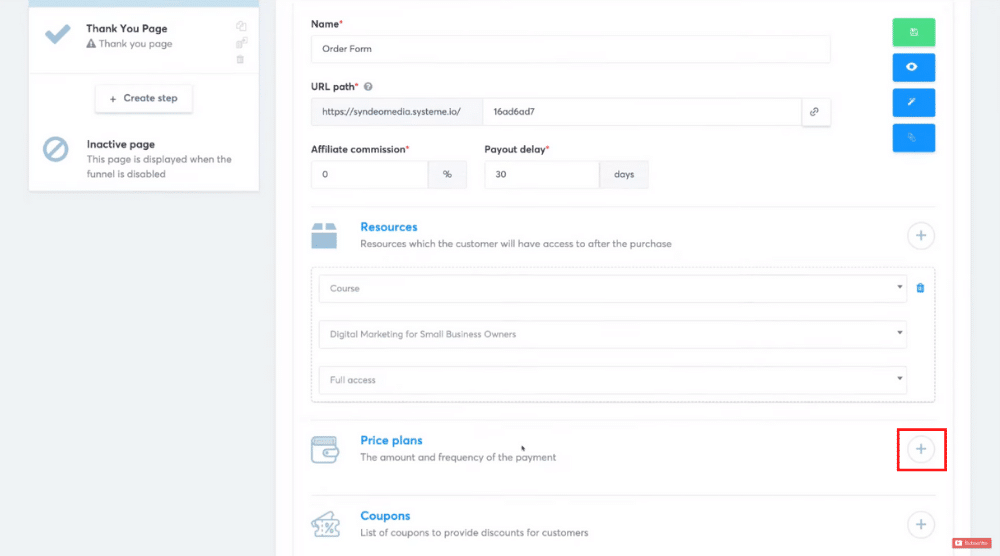
We’ll select ‘One shot’ as it’s appropriate for selling an online course.
Alternatively, you can simply create a new price plan.
Note: You can add multiple resources and price plans to the product or service that you are selling.
Customize the sales funnel pages
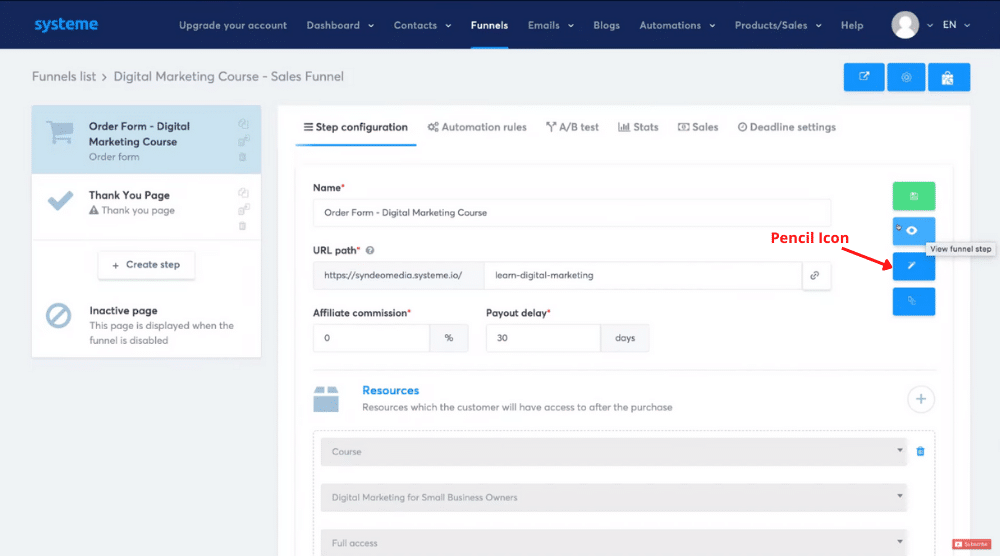
As you might observe, this is exactly the same drag-and-drop building interface that we encountered while customizing the lecture pages.
Hence, using this free sales funnel builder, you can change the content and appearance of your funnel page the way you like.
Ideally, you want to add social proof, FAQs, value-adding content, and a form. Remember that each element is customizable.
For instance, if you don’t need the ‘State/Province’ field on your form, just delete it.
Make sure you preview the page and click ‘Save changes’ once you have made all your changes.
You may now exit out of the editor. Using the same process, customize each step of your sales funnel (the next one being the ‘Thank You’ page). Take the time to customize each step in your sales funnel.
Create an email campaign
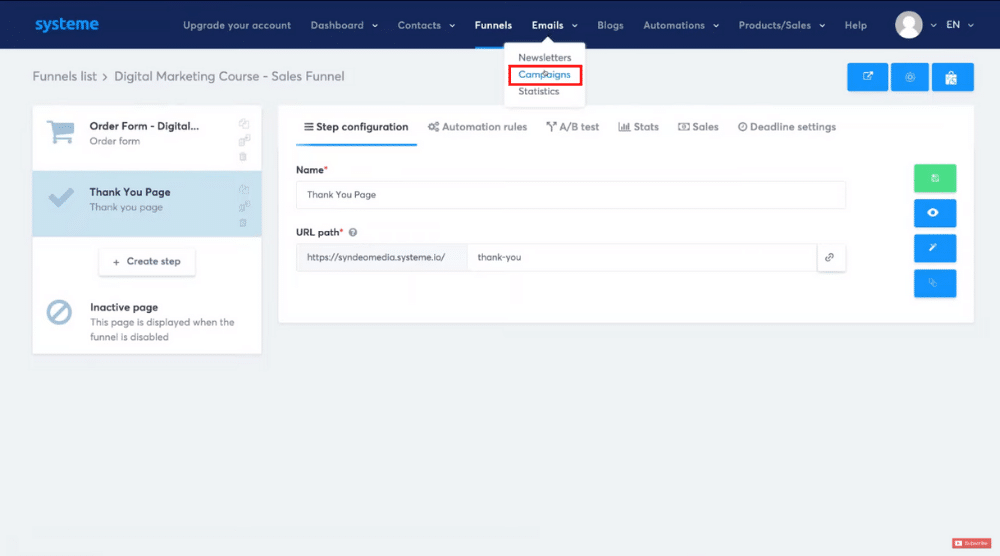
Head over to ‘Emails’ > Campaigns (at the top).
To create your first campaign within Systeme.io:
- Select ‘Create’ on the top-right
- Name your campaign – Welcome Email (for example)
- Write a description
- Hit ‘Save campaign’
- Select the newly created email
Create your first email campaign automation (welcome email)

Proceed to add the sender’s name, sender’s email address, and an enticing subject line.
Using the visual editor, you can customize each campaign just like what we did for lecture pages and sales funnel pages.
However, for this Systeme.io tutorial, we’ll select the ‘Classic editor’ instead.
Hit ‘Create’. You’ll see an interface quite similar to any email service (more of a personal look and feel associated with a simple email structure).
Start typing the content of your email and edit it using the formatting options given.
For example: type in ‘Hey’ and choose the ‘first name’ substitute from the right-hand side. (Refer to the screengrab).
This will automatically generate the first name of the contacts on our email list.
Every time someone purchases through our sales funnel, we’re going to slowly build our email list.
We want to be able to send this email automatically when someone makes a purchase through the sales funnel.
Refer to the screengrab to see how we’ve also added a link to our Facebook group to help customers find answers to questions they may have.
After adding an attachment (if needed), you have four options:
- Save it and send a test email – this is recommended to ensure your email looks professional and catchy before it’s sent to customers
- Save and publish – here, you have the option to set a delay. But since we want the email to be sent as soon as a customer makes the purchase, we’ll type in ‘0’ hours.
- Save
- Cancel
Let’s add one more email to this sequence. This next email will be sent to customers after the welcome email, and in our example, we will provide a free content calendar to those who enrolled in our course.
Follow the same process we explained above to create an email campaign.
This time once we have added the content to our email, we are going to add a file (content calendar) that our contacts can download from this email.
By clicking ‘Choose file’, you can upload the content calendar.
Now before sending this second email remember to set a delay, for example of ‘1 day’ because we want this email to be delivered 24 hours after the welcome email is sent.
Under ‘After’, select the previous automated email. You may also select a specific day and time that the email needs to be delivered to your customers’ inboxes.
Click ‘Publish’.
Our two-step email sequence has been created.
Add automation rules (don’t forget this step!)

- Navigate back to ‘Funnels’
- Click the sales funnel we created earlier in this io tutorial
- Select ‘Order Form’ and point your cursor to ‘Automation rules’
- Click ‘Add Rule’ and select ‘New Sale’ (which is a trigger for our email campaign)
- Click ‘Add Action’ and select ‘Subscribe to campaign’
- Choose the newly created email campaign from the drop-down menu
- Hit ‘Save Rule’
Now, when a customer purchases our course through the sales funnel, they’ll be automatically added to our campaign.
This will trigger our welcome email to be sent, followed by a free content calendar download email which will be delivered 24 hours after the welcome email.
And congratulations!
You just learned how to create an online course and build a sales funnel to sell your products or services (in our case we are selling the online course we created).
You also discovered how you can engage in email marketing too!
All this has been achieved for free with Systeme.io. Amazing!
Also Read: ClickFunnels Tutorial for Beginners
Systeme.io Tutorial for Free Sales Funnel Builder
This all-in-one tool gives you access to everything you need to launch your business online. Check out our complete video tutorial below to get even more out of Systeme.io to build a Sales funnel for free.
Enjoy!
Disclosure: Some of these links on this page are affiliate links, meaning we will get a commission if you buy through them, this helps support our education-based platform and we thank you in advance.
