Table of Contents
What Are Clickfunnels?
ClickFunnels is an online tool similar to website builders.
The key difference is the focus on helping users to build high-converting landing pages and sales funnels.
In this ClickFunnels tutorial, we’ll share how small businesses can use ClickFunnels to sell their products or services online.
We’ll walk you through the process of creating a sales funnel and provide you with all the information you need to make a decision on whether or not ClickFunnels or a standard website builder is going to be the best option for you.
Read more: How To Build a Sales Funnel for FREE
How to Use Clickfunnels to Build a Sales Funnel?
Let’s go ahead and dive into the ClickFunnels tutorial for beginners.
1. Understanding ClickFunnels
Head over to ClickFunnels’ website. Before we get started with a free 14-day trial, it’s important to understand the concept of ClickFunnels.
As we already established, this tool is all about building a good sales funnel that can be broken down into upselling, providing long-term value, integrating buyer psychology, and building loyalty & trust.
You should also know that a sales funnel is not necessarily a website.
A typical website is information-packed and tends to have menu navigation that takes you to multiple pages that serve completely different purposes or call-to-actions (CTA’s).
On the other hand, a sales funnel is all about the customer journey that begins with sending people from different social media platforms or channels to your sales funnel where they become visitors.
Then the idea is you want to capture them as a potential lead.
Ultimately, you want to upsell by sending that lead to a different stage in your sales funnel and also following up with different forms of email marketing automation.
As a result, that lead becomes a lifetime, valued customer in your business. And that’s the ultimate goal.
Now that you understand ClickFunnels and sales funnels, we’ll get started with a 14-day free trial in this ClickFunnels tutorial.
Read more : Top 3 BEST Sales Funnel Software for Small Business
2. Getting Started
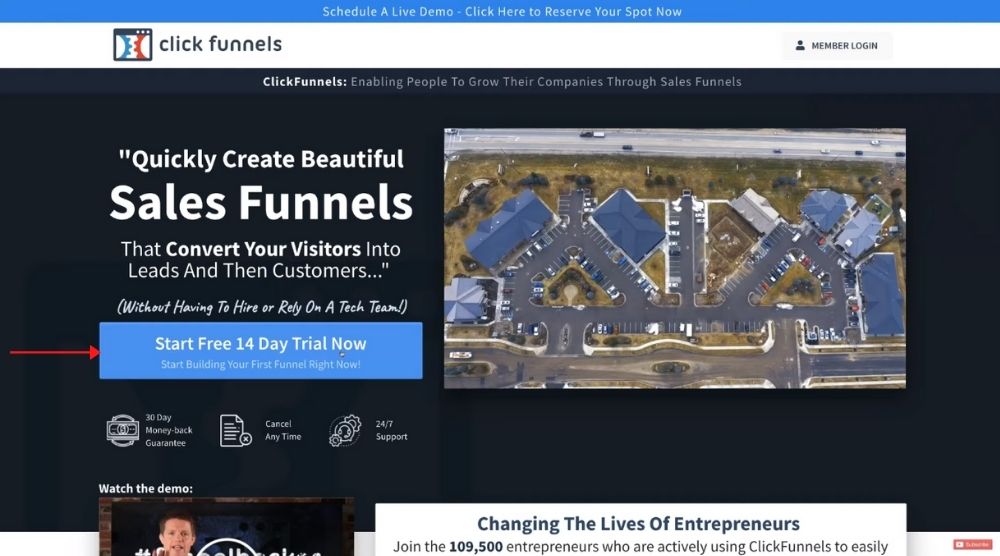
Add your details and then click ‘Start Building My First Funnel!’
Now, navigate down to ‘ClickFunnels Basic Plan’. Unless you know how to build a sales funnel, you do not want to get started with the Platinum plan just yet!
If you decide to continue after the 14-day trial period expires, ClickFunnels will cost you $97 per month.
However, you can cancel your account at any time via your dashboard or email after experimenting for 14 days in case ClickFunnels doesn’t work for you.
For now, you can click ‘Yes! Start My Free Trial of ClickFunnels!’
Once you’ve added your basic information, check the box at the bottom (agreement).
Hit ‘Process My Payment & Information’. You will then be asked if you want to receive free training (remember you do not need to make a payment till after the 14-day trial if you do not cancel within the free trial period).
We’ll skip that option for now and click ‘No thanks’. You’ve now arrived at your ClickFunnels dashboard.
Read more : How To Create a Sales Hubspot Pipeline
3. Configure Settings ClickFunnels Dashboard
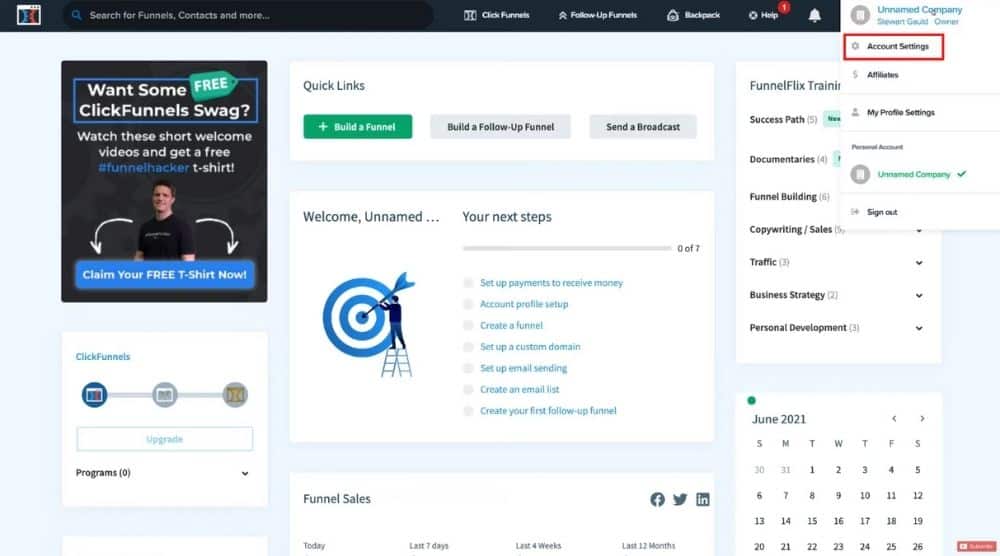
We’ll first add our company name under ‘Manage Account Details’ and then upload a company image. Hit ‘Save’.
Make sure that your company details are correct before saving the changes.
4. Integrations
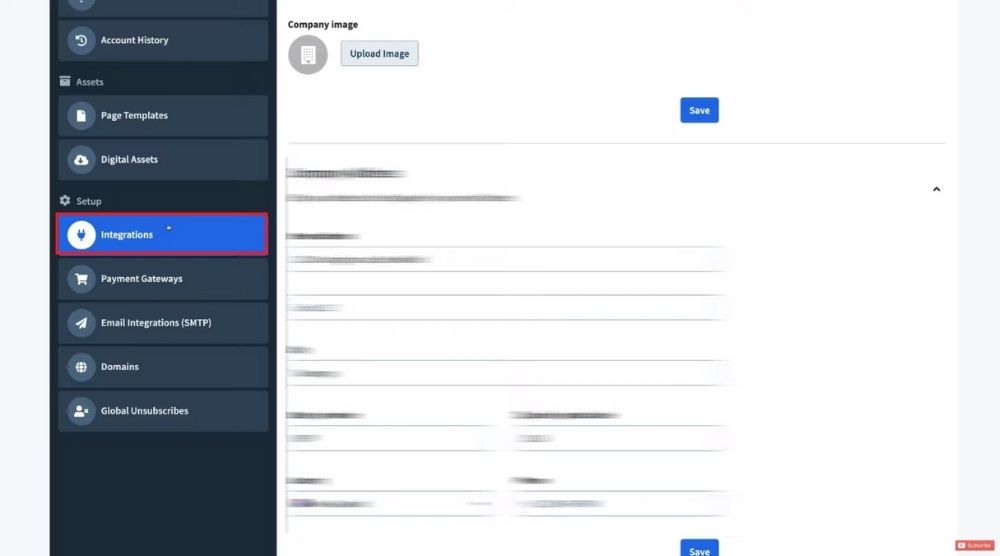
In this ClickFunnels tutorial for beginners, we’ll talk about integrations with email marketing tools. This allows us to engage in automation and to set up sequences so that we can build the relationship with our leads and customers.
Click on ‘Integrations’.
This is where you can integrate important tools into ClickFunnels.
Hit ‘Add New Integration’ and then simply select your preferred email marketing tool. You can also integrate Facebook and other tools.
For this ClickFunnels tutorial, we’ll select MailChimp as our preferred email marketing tool to integrate it with ClickFunnels using the provided step-by-step instructions that they will walk you through.
5. Payment Gateways
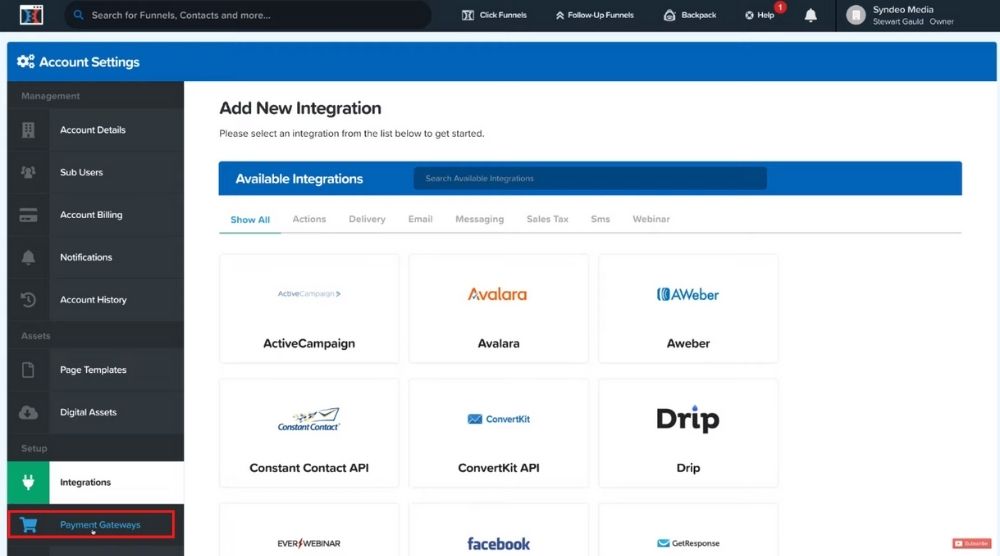
Below ‘Integrations’, we have ‘Payment Gateways’.
This is vital so that you can get paid when customers purchase from you. By simply clicking ‘Add New Payment Gateway’, you can integrate your preferred payment gateway with ClickFunnels.
Stripe is the most popular option amongst most users that you can integrate by following the simple step-by-step instructions they provide.
6. Domains
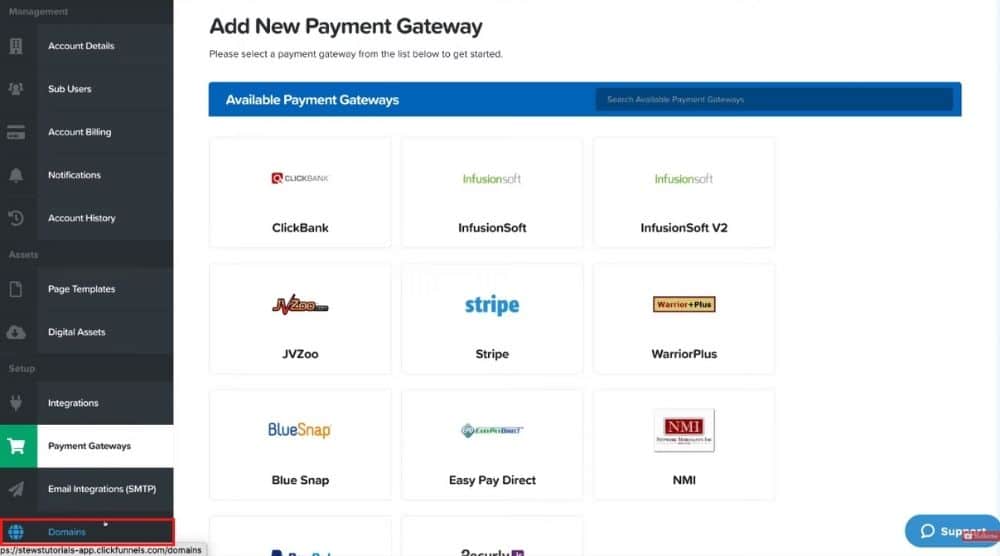
This is where you want to connect a professional domain name with your ClickFunnels account. For that, simply navigate over to ‘Add New Domain’.
Here, you can either choose a custom domain (if you don’t already have one) or use an existing domain.
Again – ClickFunnels will guide you through the step-by-step process.
We’ll now navigate back to the ClickFunnels dashboard to start building our first sales funnel. For that, you have to click on the ClickFunnels icon on the top-left corner of your screen.
7. Build Sales Funnel
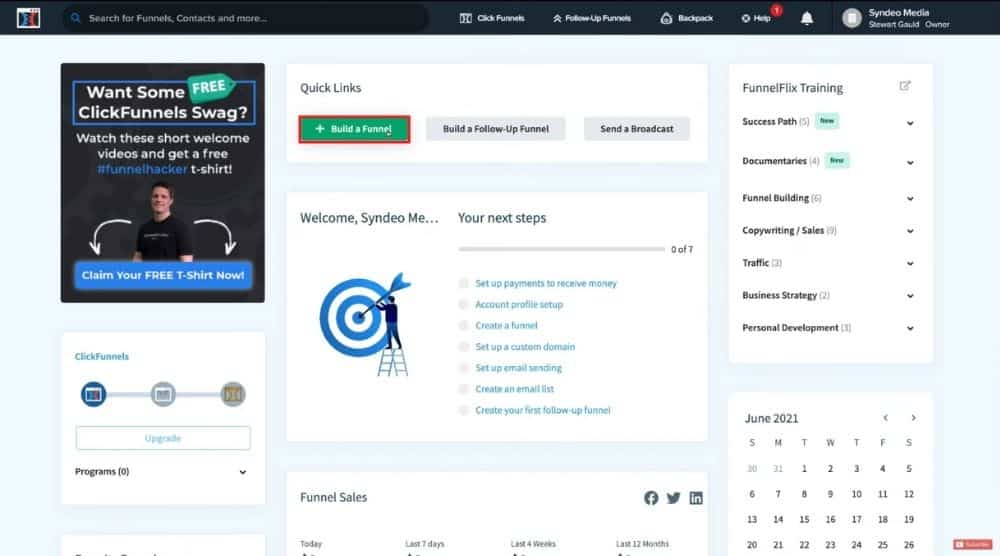
You can create a custom funnel if you’re more experienced. Above that, we have ‘Collect Emails’ to build a funnel that’s based on collecting emails.
Next to that we have ‘Sell Your Product’ to build a sales funnel around selling your product.
Then we have ‘Host Webinar’. Depending on your business and the goal of your sales funnel, go ahead and select one of these options.
For this ClickFunnels tutorial for beginners, we’re going to select ‘Sell Your Product’.
Rather than listing your product on a standard website, we’re going to list it on ClickFunnels through a sales funnel. Click ‘Choose’ and then select an option based on your goal.
For this ClickFunnels tutorial, we’ll select ‘Sales Funnel’ on the left.
Select ‘Choose’ again and name your sales funnel. Then come down and select a group tag.
However, because this is our first and only sales funnel that we’re creating today, we don’t need funnel groups.
On your right-hand side, you can see ‘Funnel Steps’ which we’re going to cover in the next section.
8. Sales Funnel Steps
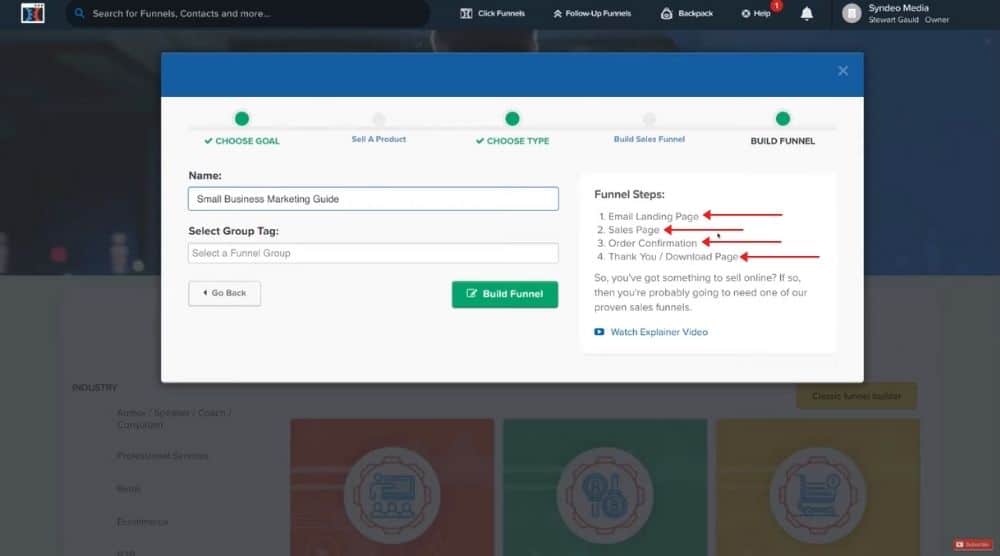
- Email Landing Page
- Sales Page
- Order Confirmation
- Thank You / Download Page
When you’re ready, go ahead and click ‘Funnel’.
On your left and below ‘Funnel Steps’, you can see all our sales funnel stages.
For example, we have our ‘Squeeze Page’, ‘Sales Page’, ‘Order Form’, ‘Order Confirmation’, and ‘Thank You Page’.
You can also add another sales funnel page if you like. Think of this as a customer’s journey when they arrive on one page and complete the specific goal (or CTA) on that page. They then move through the sales funnel stages.
9. Select Page Template
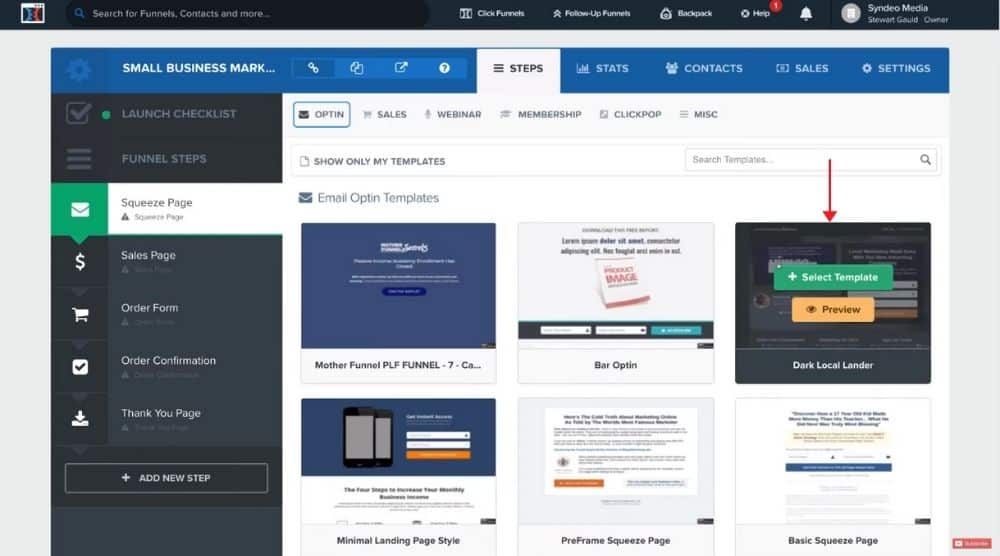
If you’re a complete beginner, we recommend choosing a premade template.
For example, for the Squeeze Page (our first page that the visitors will see when we send them from a social media channel or any other form of paid activity like Google Ads, Facebook Ads, or YouTube videos), you can simply hover over each of these premade templates.
You can go ahead and view these templates or you can select any of these templates. For this ClickFunnels tutorial for beginners, we’ll select the ‘Dark Local Lander’ template by clicking ‘Select Template’.
Arrive on the next page. So, depending on the marketing activities that you choose, you’re going to send traffic to the Squeeze Page. Then, there’s going to be a specific action that those visitors must take.
And that’s going to slowly take them through the sales funnel. You also have the option to delete any of these steps if you like.
10. Funnel Stage Settings
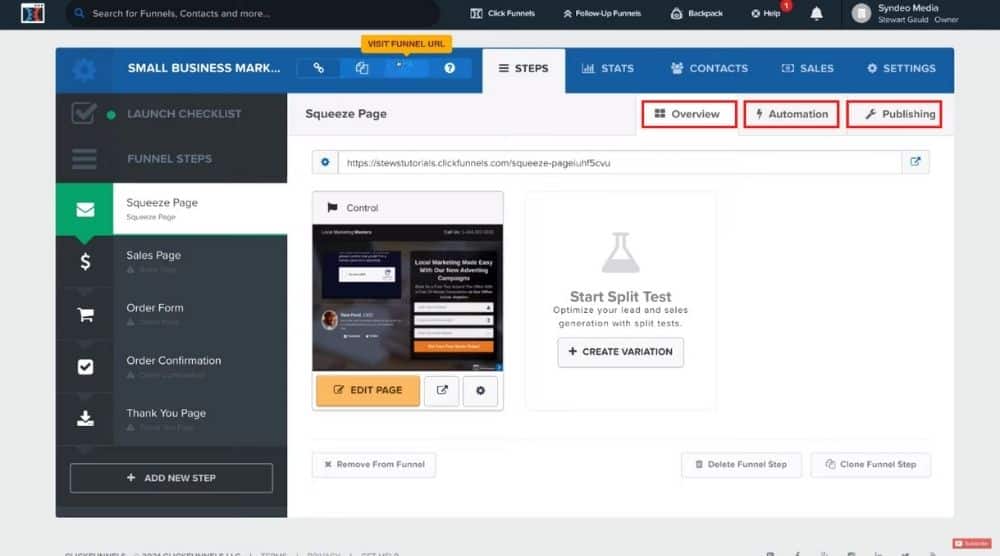
Now, under each funnel step, you’ll notice some of these settings:
- Overview
- Automation
- Publishing
Above that, we’ve got basic settings, number of sales, contacts, and then stats for this particular sales stage or landing page.
This will allow you to see how many visitors are converting and moving into the next stage of your sales funnel.
On the left-hand side, we have a funnel URL. Next to that, we have ‘Visit Funnel URL’. If we click here, we can see what this funnel looks like.
On the left, we have ‘Copy URL to Clipboard’. If you want to send this URL to someone so that they can move through your sales funnel, you can go ahead and do that here.
This is also the URL that you can share on social media and other channels to drive traffic to your sales funnel.
If you click on ‘Visit Funnel URL’, that’s going to take you to the first stage of the sales funnel.
11. Customize URL Path
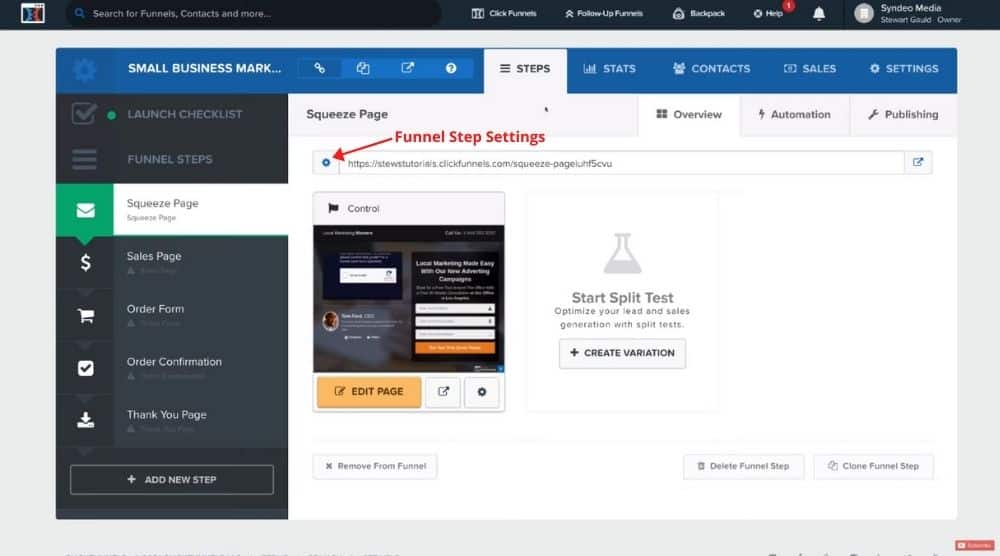
That’s going to take you to ‘Publishing’. This is where we can name the funnel step. But for this ClickFunnels tutorial, we’ll leave it as it is.
Next to ‘Funnel Step Name’, we have the ‘Path’.
It’s best practice to change this so that your URL looks professional in the eyes of your visitors.
Once you’ve changed the URL, click ‘Update Funnel Step’. You can now view the updated URL.
12. Split Testing
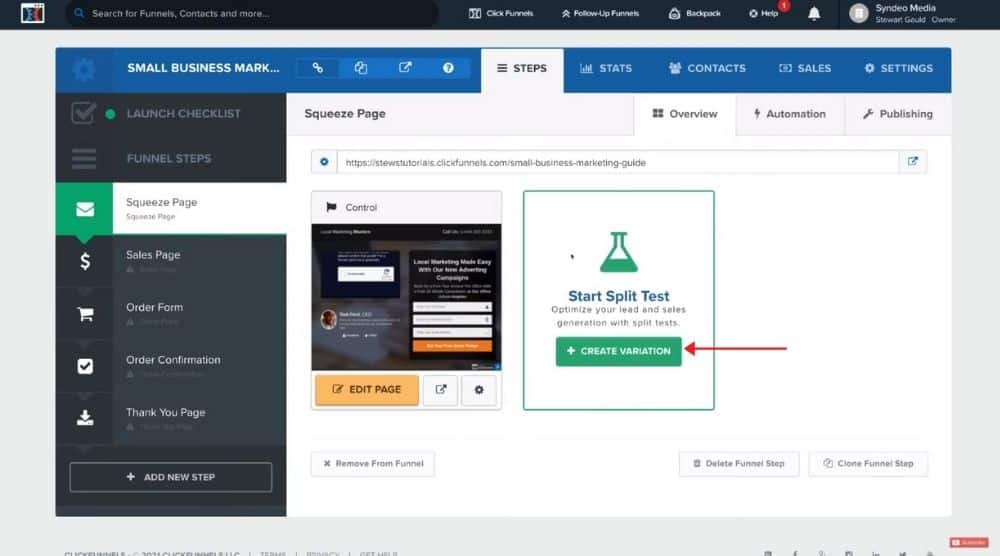
This allows you to duplicate your page and then make some slight modifications. You can then test to see which landing page works better.
To do that, click ‘Create Variation’. Now, click ‘Create Duplicate Page From ‘Squeeze Page’.
As you can see, we have our main control page over here and then we have our Split Test Variation.
Now what we would do is change the traffic to 50%. As a result, 50% of the traffic will arrive on our control page and the remaining 50% on our variation page.
You can then find out which page is performing best.
Rather than having this big element here, you can move it to the center or the right.
You can change a title on this variation and see which page performs better. With each of these different stages, you can do the same. Now, for each of these pages, you can also change the URL.
For example, to change the Control URL, click on the gear icon and change the name and/or path if you like.
Click ‘Apply Changes’ to proceed with the Split Test.
When you start driving traffic to your Squeeze Page, you can then navigate up to ‘Stats’ to see which landing page performs the best.
This process is exactly the same for all the funnel stages. The only difference is each funnel stage has completely different goals.
For example, the Squeeze Page would be used to convert visitors into leads by capturing their information.
Below that, we have the ‘Sales Page’. This would be a video explaining why people purchase our digital product.
Order Form is where people place their payment information and they confirm the order on the Order Confirmation page.
Remember, a sales funnel is all about upselling and providing as much value as you can.
You might not make money from the initial sale. For example, in our case, it’s a digital product where you have captured your visitor as a lead.
You can then generate automated email campaigns to essentially provide more value and to upsell that customer. Upselling is about growing the value for the customer, and growing the result for your business at the same time – a nice win / win situation.
When you have some experience, you can add an additional funnel stage.
For example, you can offer an additional digital product for 50% off once they’ve purchased the initial digital product.
Think about products or services that complement the initial purchase that your buyer completes.
Always ponder upon the value you can offer to your customers.
Think about buyer behavior if they bought a product or service from you and what else complements that product or service that’s going to entice them for another purchase.
That whole process is called upselling.
13. Customize Pages
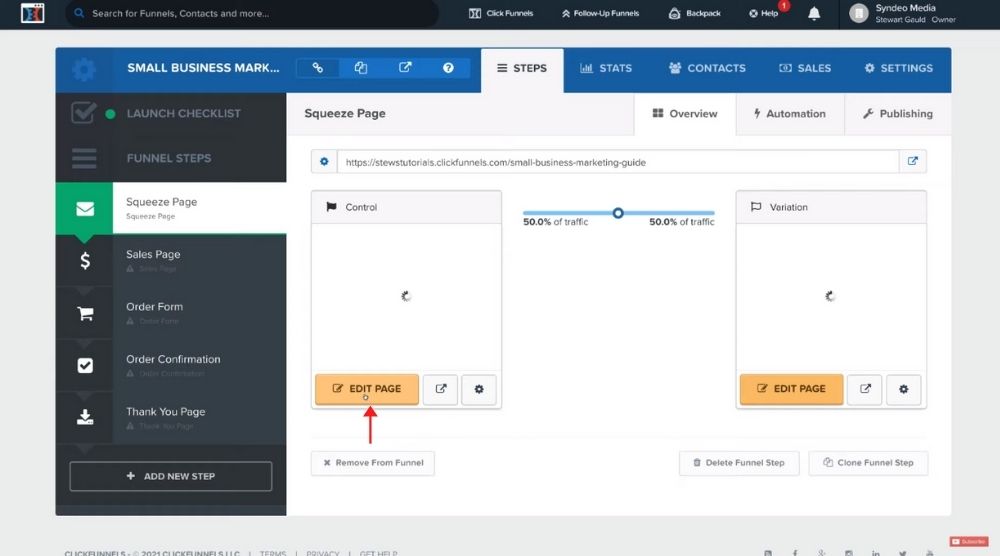
For the purpose of this ClickFunnels tutorial, we’re going to explain how you can customize the Squeeze Page and you can follow the same process for other landing pages.
We already have a premade template selected for the Squeeze Page.
Click ‘Edit Page’ to customize it.
You can now customize each of these different elements.
14. Visual Builder
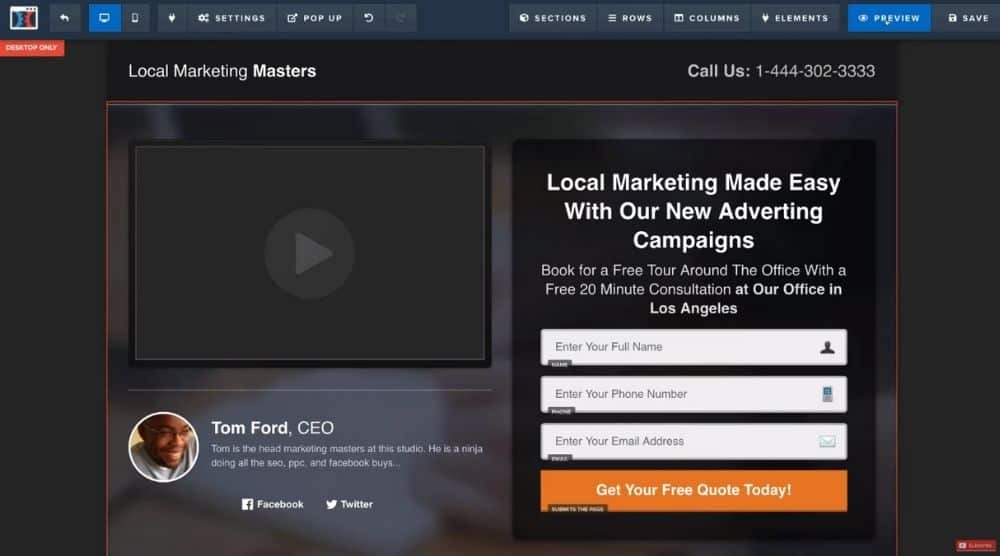
It’s quite similar to other visual builders like you see with WordPress which include Divi and Elementor and other website builders like Wix, Weebly, and Squarespace.
The ClickFunnels visual builder is broken down into four elements.
First, you can see that pages are made of sections. You can delete, save, duplicate, or change some of the settings for this section.
Within the sections, we’ve got rows. Again, you can delete, save, duplicate, or change the settings or use a different background if you like.
Within rows we’ve columns and within each column, we’ve different elements (like text elements, divider elements, booking form elements).
To customize any element (the text element, for example), you simply have to click on it and then delete the default text, enter your own text, and format it using the given options.
You can also hit the gear icon to explore more formatting options like top margin, font size, mobile size, text color, etc.
For complete beginners, we recommend keeping the default formatting options and just changing the content.
You can follow the same customization process for rows, columns, and sections.
When you make changes to any of these elements, you can view what your landing page would look like on mobile and desktop.
You want to make sure that your landing page is both mobile and desktop-friendly.
On the top, under ‘Settings’, you’ll find Integrations, Tracking Code, Facebook Pixel, Custom CSS, Background, Typography, etc.
You can also redo or undo any changes that you don’t like. From the top-right, you can add sections, rows, columns, and elements to your website.
To add a section, for example, click on ‘Section’ and then ‘Add Section’. Remember to save the changes once you’re satisfied. You can also preview your landing page by clicking on ‘Preview’ on top-right.
Also, read: How To Use Basecamp
ClickFunnels Tutorial for Beginners (Video Guide)
Once you’ve customized the Squeeze page, you can proceed to our next page which is the ‘Sales Page’. Select a pre-made template from the given options.
Remember, we want our sales to funnel to flow so we want the theme to be the same.
It’s exactly the same process for each of these funnel stages.
Hence, take the time to choose an appropriate template for each of the stages of your sales and go ahead and customize those templates based on the information that you want to provide.
That is everything we wanted to cover in this ClickFunnels tutorial for beginners to help you understand how to build a sales funnel with ClickFunnels.
If you still want to have a more detailed visual guide, I have a video tutorial on ClickFunnels to show you all how to get started in a visual step-by-step walk-through. Enjoy!
![Click Funnels Tutorial for Small Business [2021]](https://stewartgauld.com/wp-content/uploads/2021/09/Click-Funnels-Tutorial-for-Small-Business-2021-1.jpg)
