Are you a small business wanting to learn basic email marketing for beginners, or how to create a free email campaign in Canva to promote your new product, service, catalog or event?
In this tutorial, we will walk you through how you can create a free email campaign using our favorite free online design tool called Canva, then simply send your campaign to your audience through an easy-to-use email marketing platform called MailChimp.
How to create a free email campaign in Canva
Let’s go ahead and dive into this email campaign and email marketing for a small business tutorial using Canva.
Why should you send email campaigns?
No matter the size of your business, creating email campaigns is an integral part of any marketing strategy.
Email campaigns are one of the most powerful and effective ways to reach all your contacts when promoting or launching information or activities relating to your small business.
As a result, creating captivating email campaigns will help drive engagement, interest and conversions for your brand.
1. Getting Started – Creating An Email Campaign In Canva

To get started, you’ll need to first create your email campaign.
You can actually create an email campaign completely for free with an amazing online free design tool called Canva.
If you haven’t heard of Canva before, you’re missing out!
Canva is an online platform that you can design and create any kind of materials you need for your small business from business presentations, social media posts, videos, newsletters, flyers and more!
We won’t go into detail in this email marketing for small business tutorial on how to use Canva, however, feel free to check out our detailed and complete Canva video tutorial here that guides you through how to get started and make the most of this powerful free design tool.
Additionally, Canva offers thousands of unique templates that you can use as a base and then tailor to your liking, rather than building a whole design from scratch.
In our opinion, this easily makes Canva the perfect design tool for complete beginners and people with zero design experience!
If you are completely new to Canva and you currently don’t have an account, you can get started with Canva for FREE here.
*The link above is an affiliate link, which means we will get a commission if you upgrade to a paid plan (with no extra cost to you). This helps support our education-based website and we thank you in advance!
2. Canva Templates

Once you’ve signed up and signed into Canva, you’ll be redirected to your Canva dashboard (see screengrab).
- Head up to the search bar ‘Search your content or Canvas’.
This is where you can type a keyword for any design that you want to create, and Canva then generates a list of the different templates they offer relating to that keyword.
As this is an email marketing-based tutorial:
- Type in ‘Email’.
You’ll notice this then brings up a variety of different ‘Email’ related options you can then choose from (see screengrab).
‘Email marketing’ is a good option to go with, as creating an email campaign and sending that to your contacts is a form of email marketing.
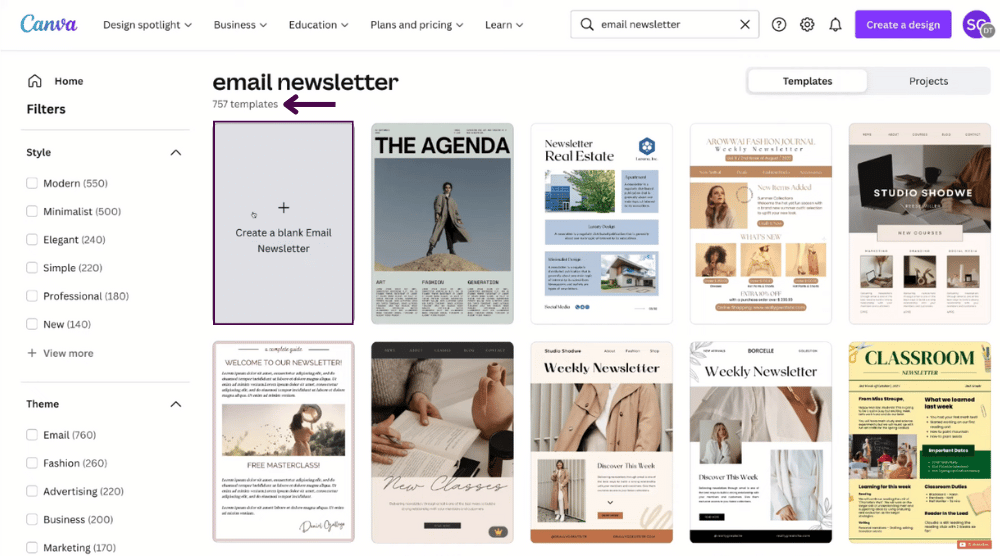
However, for the purpose of this tutorial, we’re going to select ‘Email newsletter’.
Once you’ve created an email newsletter through Canva, you can then send it to your contacts through an email marketing platform like MailChimp (we’ll explain this process later on).
You can also read our beginner’s tutorial on Top 5 FREE email marketing software for small businesses.
After you’ve chosen ‘Email newsletter’ in your search, you’ll notice Canva then generates over a whopping 757 email newsletter templates that you can then choose and design from (see screengrab).
However, it’s important to note that you have two options at this point.
- Select an email template that you like. OR
- Click on ‘Create a blank email newsletter’.

This is where you can start creating your email campaign from scratch (with no template).
We suggest choosing a template if you’re completely new to Canva and have little experience designing email campaigns.
For the purpose of this how to create a free email campaign in Canva tutorial, we’re going to pick a template and build from that template to our liking.
- Simply scroll through all the different pre-made templates under ‘Templates’ on the left-hand side bar.
- Select what design you like.
Pre-made templates are amazing as you can simply choose which one you like and then customize or build the design the way you like from that template.
We like the look of this campaign here (see screengrab).

Once you’ve chosen a template that best represents your brand:
- Click on the template.
- Select the first page on the left-hand side bar .
You’ll then be able to see a bigger version of the template (see screengrab).
This is an attractive, compelling and seamless email newsletter template that we’re going to use for our email campaign.
Canva additionally lets you ‘shuffle’ your templates font and color. You can do this by:
- Navigating down to ‘Template style’.
- Click on ‘Shuffle’ to shuffle the template font and the template colors (see screengrab).
Below your first page, you’re able to add another page to your template.
- Simply click ‘Add page’.
We’re going to use both of these Pages within our email campaign.
Read more: How to make a logo for FREE with Canva.
3. Customize Your Email Campaign In Canva

Once you’ve chosen your template, you’re ready to customize your email campaign.
Follow the steps below to find out how:
- When you hover each element, that particular element is then highlighted
- Simply click on the element you want to change.
- That’s going to generate these formatting options up here
You can simply click on each text element and change the font style, text size and text color, and more within these formatting options.
Take the time to go through each of your elements and edit them to how you like.
We’re happy with the style of this template, so all we’re going to do is simply change this default text header element to our business name.
For the purpose of this Canva email campaign tutorial, our business name is going to be ‘Beautify you’ (see screengrab).
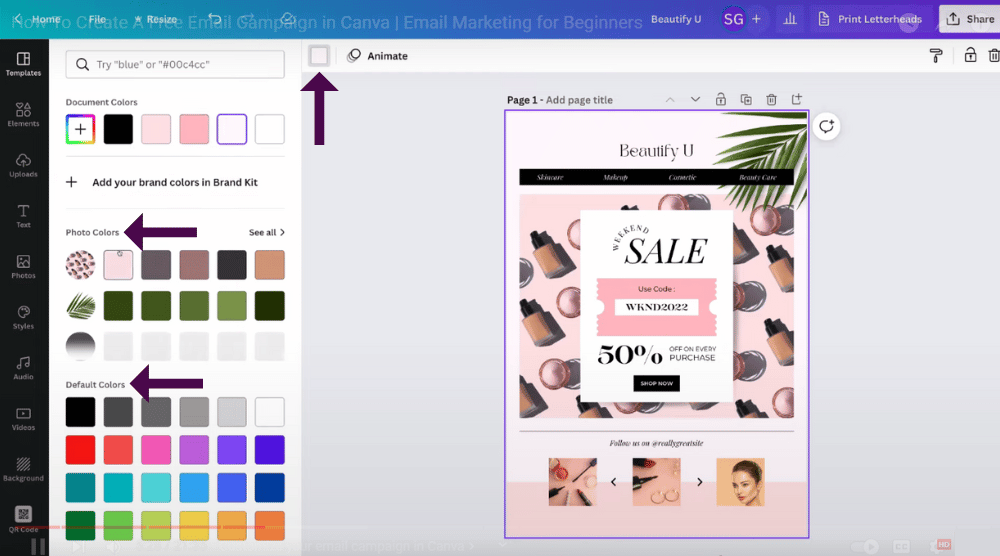
If you’d like to change the background color:
- Navigate up to the color icon in the top left-hand corner and choose from the available colors.
You can select from either ‘Photo colors’ (the colors in the template already) or ‘Default colors’
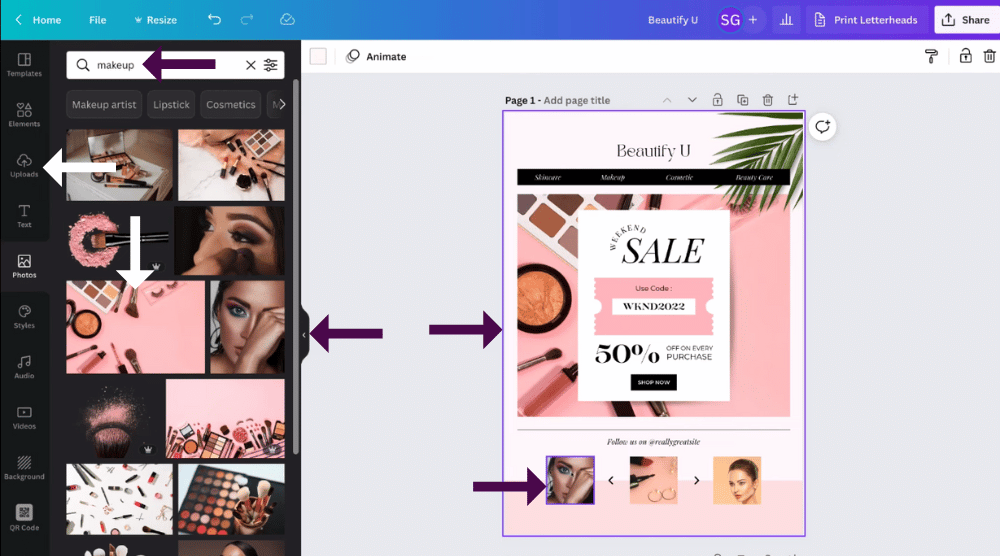
Once you’re happy with your background color, you can then replace each of the default images:
- Simply click ‘Upload’ on the left-hand sidebar to upload your own images or
- Click ‘Photos’ on the left-hand sidebar and choose a photo through Canva.
We’re going to select a photo from Canva’s photos.
- Navigate up to the search bar within ‘Photos’.
- Type in a keyword related to your business.
- Canva will then generate photo suggestions relating to your keyword.
Because we’re creating an email campaign for our makeup and cosmetic business, we want to find a relevant photo to our business.
Therefore, for the purpose of this email marketing for a small business tutorial, we’ll type in ‘Makeup’.
We’re going to click on the generated ‘Makeup’ suggestion.
Once you’ve searched a keyword related to your business:
- Simply click on an image you like the look of.
- Drag that image over to your template page (over the default image you want to replace).
- Go ahead and do this with every image you want to replace.
For example, we’re also going to replace each of these little images down the bottom on the template using the same process
These images are quite small, however you can zoom in your images to get a better idea of what you’re working with.
- Navigate down to the zoom slider below your page.
- Click on the zoom slider and drag it to the right to make your page bigger.
- Drag the zoom slider to the left to make it smaller.
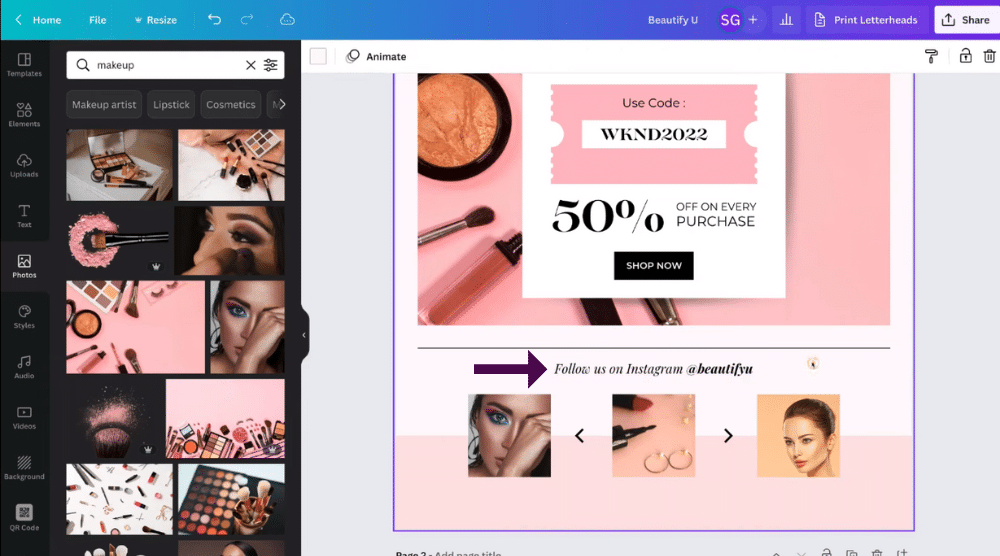
We’re also going to quickly change the default text from “Follow us on @reallygreatsite” to “Follow us on Instagram @beautifyu above these smaller images.
And we’re happy with that!
Make sure you take your time and go through the email campaign template that you selected and change all the default elements, descriptions and images with your own products and branding.
Before we show you how you can send your campaign to your contacts, it’s important we quickly cover the left-hand side bar, where you can further customize your template.
- Firstly, you’ll see ‘Templates’ at the top of the bar. This is where you can view and search different templates.
- Below this, you have ‘Elements’. Again you can search for specific elements to add into your campaign.
- Next, you have ‘Uploads’ that we mentioned earlier.
- Below ‘Uploads’ you’ll see ‘Text’ for text images that you can simply add to your email campaign.
- Underneath this, you’ll see ‘Photos’ like we mentioned previously.
- Additionally, you have ‘Styles’. This is where you can create your own style with your own colors based on your business’s branding.
Below these options, there are even more options such as audio, videos, background, QR code and more, however we’re not going to cover these in this email marketing for beginners tutorial.
You can read the article on How to create a QR code for FREE with Canva.
Another important consideration to make when creating your campaign is that you have call to actions within your email.
So think about what your call-to-action is.
What do you want your contacts to do when they click on your email?
For example, do you want them to visit your online store, sign up to your email list, or follow all your different social media channels?
Note – You can have multiple call-to-actions on your campaign!
Because everyone’s business and therefore email campaigns are going to be completely different from our example, we recommend taking the time to really design, create and customize an email campaign for your brand with all these things in mind.
4. How To Download Your Canva Free Email Campaign

Once you’ve finished editing your campaign, you’re ready to move on to the second part of this Canva email tutorial.
The first step is to download your chosen new email template.
When you’re ready to download your new email campaign:
- Simply navigate up to and click on ‘Share’ in the top right-hand corner.
- Select ‘Download’.
- Under ‘File type’, make sure you have ‘JPG’ selected.
JPG is a ‘lower file’, meaning that the images in your email campaign will load a lot quicker (when your contacts click on the email).
You can choose a PNG file instead of a JPG if you’d like your images to be of higher quality, however, it’s important to note they’ll take longer to load if you choose this option.
- Select the pages you want to download.
Because we’re going to use both of these pages for our email campaign, we’re going to keep them both selected
- Click ‘Done’.
- Then click ‘Download’.
That’s going to download the entire Canva email campaign that you’ve just created.
5. Email Marketing For Beginners Using MailChimp

Now that you’ve designed and downloaded your new email campaign, you’re ready to send your campaign directly to your contacts and your entire audience through the free email marketing platform MailChimp.
If you haven’t heard of MailChimp before, they are an amazing email marketing platform that we recommend for small businesses.
You can read our Complete beginners guide on how to use MailChimp.
Within MailChimp, you can for example, link a booking form to this section (see screengrab).
This means that if someone clicks on that section, that’s going to take them to a signup or a booking form that you’ve created.
We’re also going to show you how to make your other sections responsive and how to link your website or online store and social media platforms.
However, more on that shortly.
To get started with MailChimp:
- Simply open up your MailChimp account in your chosen browser.
Again, if you’re completely new to MailChimp and you currently do not have a MailChimp account, click here to get started!
Take your time to sign up and sign into your new free MailChimp account, and we’ll meet you there.
6. How To Create An Email Campaign In MailChimp

You’re now ready to create an email campaign and send that campaign to your contacts!
Here we are inside our MailChimp account (see screengrab).
To create an email campaign:
- Select ‘Create’ on your left-hand side bar.

- Click ‘Email’.
- Select ‘Regular’.
- Name your email campaign below ‘Campaign name’.
For the purpose of this email marketing for small business tutorial, we’re going to call our ‘July sale’.
However, make sure you name your campaign relevant to the type of email campaign in Canva you just created.
- Click ‘Begin’.

- Make sure that you have the correct audience selected (see screengrab).
Your audience is the group of contacts (or your email list) of all the contacts you want to send your email campaign to.
- Below this, check you have the correct ‘From’ information for your campaign.
In other words, you want to make sure you have your name, as well as your business email so people can identify clearly who the email is from for your brand.
However, for the purpose of this tutorial and because we’re using an existing account, we’re just going to use this Gmail (see screengrab).
- Click ‘Add subject’.
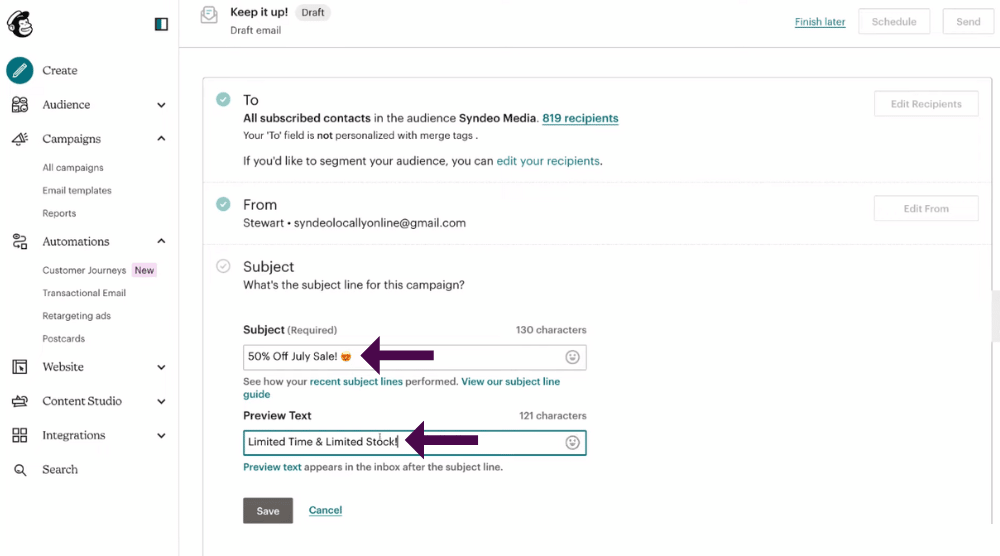
This is where you can simply add a captivating subject line for your email campaign. For ex: 50% Off July Sale!
You can also add an emoji to your subject line if you want (like we’ve done) (see screengrab)
- Below ‘Preview text’, simply type in a small bit of text relevant to your campaign that your contacts will see just after the subject line.
Similarly to your subject, you can also add an emoji to your preview text.
Once you’re happy with your subject line and preview text:
- Click ‘Save’.
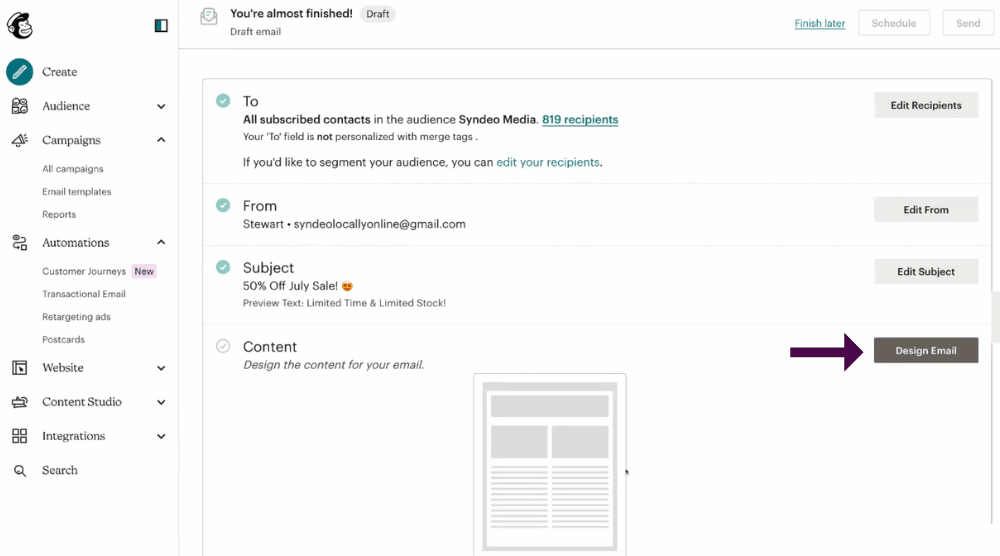
Next, you’ll need to add your Canva email campaign.
To do that:
- Click ‘Design email’ under ‘Content’.
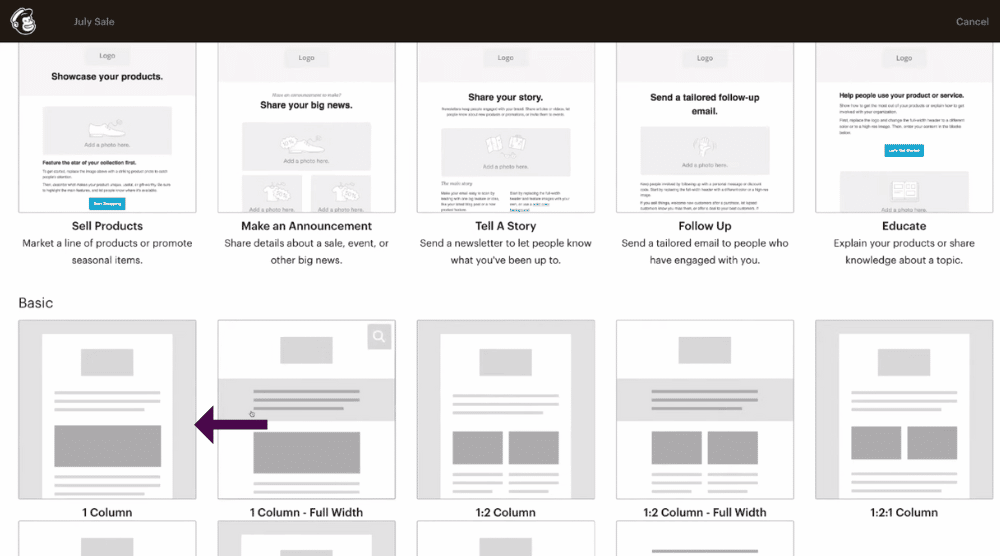
- Under ‘Select template’, select ‘1 column’ below ‘Basic’
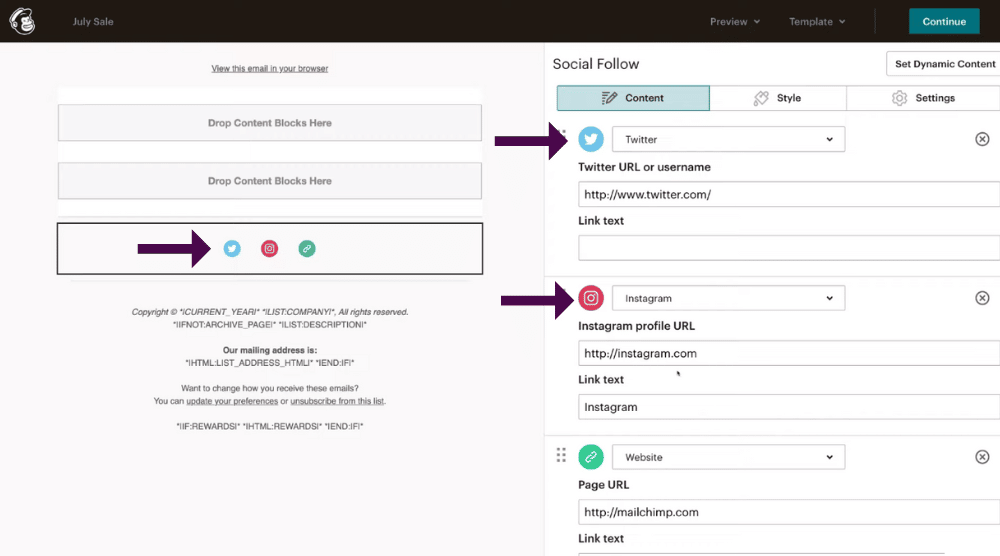
- Click on the default elements you don’t want in your campaign.
- Select the rubbish bin icon.
- You’ll then have the option to leave this ‘Social follow’
For the purpose of this tutorial, we’re going to keep this.
- From there, you can click the pencil icon on that social follow element.
- This brings up the option for you to edit and add your own Twitter or Facebook handle or add your website.
- Click on the arrow next to each social media logo to change that social element in your campaign.
For example, if you had a YouTube channel or an Instagram account that you wanted people to click on in the footer of your email, you’d simply change the element to ‘Youtube’ or ‘Instagram’.
However, we’re going to leave that for now.
Once you’ve added in edited all these options:
- Click ‘Save and close’.
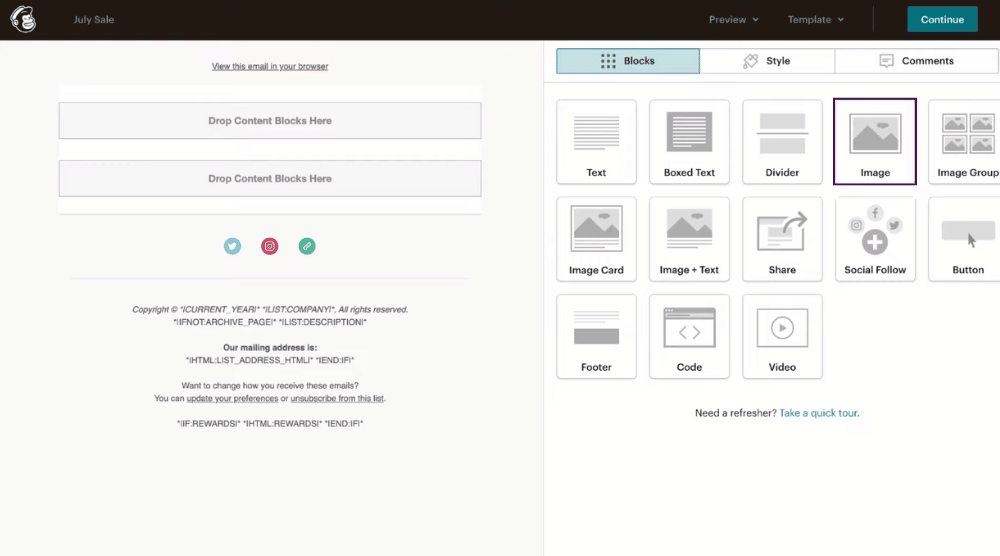
The next step is to add in and use the email campaign that you created within Canva.
This is super straightforward and easy to do! Simply follow the below instructions:
- Select the ‘Image’ block (see screengrab).
- Drag and drop that image element into the header on the left-hand side
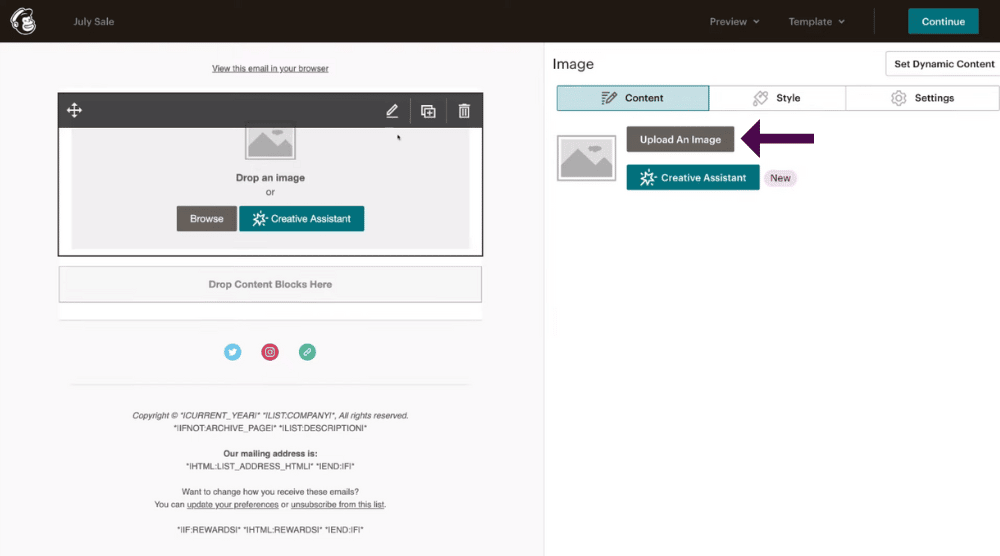
- Click ‘Upload image’ on the right-hand section of the screen.
- Navigate up to and click on ‘Upload’ in the top right-hand corner.
- Find the email campaign you just created and downloaded.
- Select the first page of your email campaign.
- Click ‘Open’.
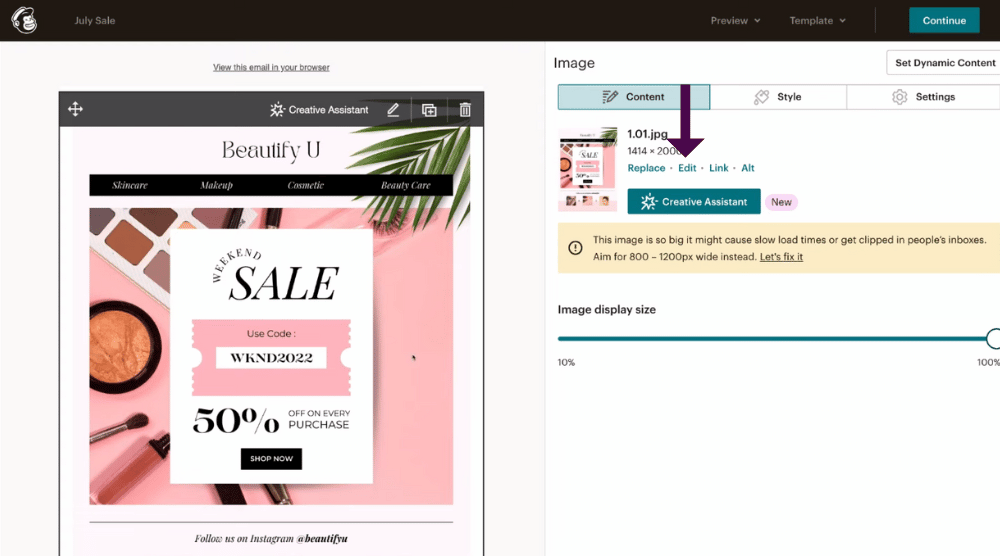
And as you can see, the first page of our email campaign that we created within Canva is now uploaded to MailChimp! (see screengrab).
Once you’ve uploaded your email campaign, you’re now ready to edit it. Simply:
- Click ‘Edit’ next to the preview of your page (on the right-hand section of your screen).
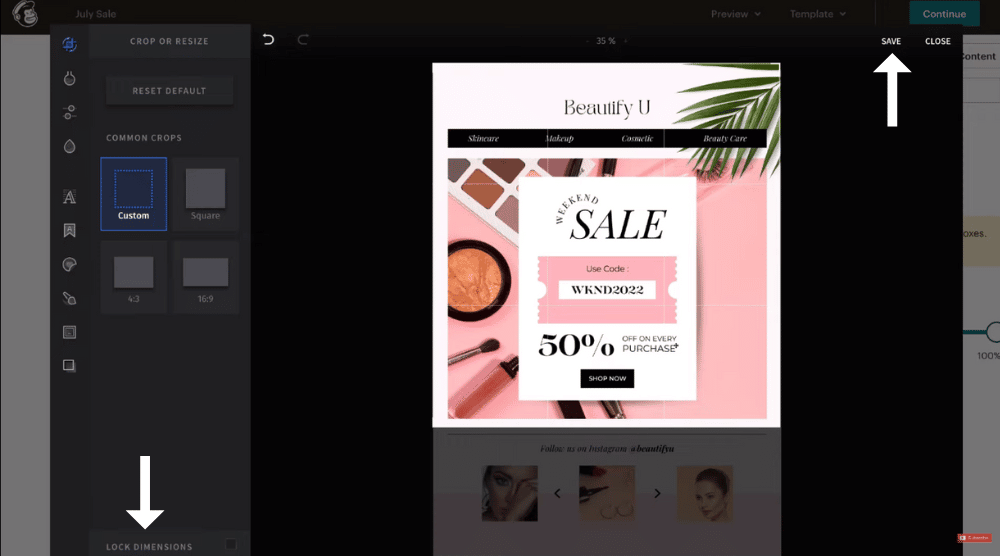
You can then crop the different sections of your email campaign then link each of the different sections to different platforms or destinations online.
- Select ‘Custom’ over here (see screengrab).
- Scroll down and untick ‘Lock dimensions’ to turn off lock dimensions.
- Navigate over to the corner of your campaign.
- Click then drag to the area that you want to crop.
We’re going to crop this top half of our email campaign (see screengrab).
When you’re happy with the cropped area:
- Click ‘Save’.
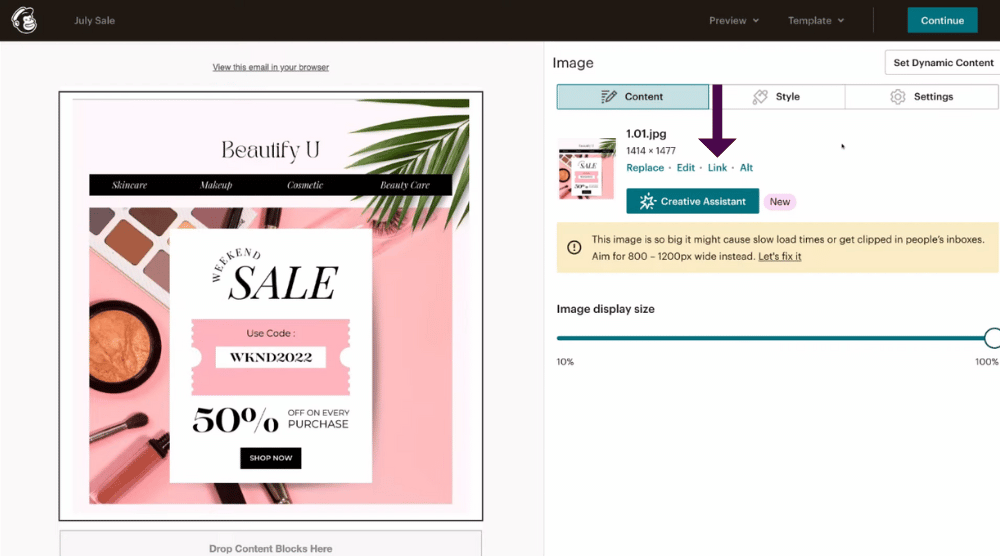
To link this cropped area to a web address:
- Select ‘Link’ next to ‘Edit’.
- Under ‘Web address URL’, simply add the URL of your shop (your online store).
This is just an example of a URL that you could add, however, make sure that you’re linking your own website URL so that people can easily get redirected to your online store.
- Click ‘Insert’.
- Select ‘Save and close’.
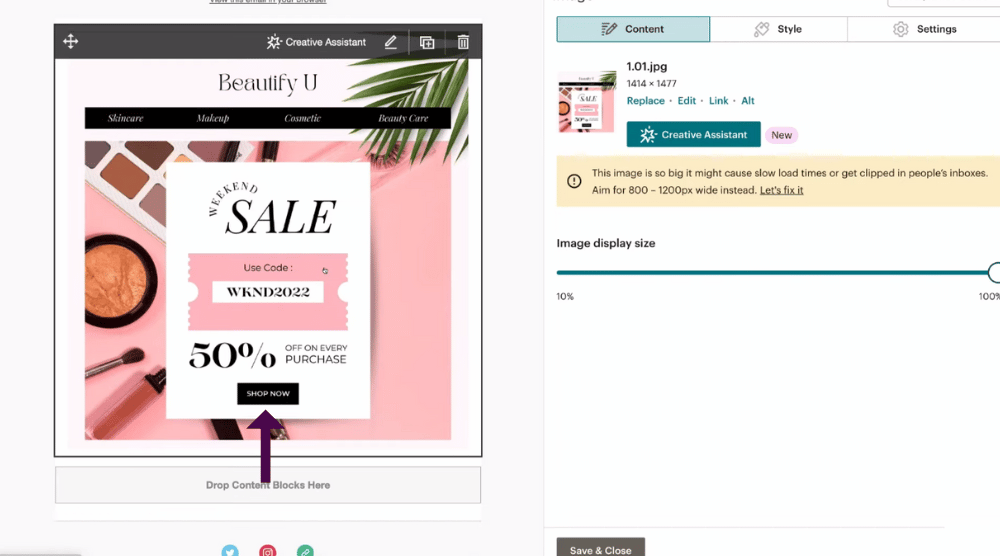
Now for example, if we send this email campaign to our contacts, a contact opens up our email and clicks on our ‘Shop now’ button, they’ll land right onto our online store.
Additionally, if they click on any other area within this cropped portion of the campaign, they’ll also reach our online store.
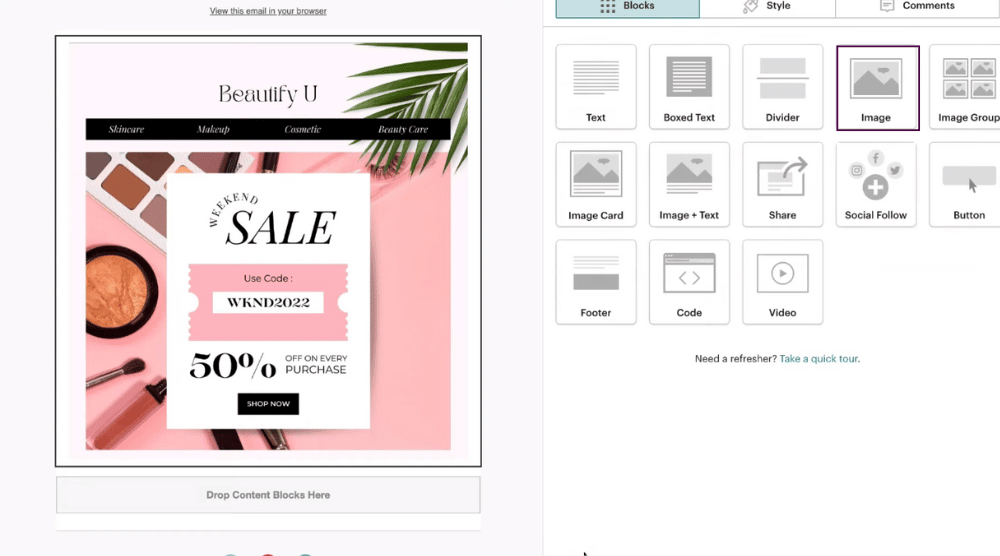
We’re going to quickly do this process again so we can crop the bottom half of our email campaign:
- Select ‘Image’ again.
- Click and drag the ‘Image’ block to below the header and within the body.
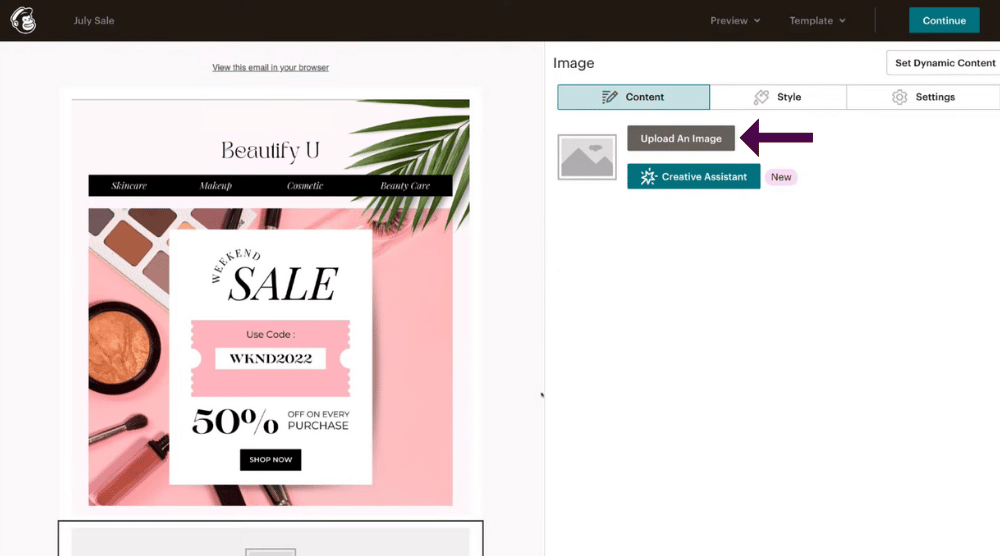
- Select ‘Upload an image’ again to upload the same image.
- Click ‘Upload’.
Remember we added the first page of our email campaign, so we’re going to add that same page again.
- Find your email campaign again.
- Click ‘Open’.
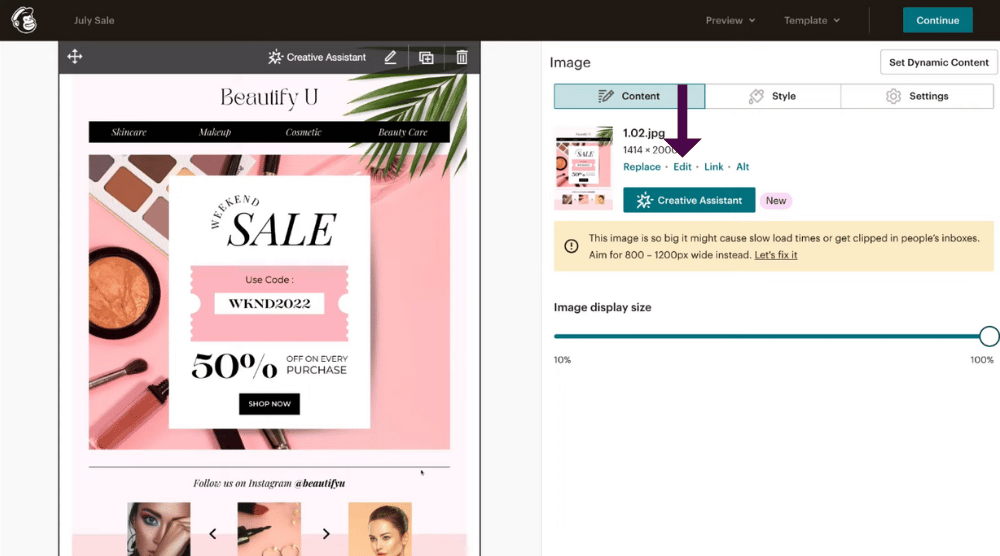
As you can see, we’ve added that email campaign page again below the first image we added earlier (see screengrab).
This time, we’re going to crop the bottom half of this email campaign.
- Click ‘Edit’ again.
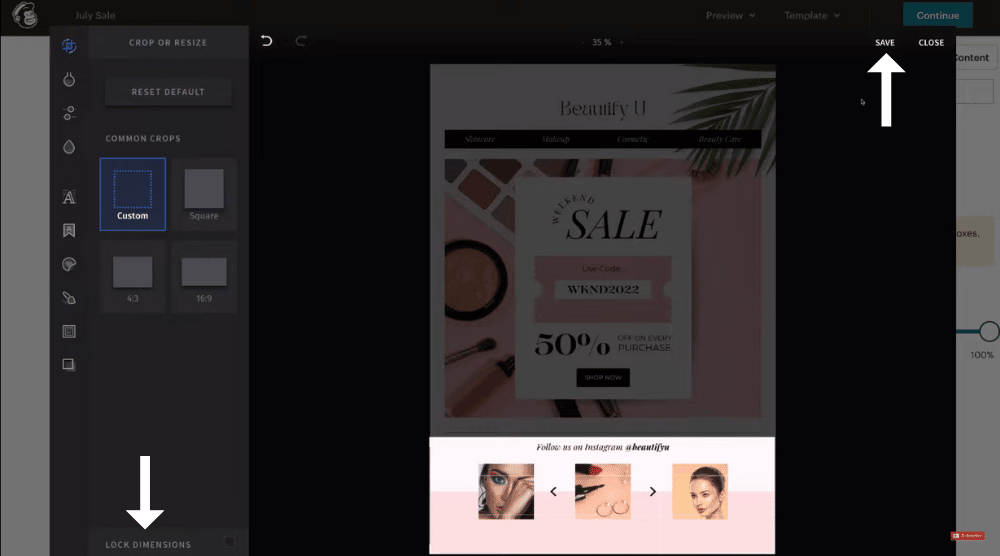
- Again make sure you have ‘Custom’ selected.
- Come down and turn off ‘Lock dimensions’.
- Navigate up to the top corner.
- Click then drag the element down to where you want to crop it.
This will let you crop the bottom section of your email campaign
- Click ‘Save’.
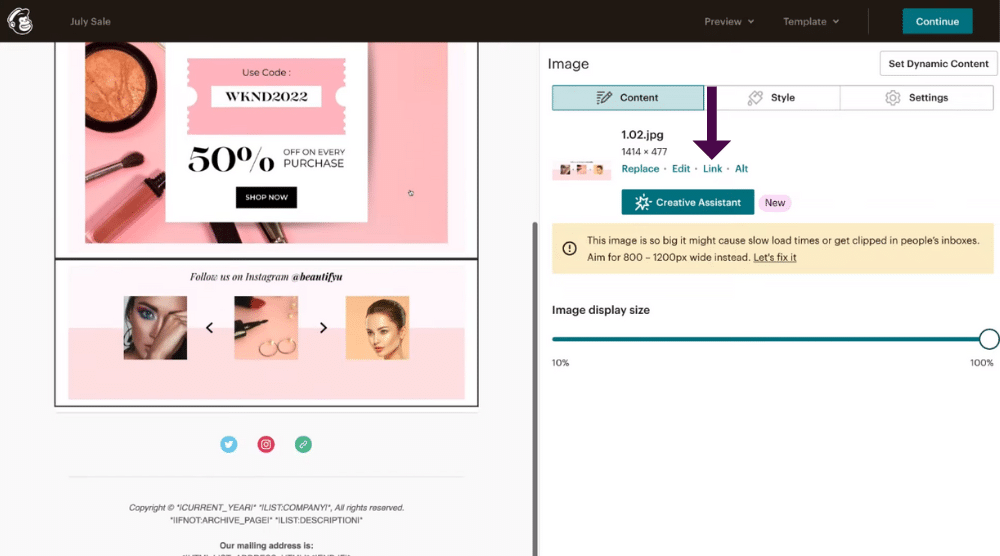
In our example, you can see we now have two sections to our email campaign (see screengrab).
Now we’ll show you how to link the second cropped image to your Instagram business account:
- Click ‘Link’.
- Type in your Instagram business account URL under ‘Web address (URL)’.
As you can see, we’ve added the Instagram business account for this business (see screengrab).
- Click ‘Insert’.
Now when a contact opens your email campaign and clicks on the part of the email campaign you’ve just cropped and linked to your Instagram, that’s going to redirect them to Instagram and your Instagram business account.
Basically, the reason you want to crop different sections of your Canva email campaign is so you can link those different sections to different online destinations or platforms!
For the purpose of this email marketing for beginners tutorial, we’re just going to repeat this process once more and add one more cropped section to our email campaign below the ‘Follow us on Instagram’ section (that we just showed you how to add).
This time we uploaded the second page that we created within Canva to make a total of three sections of our email campaign with the same method we explained earlier.
Read more: How to use MailChimp automations.
7. Email Marketing Essentials – Email Lists

Within this third section, this is where we could get people to click the ‘Sign up’ button to sign up to a different email list (let’s say if they’re a different audience)
What do we mean by this?
By creating different email lists, you can ultimately target different groups of people with different content!
For example:
- You could send a different newsletter that you send out to different groups of contacts.
- If you were launching an event, product or service and you wanted people to sign up for that event, you can build a list of your contacts that are interested in that particular product or service.
You could then send an email campaign to that specific audience or group of people.
You can read our beginner’s tutorial on How to connect MailChimp to WordPress to grow your email list.
Next, we’ll show you how you can easily capture your contacts information to use in different email lists using this email campaign:
- Navigate up to ‘Link’ once more.
- This time you have the option to keep ‘Web address’ selected.
- Add the address of the landing page that you want to use to collect your contacts information or
- Click the drop-down arrow next to ‘Web address’.
- Select ‘Landing page’.
- Click ‘Insert’.
Landing pages are used to capture specific contact information, for example, you could create a landing page that’s used to collect your contact information (say those that are interested in a specific event product or service).
If you’re interested in learning how to create a landing page (completely for free!) within MailChimp, make sure you watch our MailChimp landing page step-by-step tutorial here.
However, let’s continue with this email marketing for beginners tutorial.
Alright! So once you’re happy with your campaign and are ready to send it, you’ll first need to preview your campaign.
- Click ‘Save and close’.

- Navigate up to ‘Preview’.
- Click ‘Enter preview mode’ from the drop-down menu.
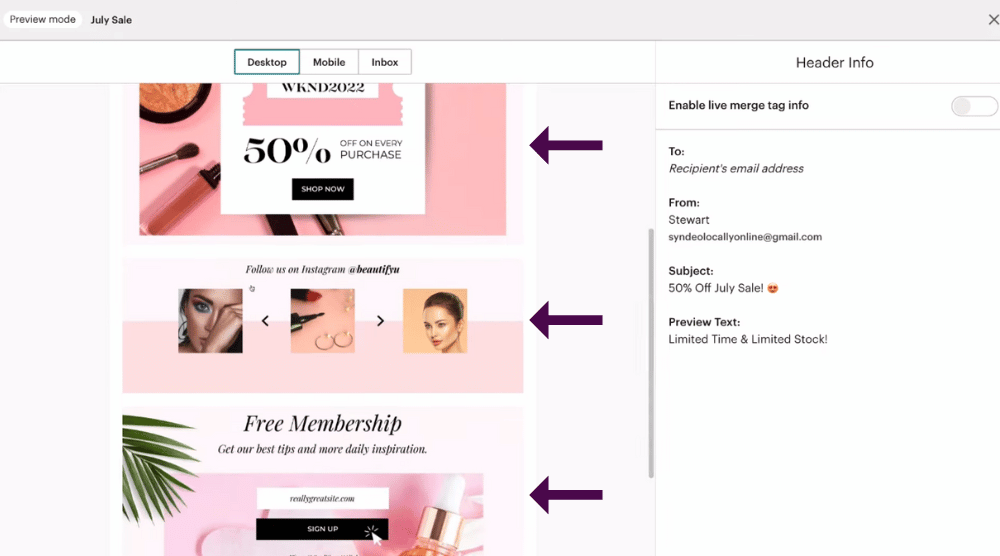
Here you can see what our final email campaign will look like (see screengrab).
We have our first section here (screengrab) that we linked to our online store.
Again, this means that when a contact clicks on this section, that’s going to take them to our online store.
Let’s say they open our email and then click on this second section here (see screengrab), that’s going to take them to our Instagram page.
Below that, if they click on the third section of our email campaign, that’s going to take them to a landing page that we added.
Now, before you go ahead and make your email campaign live, you want to make sure your campaign is responsive on both desktop and mobile:
- Simply click ‘Desktop’.
- Click ‘Mobile’.
Once you’ve done that and are happy with how everything looks:
- Exit out of this.
- Click ‘Continue’ in the upper right-hand corner.
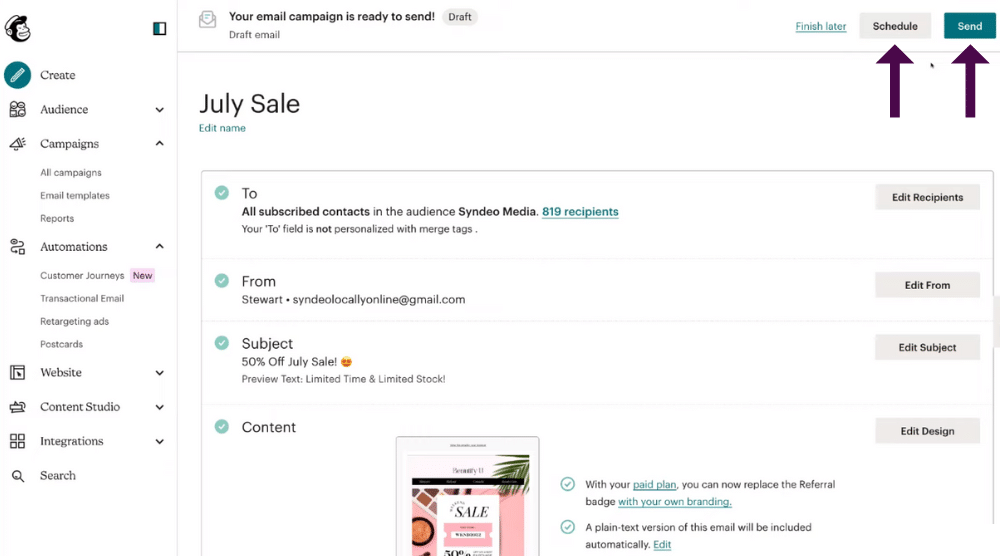
When you’re ready to send your email campaign:
- Simply navigate up to ‘Send’ in the upper right-hand corner. To send your campaign now.
Alternatively:
- Click ‘Schedule’ to schedule your email campaign to be sent at a later date.
It really is as simple as that!
And that is a quick and easy example of how to create an email campaign in Canva and then use that campaign within MailChimp to send as an email campaign to all your contacts!
Canva Email Marketing for Small Business (Video guide)
We have come to the end of this brief Canva and MailChimp email marketing for beginners tutorial, helping you design, create and launch your first email campaign!
We hope this email marketing for small business tutorial has given you the confidence to create and execute successful campaigns for your small business.
If you’d like more information, you can watch our full video guide on how you can use Canva and MailChimp to create professional and stunning email campaigns below!
