In this blog, we will dive in and teach you how to add WhatsApp live chat on WordPress so you can easily engage with your customers on your website.
If you haven’t heard of WhatsApp live chat, you’re website is truly missing out!
WhatsApp is a centralized, popular instant chat application with over 2 billion users worldwide globally.
In fact, many countries use WhatsApp as their main communication platform over text messages and other chat applications such as Facebook messenger.
With WhatsApp, you’re able to message, call or video chat anyone from anywhere in the world as long as you have access to the Internet, making it a lot cheaper and easier to get in touch with friends and family.
In addition to being able to use WhatsApp for personal communication, it is also ideal for small businesses wanting to connect with their customers or potential customers.
Read more: How to add Facebook Messenger to WordPress
How to Add WhatsApp Chat to WordPress?
Did you know you can now connect WhatsApp chat to WhatsApp business on your website so visitors can instantly chat with you through your WordPress website?
Say goodbye to constant email trains back and forth or long and costly phone calls!
As Whatsapp is used widely around the globe, this means that by adding Whatsapp to your WordPress website, visitors are able to easily get in touch with you no matter where they’re based.
We’re going to walk you through the simple steps explaining how to add WhatsApp Chat to your WordPress website through a professional and straightforward live chat feature that is easily recognized directly on your WordPress website.
Let’s delve in and add WhatsApp chat to your WordPress website!
Read more: Best WordPress hosting for small business
1. Getting started with WhatsApp live chat
The first step in learning how to add WhatsApp chat in WordPress is to log in to the backend of your WordPress website.
Don’t have a WordPress website?
Check out our complete WordPress tutorial for beginners here.
Once you’re inside the backend of your WordPress website:

- Click ‘Plugins’ on the left-hand sidebar.
- Select ‘Add new’ from the drop-down menu.
- In the ‘Search plugins’ search bar, type in ‘Joinchat’.
2. How to Install WhatsApp live chat plugin
That’s going to bring up the ‘Joinchat’ plugin (see screengrab).
This is a trustworthy and popular plugin with over 500,000 active installations.
Before we continue with this tutorial on how to add Whatsapp chat to WordPress, we strongly recommend you back up your WordPress website before installing the WhatsApp ‘Joinchat’ plugin (or any other plugin you want to install).
Although not essential, we always advise doing this, as some themes or plugins can clash with each other, causing your website to crash and go down.
Don’t worry though, this process is east and completely free to do!
If you’re unsure how to do this, check out our tutorial on how to back up your WordPress website here.
Once you’ve backed up your WordPress website:

- Click ‘Install now’ next to the ‘Joinchat’ plugin.
- Select ‘Activate’.
3. Joinchat settings
Once you’ve installed and activated Joinchat, you’re ready to configure and customize the plugin settings to your liking.

- Head back over to the left-hand sidebar.
- Find and select ‘Join chat’.
- Within ‘Joinchat’ under ‘General’, add in your WhatsApp phone number next to ‘Telephone’.
- Click ‘Test number’ to test your number and make sure it’s working correctly.
Make sure the phone number you added is the same one you use for your WhatsApp business account.
Now, it’s ideal to have WhatsApp business set up instead of the regular WhatsApp application you use for personal use.
This is because they have a lot more features specifically for businesses.
In other words, WhatsApp business is just a business version of WhatsApp.
This powerful tool is relevant for all types and sizes of businesses, allowing them to personally communicate and engage with their customers and drive and manage their sales or products.
Don’t have WhatsApp business set up?
Check out our tutorial on How to use Whatsapp for Business.
Next:
- Add a predefined message under ‘Message’.
This is the first message that the user can send to you.
We’re happy with this predefined text (see screengrab).
Don’t worry too much about this if you’re not too sure what your predefined message should be, as you can always come back and change this message later on.
Once you’ve done that:
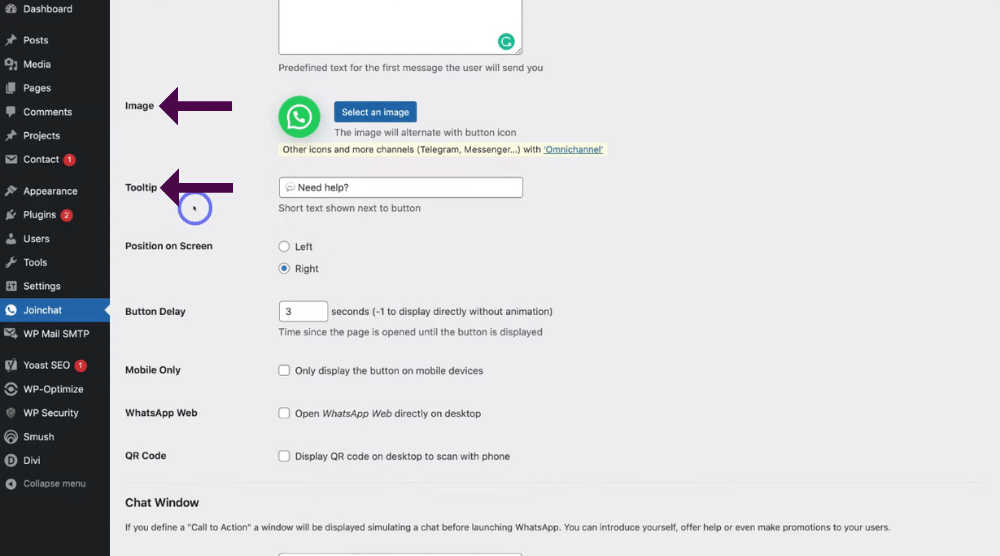
- Below ‘Image’, click ‘Select an Image’ to choose the icon button that you want to display on your website pages.
Alternatively, you can leave it as the default image (see screengrab).
- Below ‘Image’, you’ll see ‘Tooltip’.
Basically, this is a short text shown next to the icon button just mentioned.
We’re happy with the default text ‘Need help’, however simply type in a new text relevant to your business if you’d like.
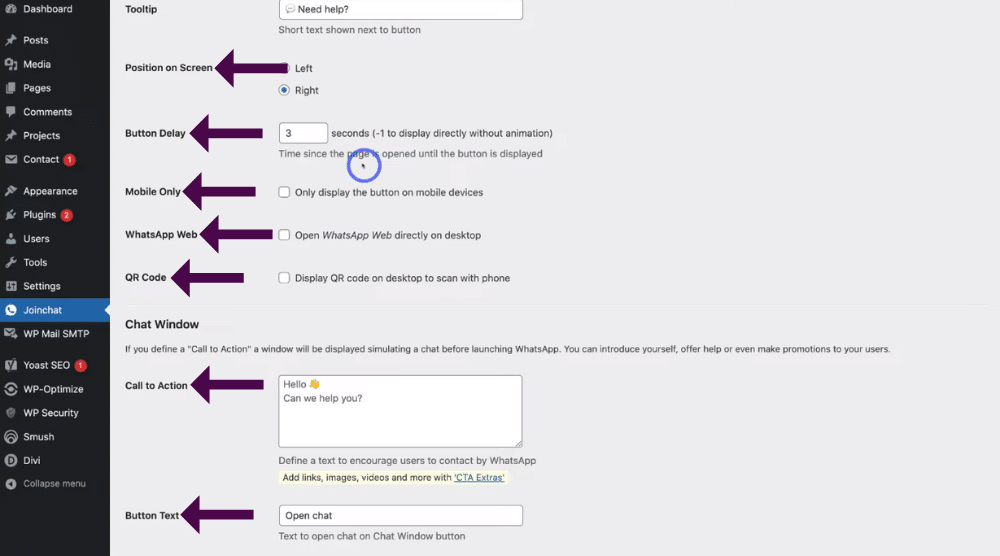
- Choose ‘Left’ or ‘Right’ below ‘Position on the screen’.
This means your WhatsApp icon button will display either on the left or right-hand side of your website pages.
We’re going to display ours on the right-hand side.
- Below this, you can add a ‘Button delay’.
This indicates when the WhatsApp button will appear on the screen after the page has been opened.
For example, we have ‘three seconds’ selected at the moment, meaning the WhatsApp icon button will display three seconds after the visitor opens the page.
Simply change this to your liking.
- Under ‘Button Delay’, select ‘Mobile Only’ to display the button only on mobile devices (see screengrab).
- Next, click ‘WhatsApp Web’ to open WhatsApp web directly on your desktop.
We’re going to leave these unticked, however, feel free to tick or untick these options as required for your small business.
- Below ‘WhatsApp Web’, you can add a QR code that will display on the WhatsApp web version.
This means that people can scan the QR code using their phone to get your WhatsApp number.
Take the time to go through all these settings and customize them to suit your business’s needs.
However, it’s important to note you can always come back to join the chat and change these later on.
You can read our beginner’s guide on How to Create a QR code for free with Canva
Once you’re happy with these settings:
- Come down to ‘Chat window’.
- Under ‘Call To Action’, you’re able to add a call to action to your WhatsApp live chat.
Additionally, here you can also use these placeholders in your call to action message.
This is used to try and encourage visitors to start a WhatsApp chat with you when they’re on your website.
You might want to use this as a place to promote your products, services, or business, or add your name, talk about offers, or more!
However, for the purpose of this how-to add WhatsApp live chat on the WordPress guide, we’re going to leave the default message as is.
When you’ve added your call to action message:
- Simply type your preferred button text next to ‘Button Text’.
This is the text that opens the chat on the chat window button.
We’re happy with the default ‘Open chat’ button text.
However, you can change this to anything relevant to your specific business.
Next, you can choose a theme color for your WhatsApp live chat.
To do that:
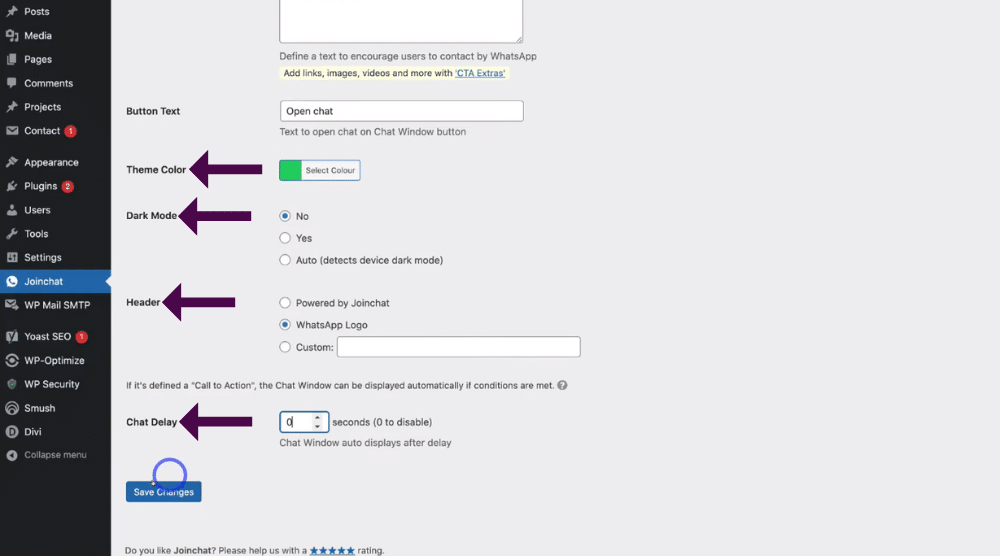
- Select a theme color next to ‘Theme Color’.
This is the WhatsApp default theme color (see screengrab).
- Below ‘Theme Color’, you can turn on or off ‘Dark mode’.
Basically, this really depends on your personal preference.
If you switch dark mode ‘On’, it changes the WhatsApp screen to a dark theme color.
Next:
- Below ‘Header’, you can choose a header (see screengrab).
We’re going to tick ‘WhatsApp Logo’.
- Come down to ‘Chat delay’.
- Add ‘Zero’.
- Click ‘Save changes’.
And that brings us to the end of the settings you can customize under ‘General’.
Once you’ve made all your general setting changes:
- Scroll back up to the top of the page.
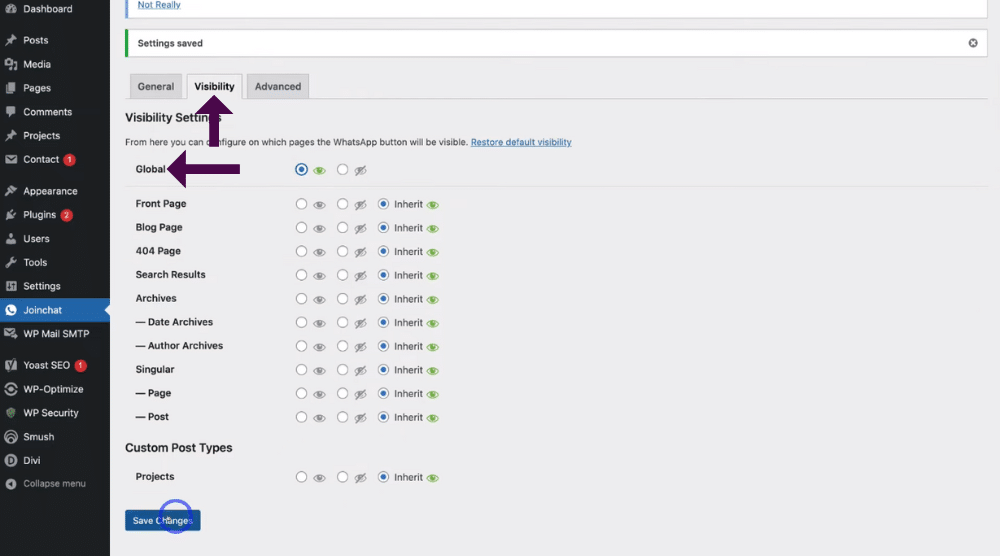
- Click ‘Visibility’ next to ‘General’.
This is where you’re able to select what website pages you want this WhatsApp chat button to show up on (see screengrab).
If you want your WhatsApp live chat button on all pages of your website:
- Simply select the eye icon next to ‘Global’.
You’re able to scroll down and select specific pages you want the WhatsApp chat button to appear on, however, we recommend having the button appear on all pages.
Next:
- Click ‘Save Changes’ at the bottom of the page.
And just like that you’ve finished setting up your WhatsApp chat button and WhatsApp live chat!
Read more: How to create a WordPress website with Elementor Cloud
4. How to test the WhatsApp button
Now we’re going to continue this tutorial on how to add WhatsApp in WordPress and walk you through how to test out your WhatsApp chat on your website.
Follow the steps below to find out how:

- Head over to the front end of your website.
- You should notice that after a few seconds, the WhatsApp chat will show on your website (see screengrab).
- Click the WhatsApp chat button icon.
You’ll then notice the WhatsApp interface will pop up (see screengrab).
- Select ‘Open chat’.
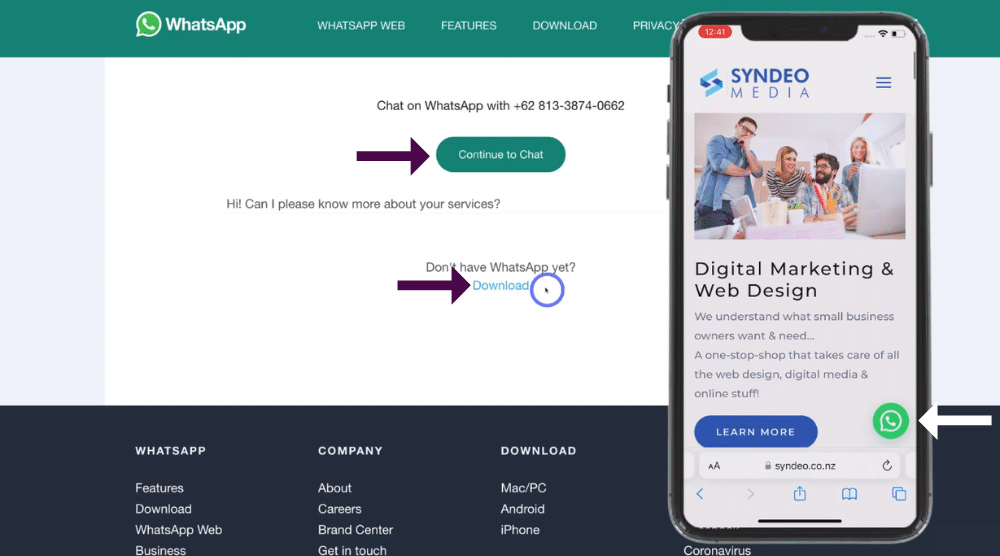
That’s going to take the website visitor here (see screengrab).
- All they need to do is click ‘Continue to chat’.
They’ll then be able to easily chat with you via WhatsApp!
Now if the visitor doesn’t already have WhatsApp installed, they can click ‘Download’ to install it.
In 2023, almost 60% of all searches online are through mobile devices, meaning it’s so important to have your WhatsApp chat button set up for mobile (we explained this process earlier) so people can contact you through their smartphone.
This is how visitors will see the WhatsApp chat button on their mobile devices (see screengrab).
Read more: How to create a Mobile app for free
5. Chat issue solution
It’s important you test out the WhatsApp live chat button and if it’s working correctly, as there’s sometimes a chat issue solution where it doesn’t generate the WhatsApp interface as we explained above (when you click on the WhatsApp button).
But don’t worry, this can be easily fixed!
There’s a simple and small trick you can do within the back end of your website to enable this pop-up interface.
Follow the steps below to fix this technical issue and enable this pop-up:

- Go back to the back end of your WhatsApp plugin.
- Under ‘General’, scroll down to ‘Call To Action’.
- Remove this Emoji (see screengrab).
- Click ‘Save changes’ at the bottom of the page.
- Refresh your website page.
- Check the chat is working properly.
This should solve that slight issue which we suspect is just a small bug in the system.
Hopefully, this gets sorted soon and isn’t an issue for much longer.
And that concludes everything we wanted to share in this beginner’s tutorial on how to add WhatsApp live chat on a Wordpress website using the free WhatsApp plugin called Joinchat!
Read more: Top 10 website builders for small business.
How to add WhatsApp Live chat to WordPress – Video
You should now be well equipped in this process, and are now ready to start communicating with your customers with this popular online chat platform right within your WordPress website!
By installing this simple WordPress WhatsApp live chat plugin, you’ll notice your business will start to gain more potential leads and customers, with more people being able to easily get in touch with you using WhatsApp.
WhatsApp live chat on your website will help eliminate costly phone calls for international customers, messy emails back and forth, and long phone calls or wait times.
Feel free to watch our video guide below if you have any queries on how to add WhatsApp chat in WordPress.
