Do you run a local business and want to learn how to add Google reviews in your WordPress website?
In this Google reviews on WordPress tutorial, we’re going to show you how to add and show your Google reviews from your Google Business Profile right onto your website in just a few minutes using a popular Google reviews widget.
By doing this, you should drive more leads and sales to your online business and brand!
Read more: How to delete negative Google reviews
What is Google Business Reviews
Google business reviews are an extremely important tool that any local or international business with an online presence should leverage.
Essentially, a Google review is when someone writes a review about your brand’s product or service on Google.
That review will then show up on Google search, meaning other people who are searching for your business online can see your other reviews through your Google Business Profile.
These reviews are imperative and provide essential information about your business to other potential customers that are searching online.
When people see other positive reviews, they’re more likely to click on your website, call your business or visit your physical location!
Did you know, over 60% of consumers use search engines to research a product before buying it and 70% of people actually believe in other people’s opinions over advertisements?
That’s precisely why these reviews are so powerful.
In addition to this, Google business reviews are great for SEO (search engine optimization) and Google rankings.
Read more: How to add your local business to Google Business Profile
How to add Google reviews in the WordPress website
By having your Google reviews on your WordPress website, you’ll immediately gain social proof to your website visitors, as well as drive more leads, sales, and phone calls.
1. Getting started with Google reviews on WordPress
The first step to learning how to add Google reviews to your WordPress website from your Google Business Profile WordPress is to log into your WordPress website.
Don’t have a WordPress website?
Check out our ultimate WordPress beginners guide here.
2. How to install the Google Reviews plugin

Once you’ve signed up and signed into your WordPress website:
- Click ‘Plugins’ on the left-hand sidebar.
- Select ‘Add new’ from the drop-down menu.
- Type in ‘Google reviews’ in the ‘Search plugins’ search bar.
- Find the Plugin for Google reviews plugin by RichPlugins.
This plugin has over 100,000 active installations and an overall 5 star review rating, so make sure you pick the correct one! (see screengrab).
However, before you download this Google reviews plugin, it’s important to note that it’s best practice to back up your WordPress website before installing and updating ANY plugins or themes.
This is because some plugins or themes can clash together and as a result break your website!
You can read our blog on How to backup your WordPress website
When you’ve backed up your WordPress website:
- Select ‘Install now’ on the plugin.
- Click ‘Activate’.
3. How to add a new Google reviews display widget to WordPress

Next, once you’ve installed and activated this Google reviews plugin, you’ll be redirected to the ‘Google reviews widget’ section within this plugin.
- Type in the name of your widget in the ‘Enter your widget name’ field.
- Click ‘Save and update’.
For the purpose of this tutorial on how to add Google reviews to your website, we’ll call our widget name ‘Google reviews home page’, as we want to add our Google reviews to the homepage of our website.
4. Local Google Business Profile
Now you’re ready to connect Google to your WordPress website!
The first step to do that is to find your ‘Place ID’, which is your Google Business Profile listing.

To find your place ID:
- Open your browser.
- Type in your business name in the search bar.
- Find your Google Business Profile listing.
- Click ‘Google reviews’ on your listing (see screengrab).

- Right-click ‘Write a review’.
- Select ‘Inspect’ from the drop-down menu.

- Find ‘data-pid’ within the code.
- Right-click on the piece of code next to ‘data-pid’ (see screengrab).
- Click ‘Copy’.

- Head back onto your Wordpress website and right-click on the ‘Place ID’ field.
- Simply click ‘Paste’ to paste that bit of code you just copied.
- Select ‘Choose language if required’ and select your preferred language from the drop-down list.
For the purpose of this Google Reviews on WordPress website tutorial, we’re going to select English.
- Click ‘Connect Google’ below this.
And that is how easy it is to connect this Google reviews plugin and Google Business Profile to your WordPress website!
You can now see all your Google business reviews down here.
Read more: Google sites vs Google My Business website builder
5. How to customize plugin review layout

The next step is to customize the layout of your Google reviews when displayed on your website.
How To Add Your Google Business Reviews
- Click ‘Layout’ on the right-hand side bar.
- Simply select ‘List’ or ‘Slider’ view.
For the purpose of this guide on how to add Google reviews to a WordPress website, we’re going to select the ‘Slider’, meaning the reviews will show up in this view as opposed to a list (see screengrab).
- Below this, select ‘Common options’.
- Under ‘Maximum characters before ‘read more link’, you can change the maximum characters before you see ‘Read more’ on each review
However, we like the layout of how many characters are shown before people click ‘Read more’.
Below this, you’ll see a few options you can tick or untick to remove particular items or buttons from your Google reviews on your WordPress website (see screengrab).
We’re going to keep these all unselected.
You can change the speed of the slider (the amount of seconds people have to read the review before the next review moves across the page).
To change this:
- Select ‘Slider options’.
- Type in your preferred slider speed below ‘Speed in second’.
We’re going to change this to ‘10 seconds’.
Next:
- Change the height of the text within the review if you like below ‘Text height’.
However, we’re happy with the default text height of 100px.
Below that:
- Tick or untick ‘Hide background’ to hide the background.
- Select or deselect ‘Hide prev & next buttons’ if you want.
For easy user navigation, we recommend keeping this option unselected.
- Tick ‘Hide dots’ if you want to hide the 3 dots below the reviews.
However, again we advise keeping these dots as it’s better for user navigation!
- You then have ‘Style options’ (see screengrab).
- Here you can change the ‘Container max-width’ and
- Choose a different ‘Container max-height’ if you wish.
- You can also change other basic options down here and more advanced options.
However, if you’re not too sure how you want to customize and display the layout of your reviews on your WordPress website, don’t worry!
You always have the ability to return back to these customization settings if you want, or if you change your mind about how you want something to look.
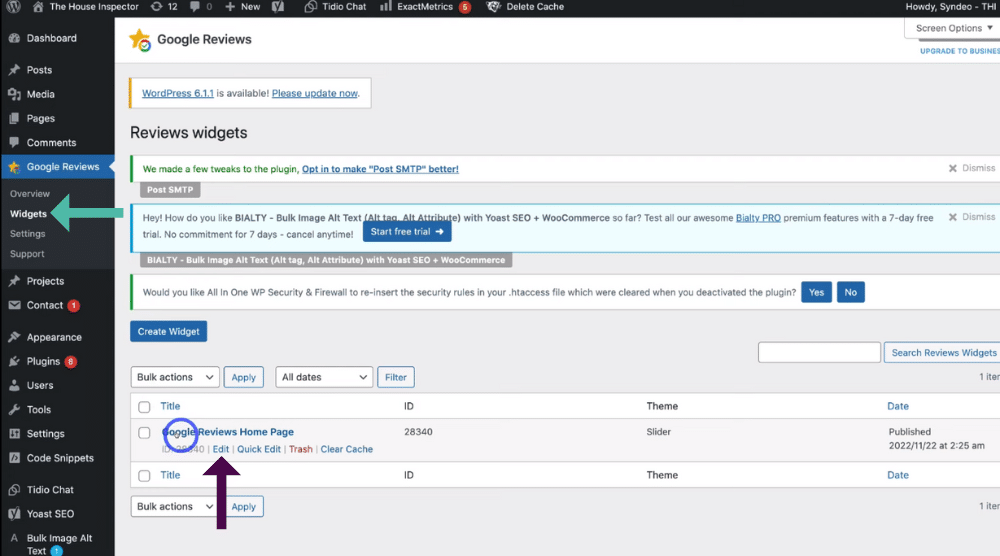
To do this:
- Select ‘Widgets’ on the left-hand side bar.
- Find the widget you created.
Remember, ours was the ‘Google Reviews Home Page’ (see screengrab).
- Click ‘Edit’.
That’ll then take you back to your widget where you can always change how your Google review widget looks.
We actually really like how the default layout looks, and have chosen to only change the slider speed duration.
Once you’re happy with any changes you’ve made:
- Click ‘Save and refresh’.
6. How to copy Shortcode
You’re now ready to show your widget on your website!

Follow the steps below to find out how:
- Right-click the shortcode next to your widget name (see screengrab).
- Click ‘Copy’.
- Select your website name in the very upper left-hand corner.
- Click ‘Visit website’.
Now, let’s show you how to display your widget on your WordPress website with the different page editors and themes within WordPress.
7. How to add Google reviews with Divi
First, we’re going to show you how to add Google reviews in the Wordpress website if you’ve used the Divi theme to build your website pages.

To do that:
- Click ‘Enable Visual Builder’ at the top of your Divi website.
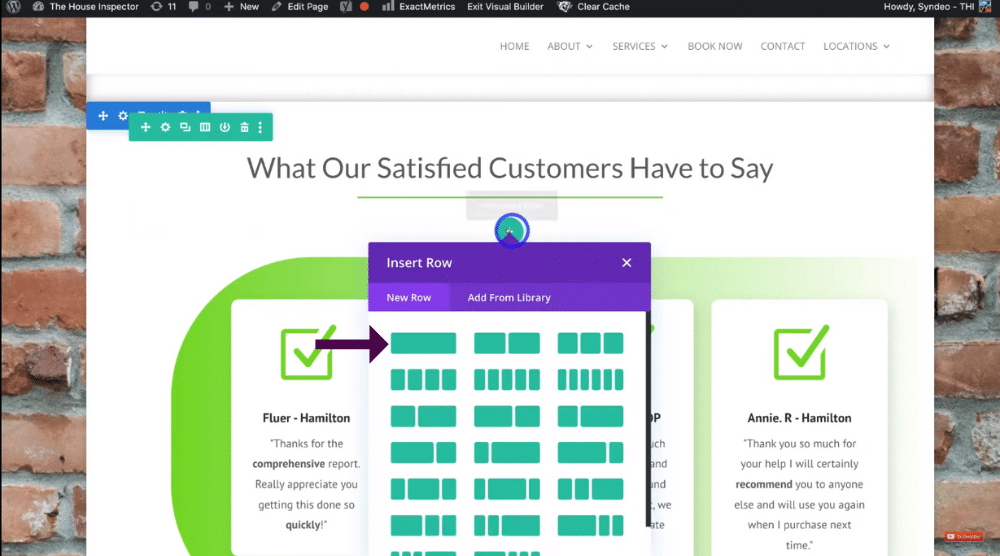
- Find the section of the page you want your Google reviews to show up on.
- Click ‘Add new row’ on this section (see screengrab).
- Select a full row from the row options.
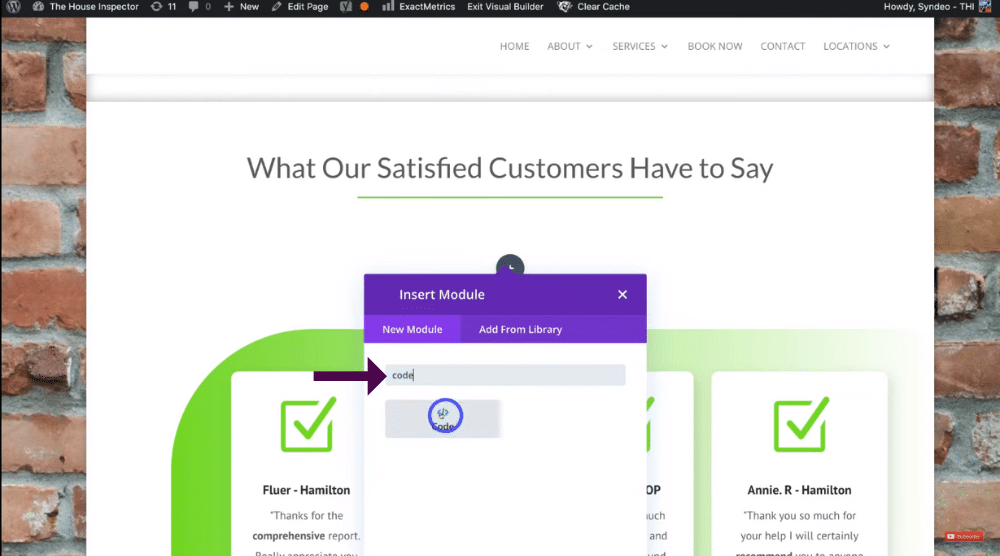
- Click ‘Add New Module’
- Type in ‘Code’.
- Select ‘Code’.
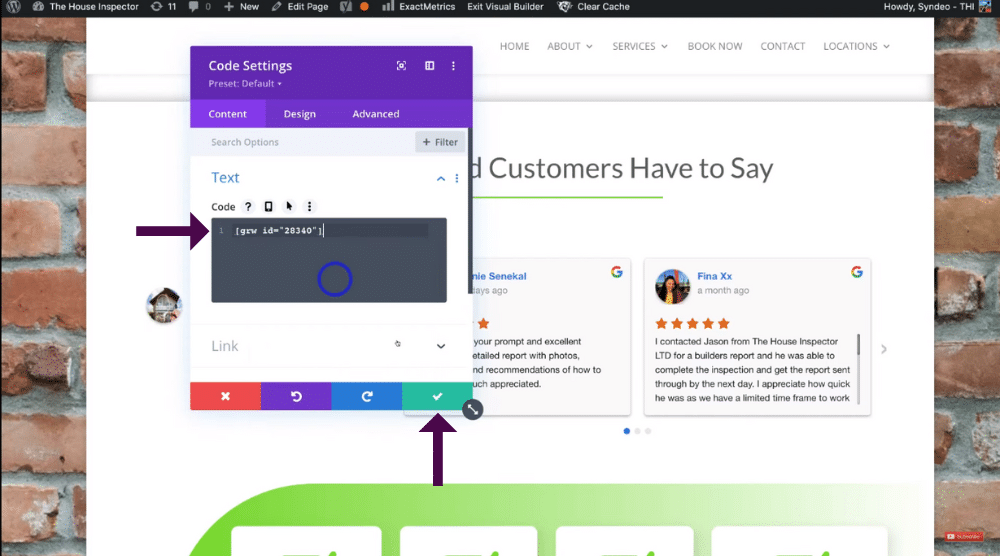
- Paste in the code you just copied in the field below ‘Code’.
- Click the green tick.
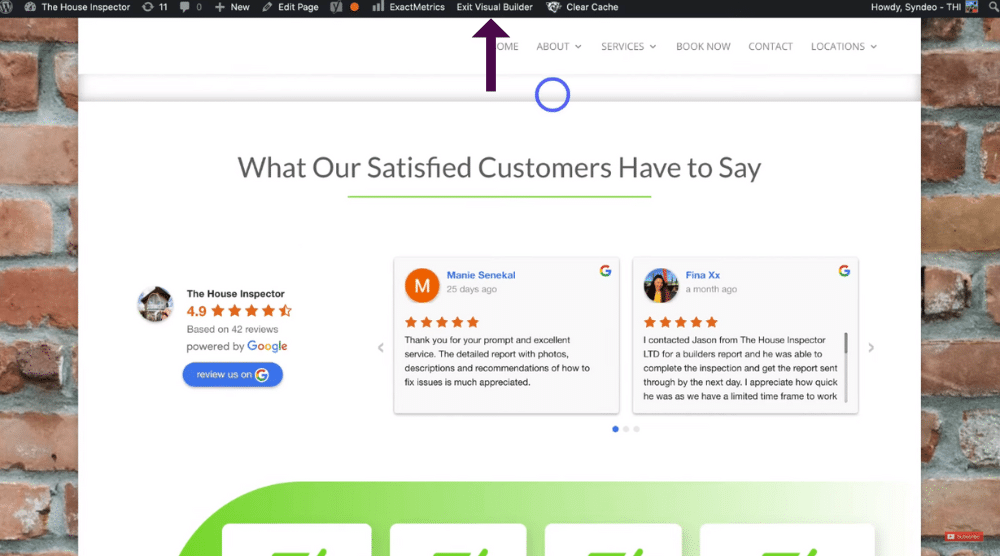
And as you can see, we’ve now added our widget in this space! (see screengrab).
- Click the three dots at the bottom of the page.
- Select ‘Save’ in the bottom right corner.
Next, you can test your new Google review widget.
You can do this by:
- Exiting out of the visual builder.
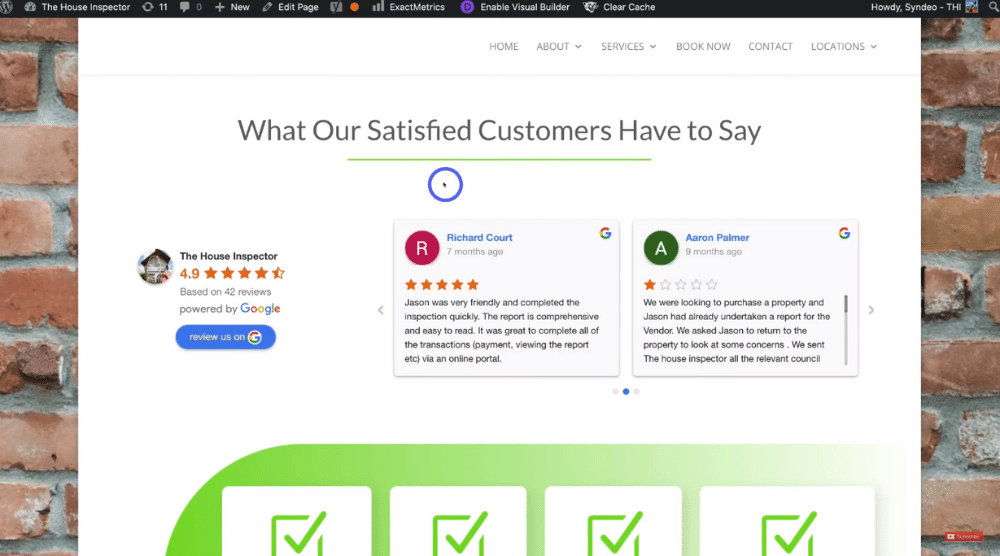
- Heading back onto the page you added your reviews onto.
- Scroll down to the section you added the Google Reviews widget
- Simply check everything looks correct.
- Make sure the links and buttons work correctly and that you’re able to navigate through and read each entire review.
And that’s all you need to do to connect your Google reviews widget to your WordPress website using Divi.
Read more: How to use Divi in WordPress
8. How to add Google reviews with Elementor
Now if you’ve built your website with Elementor and want to learn how to add Google reviews in your WordPress website:

- Head onto the website page you want to add your reviews to within the Elementor editor.
- Click the ‘+’ button (see screengrab).
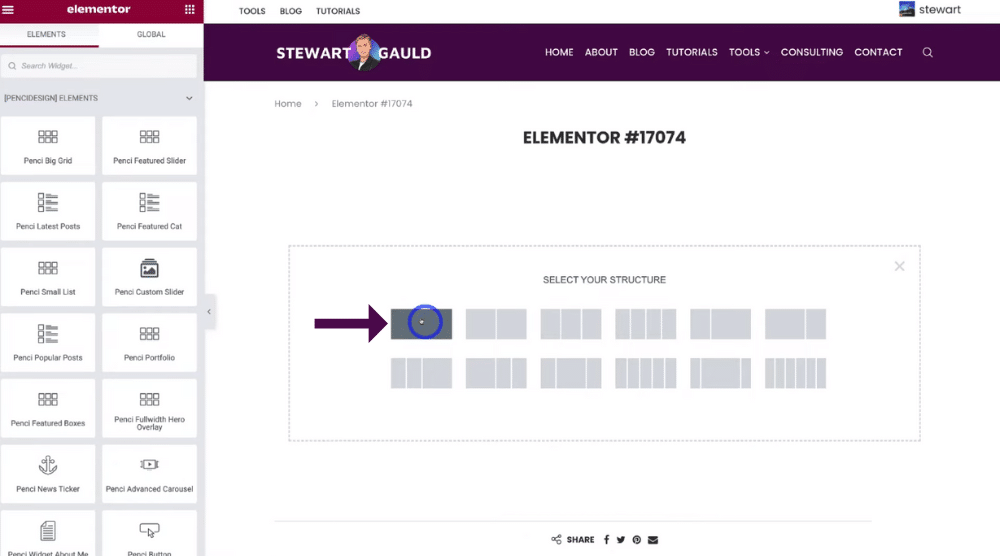
- Select a structure you like.
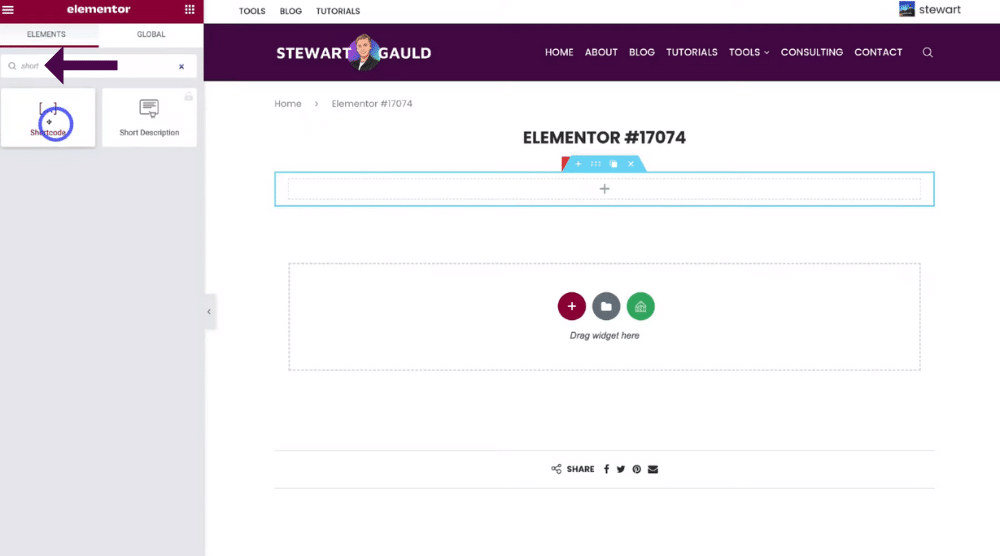
- Click on the ‘+’ section.
- Navigate over to the left-hand sidebar.
- Type ‘Shortcode’ in the ‘Search Widgets’ search bar.
- Click on the shortcode.
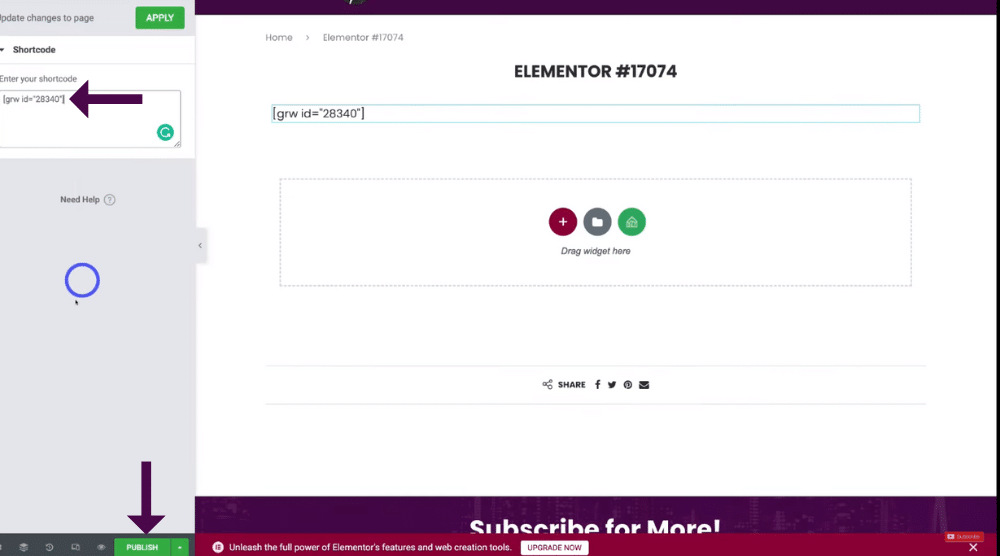
- Drag the shortcode onto the section within your website page (see screengrab).
- Paste the Google reviews widget you copied earlier under ‘Enter your shortcode’ on the left-hand sidebar.
- Click ‘Publish’.
And your Google review widget will now appear on your WordPress website!
Read more: How to create a website using Elementor Cloud
9. How to add Google reviews with WordPress Editor
If you just use the WordPress editor to create your website pages, follow the steps below to learn how to use this:

- Click the + ‘Add block’ button in the upper left-hand corner (see screengrab)

- Type ‘Shortcode’ in the search bar.
- Drag that shortcode element into the place you want your reviews to appear on (see screengrab).

- Paste the shortcode you copied earlier.
- Select ‘Preview’ in the upper right-hand corner to preview your Google reviews widget.
- Click ‘Publish’.
You’ll then find your Google reviews have now been published on your WordPress website!
And that is how simple it is to add the Google reviews widget to your WordPress website with Divi, Elementor, and the standard WordPress editor.
Read more: Divi vs Elementor comparison guide
Full video guide – How to add Google reviews in WordPress website
We’ve now shown you everything you need to know to add your Google reviews from your Google Business Profile directly into your WordPress website.
You’ll find that by simply adding this widget to your website, your website will gain social proof, authority and credibility online, and as a result, you’ll find your business will naturally gain success and grow online!
You can check out our full video guide on this process below!

