Do you have an online store and want to learn how to connect Google Search Console to Shopify?
In this Shopify Google Search Console setup guide, you’ll learn just how easy it is to connect Google Search Console to Shopify.
By doing this, you’ll be able to effectively measure how well your website is organically performing within Google search!
Read more: Best website builder for an online store
What is Google Search Console?
Google Search Console is a free Google service that let’s businesses track, strengthen and optimize their website.
This incredible platform allows you to track the amount of organic search visibility and the performance of those organic searches within Google.
In addition to this, you can identify and fix any errors your website may have through this dynamic free Google product.
As a result, your website, business and brand will become more credible and authoritative within the digital world!
Read more: How to get started with Google Workspace
How to connect Google Search Console to Shopify?
Let’s dive right in and show you how to set up Google Search Console for Shopify and your online store.
1. Get started with Google Search Console

To get started with Google Search Console and Shopify, you’ll first need to sign up and sign into your Google Search Console account.
Don’t have a Google Search Console account? Check out our beginner’s guide here.
Follow the steps below to sign into your Google Search Console account:
- Type ‘Google Search Console’ on your browser.
- Sign in with your Google account.
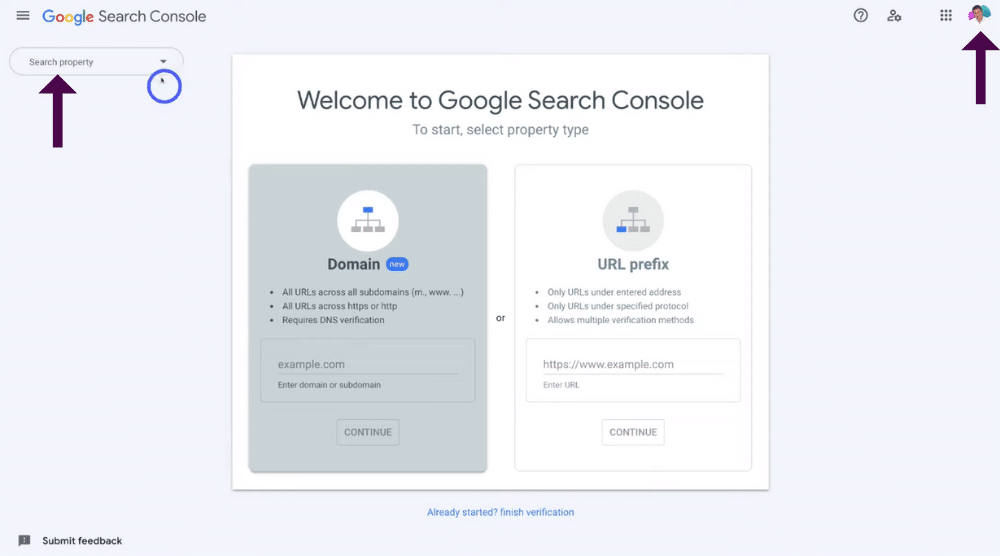
Before you go any further, it’s important to ensure you have selected the correct Google account! (see screengrab).
When you’ve checked that:
- Click ‘Search property’ on the left-hand side of the page.
- Select ‘Add property’ from the drop down menu.
- Add your Shopify store URL under ‘URL prefix’ (see screengrab).
2. Getting started with Google Search Console and Shopify
Next, you’ll need to login to your Shopify store (see screengrab).
Don’t have a Shopify store?
Make sure you watch our Shopify tutorial for beginners to learn how to set up your own online store through Shopify.
Once you’ve logged into your Shopify store, you’ll need to remove your online store password (if your website isn’t currently live for everyone).

To do that:
- Click ‘Online store’ on the left-hand side bar.
- Select ‘Preferences’ within ‘Online store’.
- Simply click ‘Remove password’ or
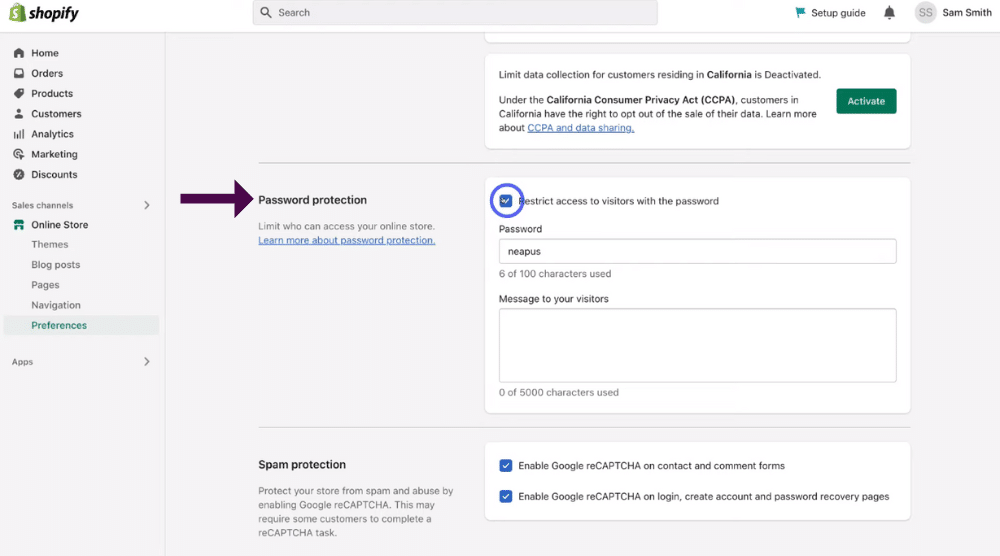
- Scroll down the page to ‘Password protection’.
- Untick ‘Restrict access to visitors with the password’ (see screengrab).
- Click ‘Save’ in the right hand corner.
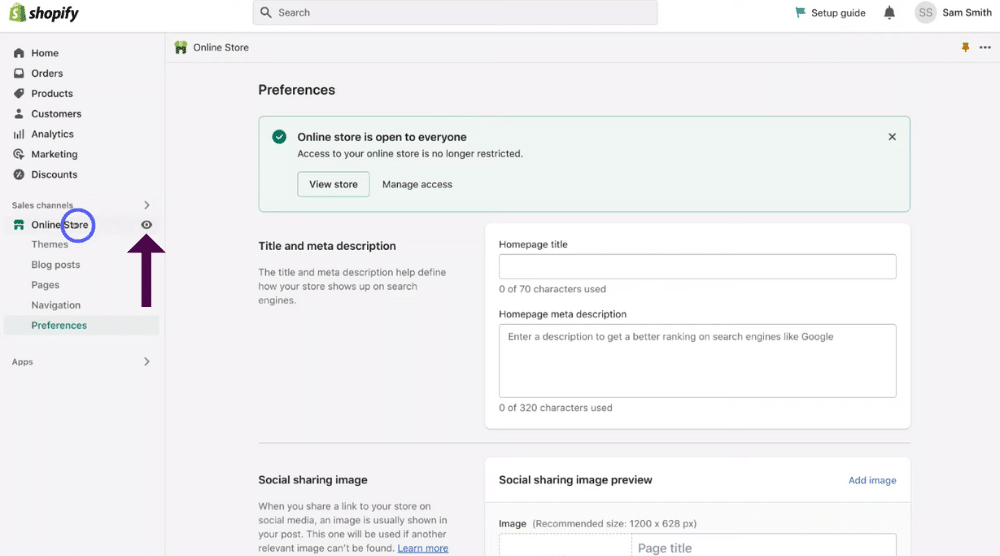
Next, you’ll need to head to your online store:
- Click ‘Online store’ again on the left-hand side bar.
- Select the ‘Eye’ icon.
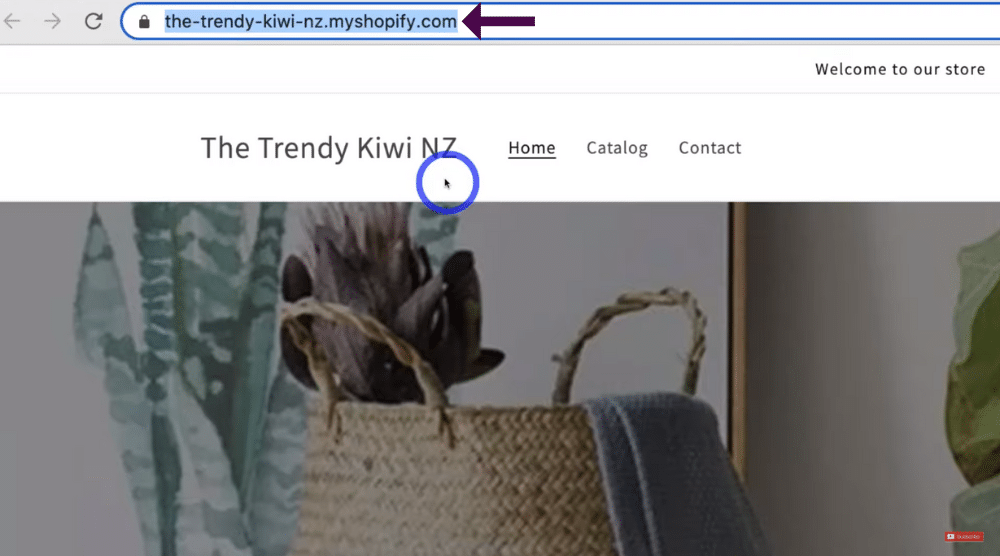
You should now be on your Shopify online store.
- Right click on your domain at the top of the page (see screengrab).
- Click ‘Copy’.
Our domain is the-trendy-kiwi-nz.myshopify.com, however, it’s important to note that it doesn’t matter if you have a proper domain!
You can read our blog on How to choose a domain name.
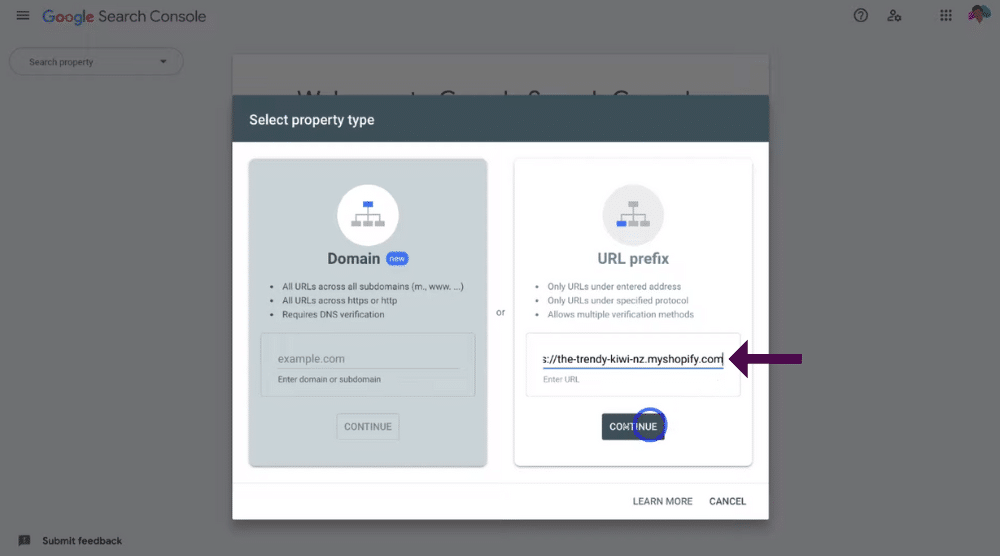
Once you’ve done that, you’ll need to paste in your URL back in Google Search Console:
- Head back to your Google Search Console account.
- Paste in your URL under ‘URL prefix’.
- Remove the ‘/’ at the end of your domain name.
- Click ‘Continue’.
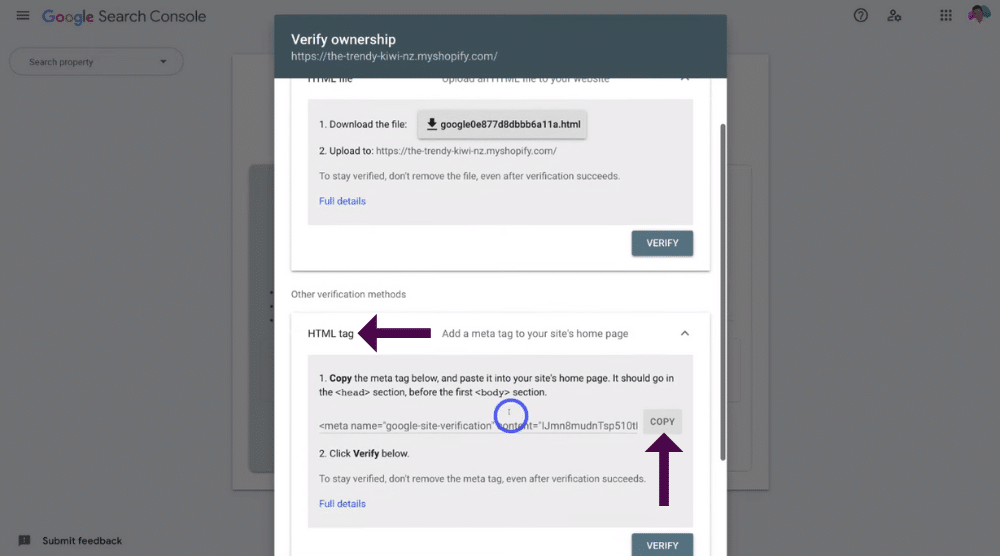
Next, you’ll need to add a meta tag to your Shopify store from Google Search Console:
- Select ‘HTML tag’.
- Click ‘Copy’.
That’s going to copy this meta tag (see screengrab).
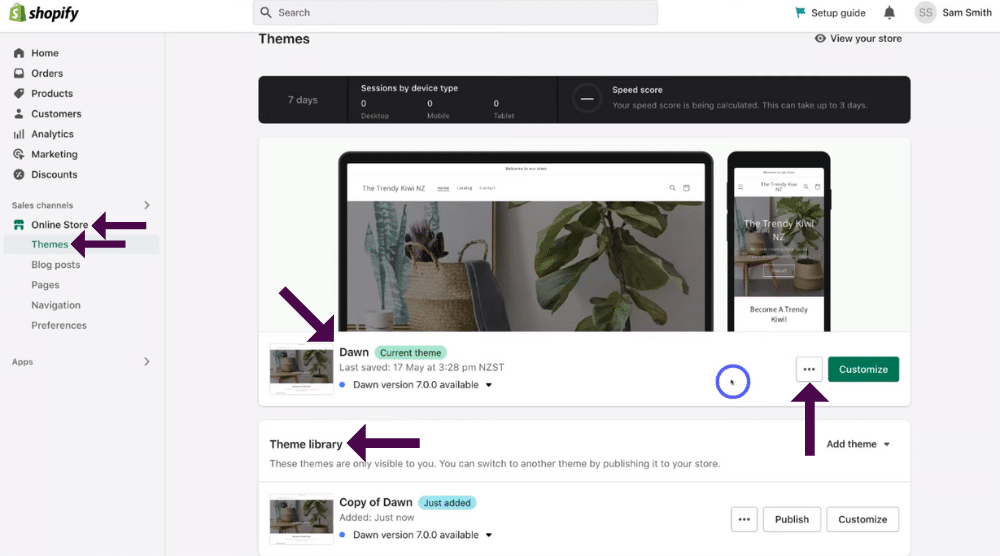
- Head back to your Shopify store.
- Click ‘Online Store’ again.
- Select ‘Themes’ under ‘Online Store’.
We currently have the ‘Dawn’ theme for our store (see screengrab).
Before you add the HTML tag (meta tag) into your theme tag:
- Click the three dots (see same screengrab).
- Simply select ‘Duplicate’.
That will make a copy and a backup of your theme in case you make any mistakes or any changes that don’t work with your theme when you change the code.
We strongly recommend you do this before making any changes to your theme!
You’ll notice this backup will be located under your ‘Theme library’.
Read more: How to connect Shopify to Facebook shop
3. How to edit theme.liquid
Once you’ve made a backup of your theme, you’re ready to add the HTML tag to the code of your theme!

To do that:
- Click those three dots you clicked earlier.
- Select ‘Edit code’.
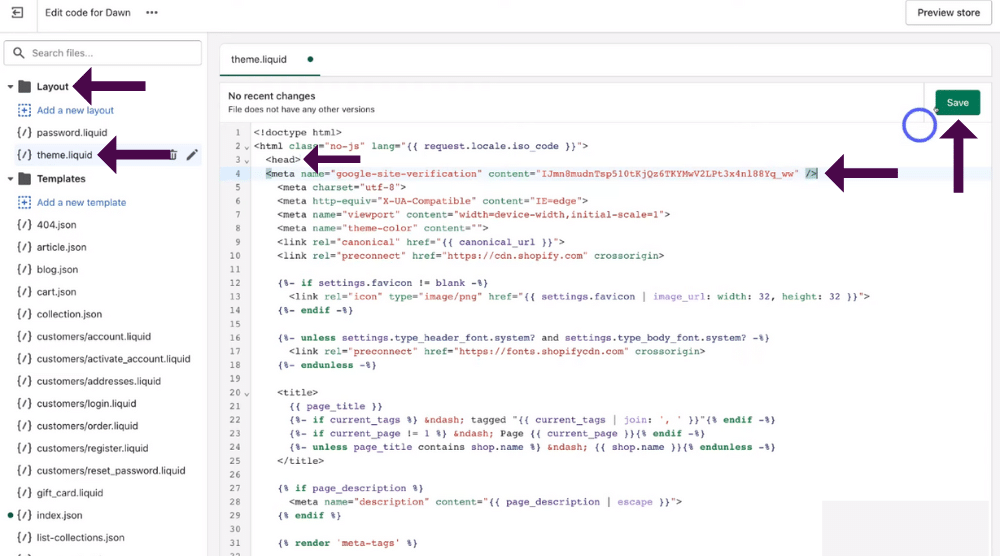
- Under ‘Layout’ on the left-hand side bar, click ‘theme.liquid’.
- Find ‘Head’ on the piece of code (see screengrab).
- Click enter on your keyboard.
This will add a space in your code.
- Paste in the HTML tag you copied earlier from the Google Search Console in this space.
- Click ‘Save’.
And that’s all you have to do to add the Google Search Console HTML tag into your Shopify theme, connecting your Shopify store with Google Search Console.
Read more: How to use Shopify for email marketing
4. Verify ownership of your domain
Once you’ve done that, you’ll just need to verify the ownership of your domain, then you’ll know exactly how to connect Google Search Console to Shopify.

Follow these steps to do this:
- Exit out of Shopify.
- Head back to Google Search Console.
- Find and click ‘Verify’ under ‘HTML tag’ (see screengrab).
The verification process then only takes a few moments.
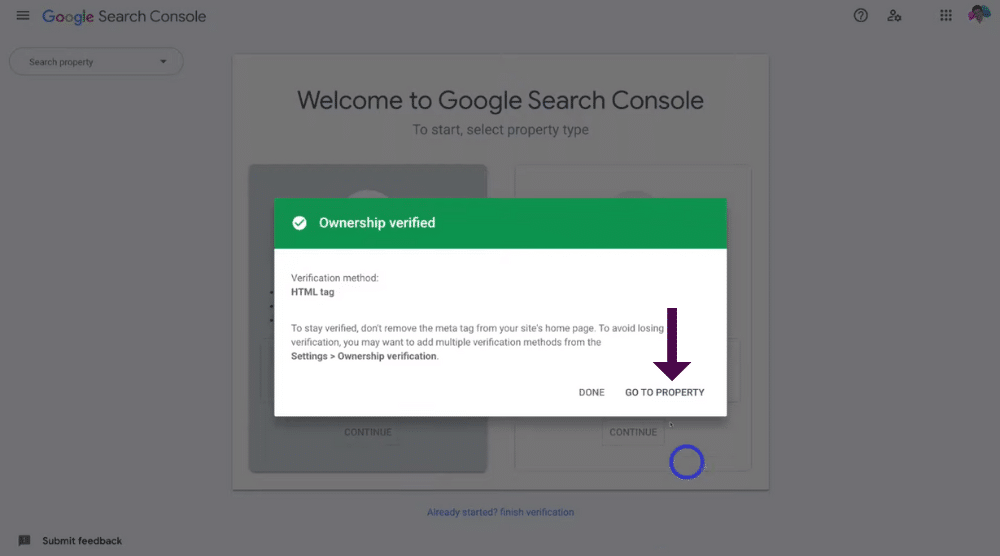
- You should then see this popup window to confirm your ownership if verified using the HTML tag (see screengrab).
- Click ‘Go to property’.
Now you can see the Google Search Console dashboard, where you’re now able to successfully measure your Shopify website’s performance on Google.
And that’s it!
You’ve now successfully learned how to install Google Search Console on Shopify.
Read more: How to install Facebook pixel to Shopify
How to Setup Google Search Console to Shopify (Video Guide)
That brings us to the end of this Shopify Google Search Console setup guide.
We hope you gained immense value in this tutorial on how to connect Google Search Console to Shopify.
You should now know how to connect these two incredible platforms together in just a few minutes to get the most out of your online store!
Watch our video tutorial on how to install Google Search Console on Shopify below.

