We are going to show you everything you need to know about how to use and set up Google Workspace during this tutorial on Google Workspace for small businesses.
If you want to enhance your team’s productivity, collaboration and performance, this is the tutorial for you!
We’re going to take a deep dive into all the essential features of Google Workspace in this guide for beginners, so you can make the most out of this amazing all-in-one business suite, right within your Google account.
What is Google Workspace?
As the name suggests, Google Workspace is another incredible platform offered by Google.
Essentially, they offer various different productivity, collaboration and communication applications for any business type or size, allowing users to create, share or collaborate with other team members – all in one place!
Some of these apps you may be familiar with, and include Google Docs, Google Drive, Google Calendar, Google Meet, Gmail, (Google Workspace email), Google Sites (plus more!)
These apps are super simple tools that enable you to create and share professional documents, spreadsheets, events, emails, calls, websites and more.
One of the biggest benefits we love about Google Workspace is that everything is found and stored in one place, reducing the amount of time friction spent jumping between products (such as Microsoft) or different online platforms.
Another plus is that everything is saved within the Cloud, meaning you don’t have to worry about where you saved what document or what the most up to date version is!
With that all said, can you use Google Workspace for small businesses?
Absolutely!
Google Workspace is the perfect platform for small businesses and we will show you why as we continue with this tutorial.
It really is a complete and dynamic all-in-one workspace that helps you streamline processes and increase productivity within your small business.
Read more: Top 10 MUST have digital tools for small business success.
How To Use Google Workspace?
The purpose of this how to use Google Workspace tutorial for small businesses is to walk you through all the essential tools and features of the platform, so you and your whole team can reap the benefits of using this complete business suite.
Let’s get started with Google Workspace!
1. Getting Started – Set Up Google Workspace

To set up Google Workspace:
- Simply type in workspace.google.com into your browser.
You’ll then arrive here (see screengrab).
Completely New To Google Workspace?
Check out our initial Google Workspace tutorial that shows you how to set up your domain name with Google Workspace, add your first business email, and how manage your payment plan.
Make sure you check that tutorial out first, then when you’ve signed up, signed in, and are ready to learn about all the essential Google Workspace features to get your business up and running with Google Workspace, head back to this tutorial on how to use Google Workspace.
2. Admin Home
Once you’ve signed into your account, you’ll need to log into your Admin panel:
- Simply click ‘Admin console’ on your Google Workspace homepage.

Alternatively, you can access your admin panel before signing in:
- Head over to your browser.
- Type in admin.google.com.
- Sign in from there.
That’s going to take you here (see screengrab).
Read more: Google Sites vs Google my Business website builder review.
3. What is Google Apps

Now that you’ve logged in, let’s continue setting up Google Workspace and actually find all these incredible collaboration, productivity, and communication apps within Google Apps:
- Click the dots in the upper right-hand corner of the screen (see screengrab).
- Navigate down the app list and find the app you’re after.
- Here you can scroll down to ‘Admin’, which will also take you to the admin panel.
Essentially, if you’re using any of these different apps, you’re able to always find your ‘Admin’ app here, as well as other Google Apps.
For example, to find and use your business emails:
- Click ‘Gmail’ from the app list.
As you can see, we only have one user that’s associated with this account (see screengrab).
However, each additional user that you add to your Google Workspace account also can access these apps and use these on a daily basis.
Some of these popular day-to-day apps include:
- Gmail is a Google Workspace email service which you can send and receive emails from.
- Google Drive is where you’re able to save and store all your documents and other media types within the cloud.
- Google Slides are multiple slides you can use for presentations.
- Google Sheets are data spreadsheets that you can both create and share with your team.
- Google Docs is where you can create, share and collaborate on word documents with your team.
- Google Calendar is for creating events or sharing events with your team.
- Google Chat is for messaging other team members.
- Google Meet is for video calls.
- Google Sites is where you’re able to create and build a free website.
- Google Forms is great for creating both forms and surveys that you’re then able to share with others.
Now we have some dedicated tutorials on some of these different apps that you can check out below if you want to learn more about each app.
You can watch our beginner’s guide on How To Add a Contact Form on Google Sites.
However, let’s continue with this essential guide for beginners on how to use and set up Google Workspace for small businesses.
4. How To Add New Users To Google Workspace

Once you’re inside your Google Workspace admin account, the first thing you’ll want to do is add your team members (users).
Think about your business and what team members need their own business email and a Google Workspace account, and that would benefit from all the features we’ve covered above.
To create and add new users:
- Click ‘Directory’ on the left-hand sidebar under your admin console.
- Select ‘Users’ from the drop-down menu.
‘Users’ is the place you can add, delete and manage all your users within Google Workspace.
As you can see, we only have one user (see screengrab) that we added when we first set up our Google Workspace account.
To add a new user:
- Click ‘Add new user’.
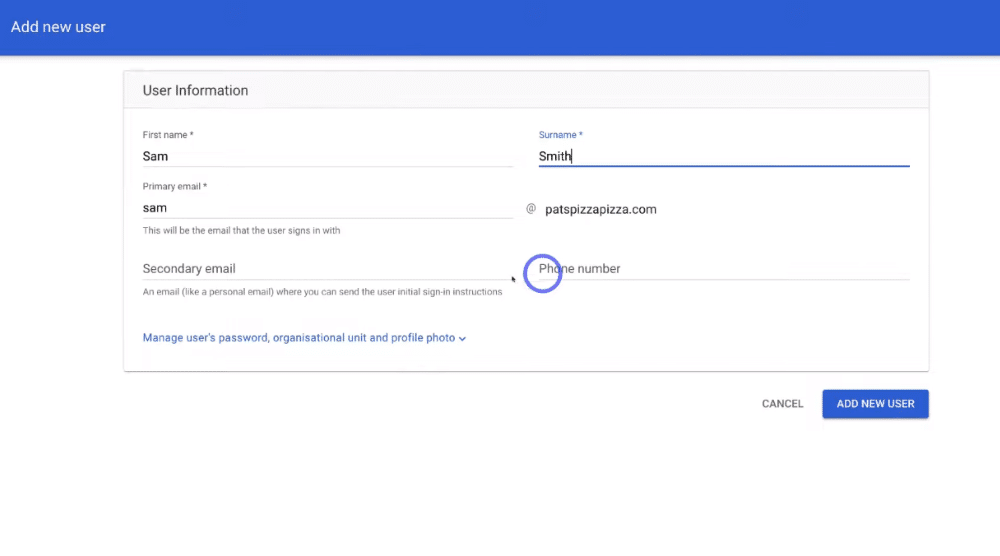
- Type in the team member’s first name below ‘First name’.
- Add their surname below ‘Surname’.
- Below ‘Primary email’, add the first name of the user.
You’ll also see the domain name (see screengrab).
So for example, our new user’s email will be sam@patspizzapizza.com
Read more: How to set up an automatic out of office reply in Gmail.
5. Primary Email vs Email Alias

If you’d like to add a sales, admin, or help business email for your users as well as their primary email, don’t worry!
You can do this by setting up email aliases for each individual user (we’ll show you how to do this in a moment).
Google Workspace email actually lets you set up a crazy 30 email aliases per user!
However, let’s continue setting up your new user:
- Add their secondary email below ‘Secondary email’.
This could be a personal email address or an email they are currently using.
- Type in their phone number under ‘Phone number’.
- Click ‘Manage user’s password, organizational unit and profile photo’.
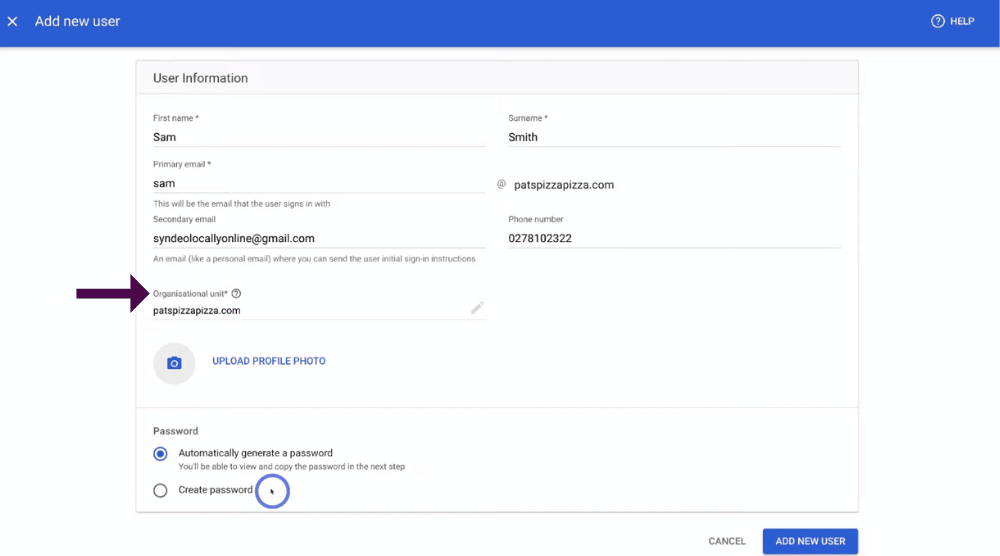
- You can change the ‘Organizational unit’ if you like.
We’re going to leave our organizational unit the same.
- Click ‘Upload profile picture’ if you like.
You can also leave this for the user to upload.
- Select ‘Automatically generate a password’ or
- ‘Create password’ to allocate a password to your user.
Once you’re happy with that information:
- Click ‘Add new user’.
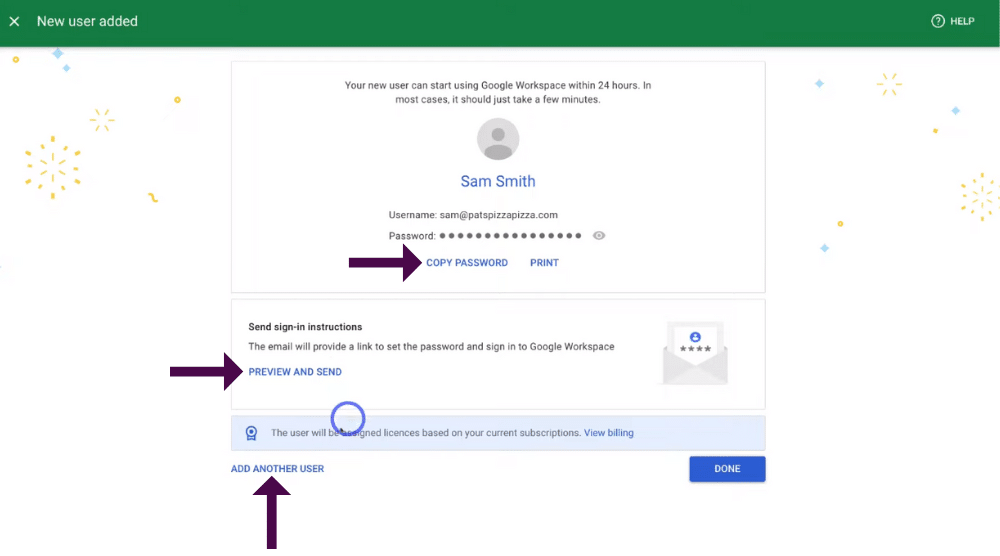
It’s important to note that it may take up to 24 hours for your new user to start using Google Workspace.
However, in most cases it should just take a few minutes.
If you’d like to copy this information and send it to your new user so they can access their account right away:
- Click ‘Copy password’.
You’re also able to send sign-in instructions directly to the user:
- Simply click ‘Preview and send’.
This will then be sent to the email you added earlier.
- Click ‘Add another user’ if you need to add multiple users following the same process.
- Select ‘Done’ when you’ve finished adding in all your users.
For the purpose of this Google Workspace tutorial, we’re going to click ‘Done’.

- Refresh the page.
You’ll then see your new user added to your admin console (see screengrab).
Read more: How to create a free business email with Gmail.
6. Administrator Roles

Before we move on, it’s important that we touch on administrator roles.
This is our first user ‘Stewart Gauld’ that we created for this tutorial on how to use Google Workspace (see screengrab).
Their administrator role is the ‘Super admin’, meaning they have complete control over everything within the Google Workspace.
However, for the purpose of this Google Workspace for beginners tutorial, let’s say the user we just added ‘Sam Smith’, is the admin of our business.
Because they’re the admin of our business, we’ll need to assign an administrator role so they can access the admin console and the ability to do essentially everything within Google Workspace.
To do this:
- Simply click on the user.
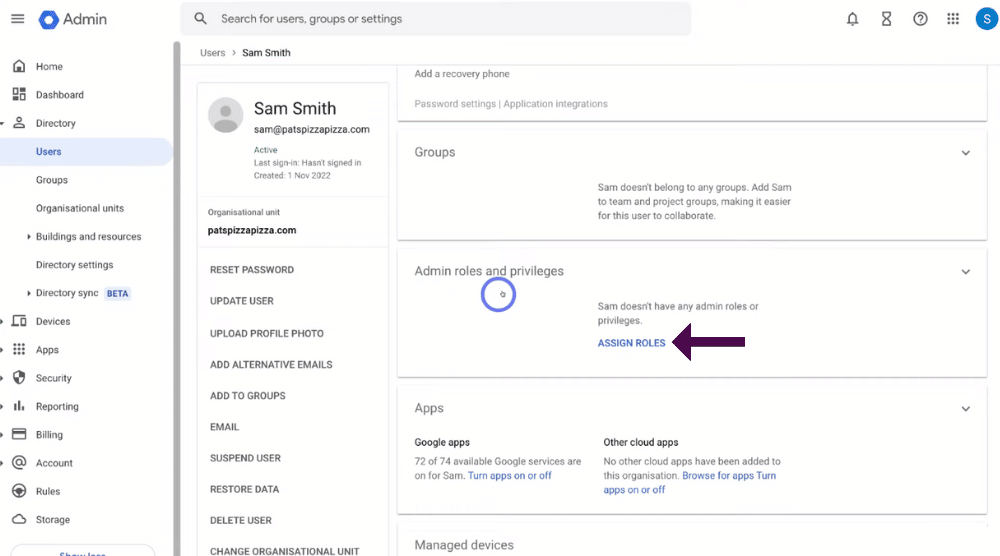
This is where you can manage everything to do with the new user you just created (see screengrab).
- Scroll down the page to ‘Admin roles and privileges’.
This is where you can assign roles to your user.
- Click ‘Assign roles’.
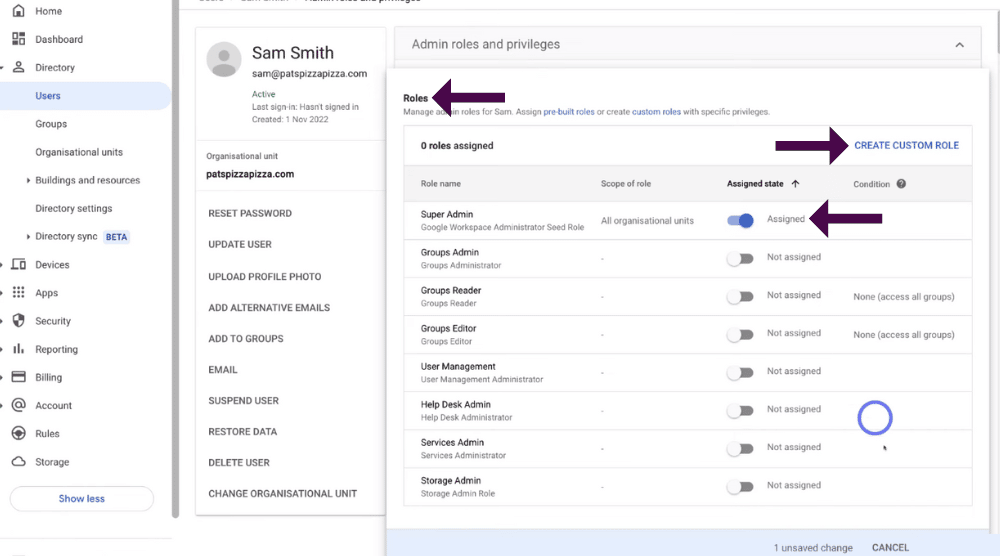
- Under ‘Roles’, you can access all the different Google Workspace roles and assign these to your different users (see screengrab).
You can find out more about the different roles Google Workspace offers here.
If you want to create a custom role for your user (and that role isn’t already displayed on the ‘Roles’ page):
- Click ‘Create custom role’.
However, we want our users to have access to this admin console and have complete control over Google Workspace as a super admin.
Follow the simple two steps below to find out how to do this:
- Click ‘Assigned’ under the ‘Super admin’ role.
- Come down and click ‘Save’.
And just like that, we’ve assigned our new user ‘Sam Smith’ as a ‘Super admin’ role within Google Workspace.
Read more: How to create email snippets in Gmail.
7. How To Add Email Aliases

Now let’s continue with this tutorial on how to set up Google Workspace and show you how to add email aliases to your users.
Basically, this means that users can both send and receive emails from different email aliases (that are not their primary email addresses).
To do this:
- Select ‘Add alternative emails’ on the left-hand side within ‘Admin roles and privileges’
- Type in your email alias under ‘Alternative email’ (see screengrab).
For example, we’ve just made Sam Smith an admin, so now we’re going to add ‘admin’ as his email alias.
- If you have multiple domains, click on the drop-down arrow to add the correct domain (see screengrab).
We’re also going to add one more alternative email (one more email alias) for this user.
Remember, you’re actually able to add up to 30 email aliases per user, so take the time and add in all your email aliases under ‘Alternative email’ before continuing.
Next:
- Click ‘Save’.

We’re happy with our two email aliases ‘admin’ and ‘support’.
Now, every time that someone sends an email to either admin@patspizzapizza.com or support@patspizzapizza.com, this user (Sam Smith) will receive those emails.
As you can see, the alternative email addresses for our users have been updated (see screengrab).
We’ll now quickly add another email alias to our first user ‘Stewart Gauld’.
You can do this by:
- Heading back to ‘Users’ (see screengrab).
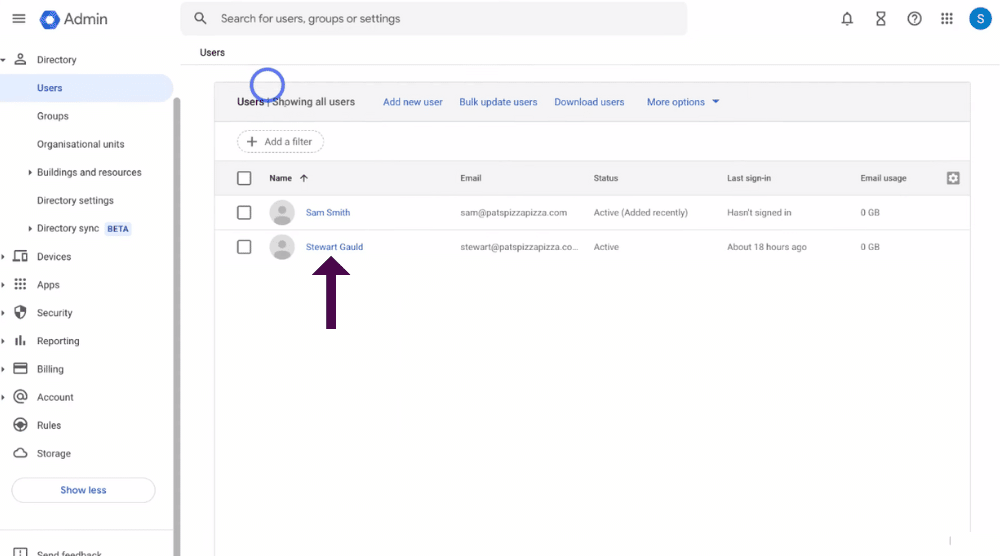
- Select ‘Stewart Gauld’.
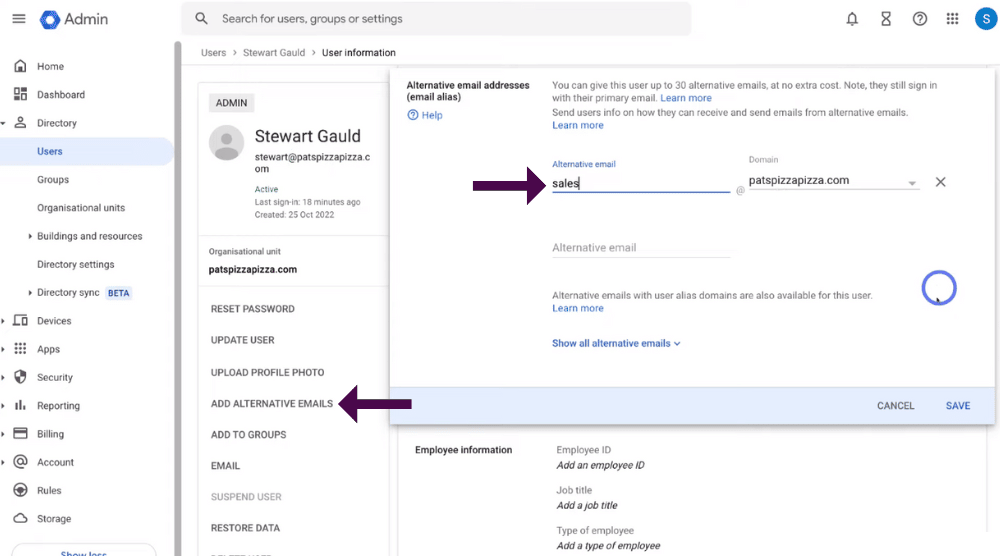
- Click ‘Add alternative emails’.
We’re then just going to add one alias to this email and to this user, called sales@patspizzapizza.com then click ‘Save’ again.
This means that this user will receive and be responsible for all emails coming from sales@patspizzapizza.com.
So we now have a total of 3 email aliases between the two users we created!
Read more: Top 5 team communication software for small business.
8. How to send as an email alias

Now it’s important to note that by creating these email aliases, your users are able to receive emails from the aliases associated with their account only.
Next in this Google Workspace tutorial for small businesses, we will show you how to make sure your users can send emails from these aliases.
To do that:
- Click the dots in the top right-hand corner to take you to all your Google Apps (see screengrab).
- Select ‘Gmail’.

Make sure you’re inside the Gmail account associated with the correct user (this is the user behind the alias that you want them to be able to send emails from):
- Click the ‘Settings’ icon in the top right-hand corner (see screengrab).
- Select ‘See all settings’.
- Navigate across and click ‘Accounts’ (see screengrab).
- Under ‘Accounts’, click ‘Add another email address’.

- Next to ‘Name’, add any name you like.
Our user is called ‘Stewart Gauld’, so we’re going to call our name ‘Sales Stewart Gauld’.
- Type the email alias next to ‘Email address’ (see screengrab).
Remember within the admin panel, we just set up this email alias for this user, so make sure this email address is the same address as the email alias you just set up.
- Tick ‘Treat as an alias’.
- Click ‘Next step’.
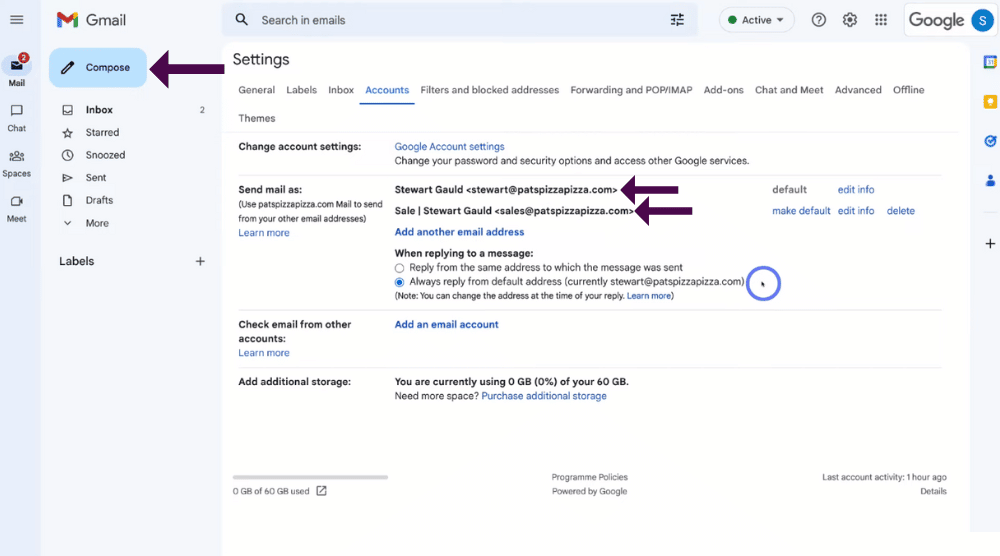
And as you can see, we now have two emails! (see screengrab).
The first email is our primary email for this user, and the second is the alias we just set up.
By enabling this, we can now both receive and send emails from sales@patspizzapizza.com!
Below this you have two options you can select:
- Reply from the same address to which the message was sent.
- Always reply from the default address (which is currently set as your primary email).
We’re happy with this option selected for now, however, take the time and choose what option suits you and your business.
Now we’ll show you how you can simply switch between your primary email and email alias when creating your email:
- Click ‘Compose’ on the left-hand side of the page.
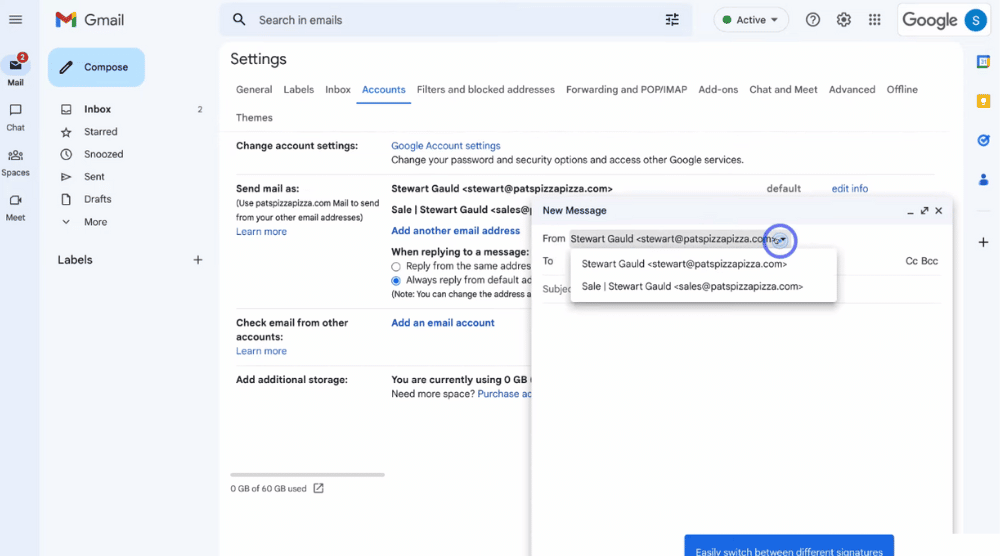
- A new message will pop up that you can then create and send.
- Click the drop-down arrow next to your email address and choose to send your email from the primary email or from the email alias you just created (see screengrab)
9. How To Add An Email Signature To Gmail Emails

Before you start sending emails, it’s important to add a professional email signature to your emails to increase the professionalism of your email:
- Click the ‘Settings’ icon again on the upper right-hand side of the screen.
That’s going to take you here (see screengrab).
- Click ‘General’.
- Under ‘General’, scroll down and find ‘Signature’.
We currently don’t have any signatures for this account (see screengrab).
To create a new signature:
- Click ‘Create new’

- Type in the name of your signature.
We want to create a signature for our sales alias, so we’re going to add ‘Sales signature’.
Once you’ve named your signature:
- Click ‘Create’.
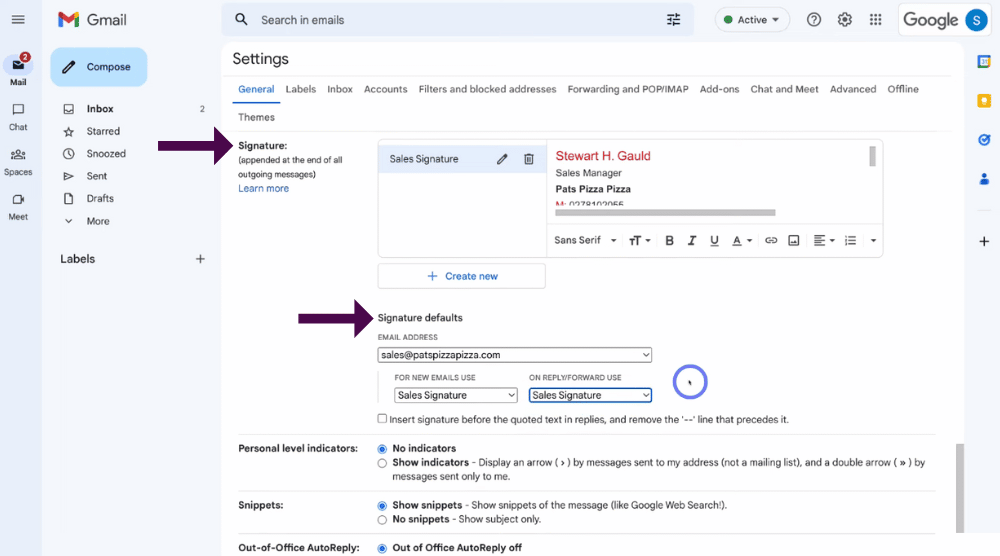
- Simply add in your email signature.
And as you can see, we’ve added an example of an email signature (see screengrab).
If you don’t have an email signature and want to learn how to actually create an email signature to then copy and paste that email signature into Google Workspace, check out our beginners tutorial where we run you through two different methods on how to create a business email signature.
However, let’s continue with this tutorial in getting you started with Google Workspace!
Once you’ve created an email signature, you can then choose your default signature below ‘Signature defaults’.
At the moment we have this email address (our primary email address) selected.
To use your signature with your alias:
- Click the drop-down arrow and select the alias that you just added.
We’ve just created the signature of a sale, so we’re going to select the sales email address we just created.
Next:
- Below ‘For new emails use’, select the correct signature.
Again, we’re going to select ‘Sales signature’.
- Below ‘On reply/forward use’, select the correct email signature.
Again, we’re going to select ‘Sales signature’.
Once you’re happy with that:
- Scroll down and click ‘Save changes’.
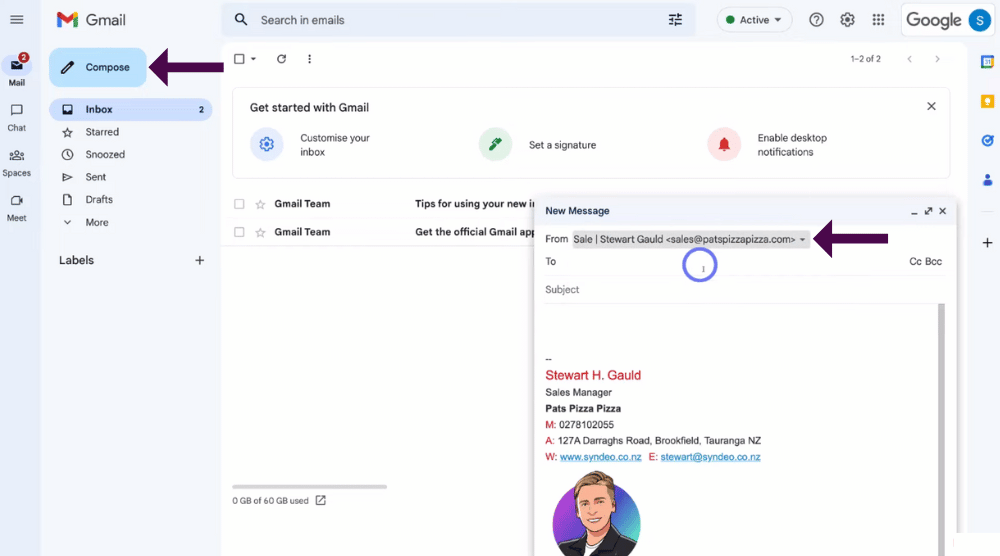
You can test that your email signature settings are correct:
- Click ‘Compose’.
- Navigate over to ‘From’ and select the email Alias that you want to send an email with.
- That’ll then automatically add the email signature you’ve just uploaded to your message (see screengrab).
10. How To Create An Email Group Within Google Workspace

Let’s get out of Gmail and head back to your admin console:
- Simply navigate up to Google apps in the top right-hand corner.
- Find and click ‘Admin’.
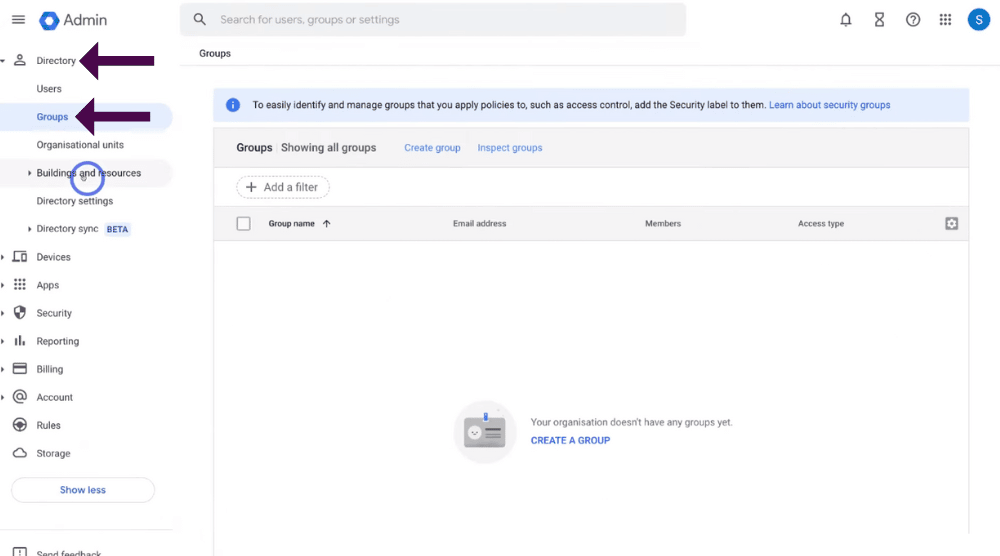
That’ll take you back to your admin console (see screengrab).
- Head over to the left-hand sidebar and click ‘Directory’.
- Select ‘Groups’ and create a new email group.
If you want to learn more about creating an email group for your team, make sure you read our beginners tutorial here where we dive into both creating and setting up group emails within Google Workspace.
However, let’s continue with this tutorial on how to use Google Workspace for beginners.
11. How to Increase Your Email Deliverability For Gmail
The last thing we want to mention in this Google Workspace tutorial is about how you can increase your email deliverability.
What do we mean by this?
Sometimes emails you send can go straight into your recipient’s spam folder even though they’re not spam (which is not ideal!)
To avoid this, it’s important to increase the email authority of your domain and email deliverability.
You can read our beginners tutorial here, where we explain how you can easily set up 3 authentication methods to help you increase email deliverability within your Google Workspace account.
Additionally, if you’ve built your website with WordPress, it’s important to set up SMTP which is used to ensure that your emails are being delivered.
You can check out our complete tutorial on this process here.
However, that brings us to the end of this Google Workspace beginners tutorial!
Google Workspace Tutorial For Beginners (Video)
We have shared everything we wanted to show you in this essential Google Workspace tutorial for beginners to help you with getting started with Google Workspace.
These basic yet essential features we’ve mentioned are a great way to leverage Google Workspace and everything it offers to help your small business grow and thrive online!
We hope you gained value, and are now confident in how to set up Google Workspace.
Check out our full video below where we walk you through this process.
