In this HubSpot WordPress integration tutorial, we are going to guide you through the process of how to connect HubSpot to WordPress using the free HubSpot CRM plugin.
If you haven’t heard of HubSpot before, they’re a huge powerhouse in the online world that offer marketing, sales, and customer features and tools to businesses all around the globe!
Within their incredible platform, HubSpot offers powerful and free CRM (customer relationship management) software that is the leading choice for many types of small businesses for various reasons.
We love and recommend HubSpot as they offer an incredible FREE CRM plan full of impressive features, so you can easily manage your contacts, customers and team in one easy to use platform.
The free plan allows you to add an unlimited number of users and one million contacts, making HubSpot the number one CRM choice for small business owners (in our opinion) that don’t have the means to invest in a pricey CRM platform.
Read more: Top 5 free CRM software for small business
How to Connect HubSpot CRM to WordPress?
Additionally, you’re able to easily integrate many other online platforms with HubSpot, including a free WordPress plugin that lets you connect and manage everything within your CRM to the backend of your WordPress website.
We are going to show you how to connect HubSpot to your WordPress website using the WordPress HubSpot CRM plugin.
Let’s get stuck into this HubSpot and WordPress integration guide!
1. Getting Started With Hubspot Wordpress Integration

You’re probably wondering, why should I connect HubSpot with my WordPress website and what benefits will this have on my business?
Well, we are here to tell you that by connecting these two platforms, you’re able to manage all your CRM-related tasks directly inside your WordPress dashboard.
In other words, by installing the HubSpot CRM WordPress plugin, you’re able to integrate your HubSpot dashboard inside your WordPress account, meaning the user interface is identical.
Additionally, you’ll save more time, and naturally, be more productive!
You’ll be surprised at the amount of time you spend switching between different online platforms and tabs to manage the different areas of your business.
The best part about this HubSpot WordPress integration is that you don’t need to be a coding expert to set it up.
In fact, you don’t even need to know an ounce of any code when connecting this HubSpot CRM WordPress plugin!
Read more: Best WordPress hosting for small business
2. How to Install The HubSpot CRM Plugin
To install the HubSpot CRM WordPress plugin, you’ll first need to log in to your WordPress account.
Don’t have a WordPress website?
Check out our complete WordPress for beginners guide, where we walk you through how to set up and use WordPress to build a professional website for your business.
Once you’ve signed up and signed in to your WordPress account, follow the steps below to learn how to connect WordPress to your CRM:

- Click ‘Plugins’ on the left-hand side bar within your WordPress dashboard.
- Select ‘Add new’ from the drop-down menu.
- Navigate up to ‘Search plugins’.
- Type in ‘HubSpot’.
Find the plugin ‘HubSpot – CRM, Email Marketing, Live Chat, Forms & Analytics’ (see screengrab).
This is a plugin by HubSpot with over 300,000 active installations and high ratings.
Before we go any further, it’s important to note that before you install any plugin or theme onto your WordPress website, you should backup your WordPress website.
Although not crucial, we strongly suggest backing up your website as some themes or plugins can clash with each other, which can cause your website to go down or break!
Once you’ve backed up your WordPress website, you’re now ready to install the plugin!
- Select ‘Install now’ on the HubSpot CRM WordPress plugin.
- Click ‘Activate’.
3. How to Sign Up / Sign Into HubSpot CRM From WordPress
The next step is to sign into your HubSpot account from WordPress.
Don’t worry though, the good news is that you’re able to use this HubSpot CRM plugin on both free and paid plans.
Completely new to HubSpot CRM?
We suggest checking out our complete HubSpot FREE CRM beginners guide here, then jumping back into this tutorial when you’re finished.
Get started with HubSpot for FREE here.
*The link above is an affiliate link, which means we will get a commission if you upgrade to a paid plan (with no extra cost to you). This helps support our education-based website and we thank you in advance!

After you’ve created your HubSpot account:
- Click ‘Sign in here’ on the upper right-hand side of the screen.
You’ll then receive a code to the email you used to sign up with HubSpot.
- Simply find the email with the code within your email inbox.
- Enter in the code below ‘Enter code’ back on your browser.
- Click ‘Login’.
4. How to Connect HubSpot With WordPress
Next, you’ll need to connect this HubSpot plugin with WordPress.

Simply follow the steps below to do this:
- Click ‘Continue with this user’ if this is your HubSpot account (see screengrab).
- Alternatively, click ‘Create account with a new user’.
- Select ‘Continue with this account’.
- Click ‘Connect website’.

This will then connect your HubSpot account to your WordPress website, and redirect you back to your WordPress dashboard (see screengrab).
And there you go – you’ve connected Hubspot to Wordpress!
As we’ve shown you, you don’t need to have any coding experience to install and connect HubSpot with your WordPress site.
Next, you can go through the CRM demo HubSpot provides if you like, or simply skip this step.
Now that your HubSpot WordPress integration is complete, you’re able to start engaging in important CRM activities
You’ll notice three main CRM activities now on your screen (see screengrab).
1) Live chat.
This is where you can enable a live chat (called ‘Chatflows’) then add that chat directly to your website pages with the intention to engage with your website visitors and capture new contacts and leads.
2) Forms
You’re able to simply create and manage forms through this plugin and then embed those forms directly onto your website.
3) Contacts
Additionally, you’re able to head over to the left-hand sidebar to find all the activities within HubSpot CRM you can leverage (see screengrab).
Read more: How to use the HubSpot CRM app
5. How to Manage Your Contacts Within the HubSpot CRM Plugin
One of the main goals of any CRM software is to provide a place where you can easily manage your contacts.

To manage your contacts:
- Click ‘Contacts’ on the left-hand side bar.
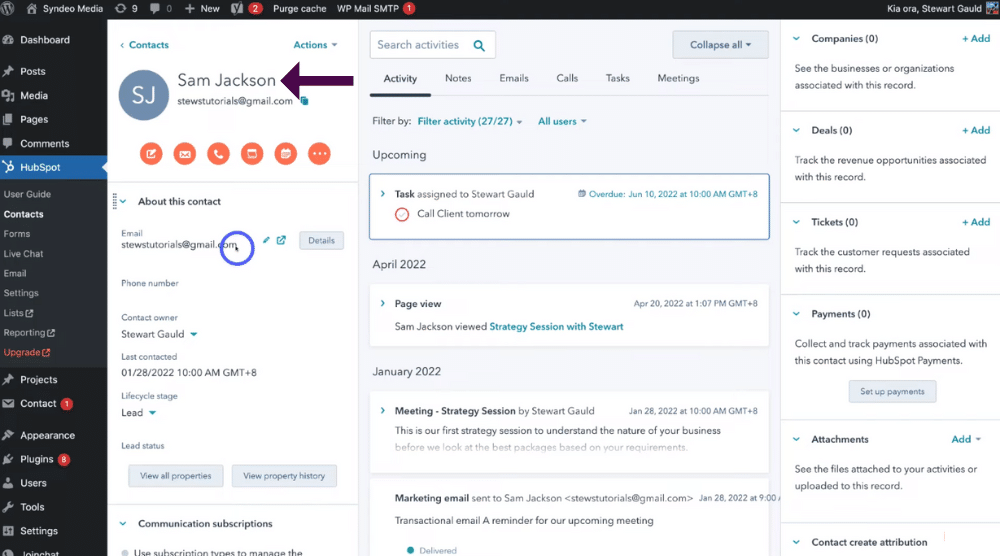
This will bring up your list of contacts for your business.
From here:
- Simply click on each contact

- By clicking on the contact it will generate all the activity relating to that contact (see screengrab).
We’re going to go into detail about how to manage contacts in this how-to connect HubSpot to WordPress tutorial, as we cover all this information in more detail (and more!) in our dedicated beginners HubSpot tutorial mentioned earlier.
However, as you can see, you can manage all your contacts within your WordPress website!
6. How to Manage Your Forms Within HubSpot CRM Plugin
In addition to being able to manage your contacts, you’re also able to handle forms within the HubSpot CRM WordPress plugin.

To do this:
- Click ‘Forms’ below ‘Contacts’.
This is where you can create forms for your website (see screengrab).
- Navigate up to and click ‘Create form’.
Additionally, you can edit any forms you’ve created in the past and embed them on your website through this interface:
- Head over to a form you’ve already created (see screengrab).
- Click ‘Copy shortcode’
- Simply embed that form onto your website.
Read more: How to create a free landing page with HubSpot
7. How to Manage Live Chat Within HubSpot CRM Plugin

As previously mentioned, live chat is where you can create a chat flow and then add that to your WordPress website (see screengrab).
- Navigate back over to the left hand side to ‘Live chat’ below ‘Forms’.
We recommend using this chat flow feature within HubSpot, rather than a different independent live chat software.
You’ll notice that in doing so, your life becomes so much easier as your chat flows are already integrated with both your WordPress website and HubSpot!
Basically, this means all this data is going to be recorded inside HubSpot.
So take the time to create your chat flow and embed that on your website so that your website visitors can directly chat and ask questions with you on your website pages.
8. How to Engage in Email Marketing Within HubSpot CRM Plugin
Finally, you can also engage in email marketing activities within your CRM in two different ways.

To do this:
- Click ‘Email’ below ‘Live chat’ on the left-hand side bar.
- Select ‘Create email’ in the upper right hand side of the screen.
This will create an email inside HubSpot.
Alternatively:
- Simply connect a platform like MailChimp if you already use another platform for your email marketing activities! (see screengrab).
Read more: How to connect MailChimp to WordPress
9. Settings

If you need to change any basic settings within your HubSpot CRM WordPress plugin:
- Simply click ‘Settings’ below ‘Email’ on the left-hand sidebar (see screengrab).
10. Lists And Reporting
Did you know you can manage your lists and reports for all CRM activities through this plugin?

You can do this by:
- Clicking ‘Lists’ below ‘Settings’.
These lists are made up of your email list (subscribers) that you’ve added to a particular list.
You’re then able to engage in email marketing activities with that list.
For example, you could have a list for specific online form submissions like a booking form, or say a list of contacts that want to receive your newsletters.
It’s important to note that you can also create multiple lists to manage your contacts.
- Below list, click ‘Reporting’.
Reporting lets you manage all your CRM activities (sales pipeline, issues, tasks and other analytics).
These two options will redirect you over to the web version of HubSpot.
However, that brings us to the end of this beginner’s tutorial on how to connect WordPress to your CRM so that you can manage everything CRM related directly inside WordPress!
Read more: How to create a sales pipeline within HubSpot
Video tutorial – How to connect HubSpot to WordPress
We hope you gained value in this simple HubSpot CRM integration feature that will, as a result, save you valuable time!
This means you’ll ultimately be more productive with your sales, contacts and teams all by simply enabling this free HubSpot CRM WordPress plugin.
Feel free to check out our video tutorial below.

