Table of Contents
In this email automation tutorial, we introduce you to Klaviyo which is a powerful online marketing automation platform designed for e-commerce websites.
You can customize Klaviyo email templates and create email flows that will automatically welcome new customers, recover abandoned carts, up-sell, cross-sell, and more.
The good news is – it’s completely free to get started with Klaviyo.
However, if you grow beyond 250 contacts, you’ll need a paid plan.
Before we go on and explain how to use Klaviyo automation, let’s cover the basics of understanding email marketing automation first.
What Are Email Automations?
Let’s imagine a scenario.
You’re interested in mastering productivity during work hours.
To search for actionable strategies, you turn to Google search for help.
While reading through the content of one website, you decide to subscribe to their email list.
This would help you receive weekly newsletters on productivity.
Now, as soon as you hit ‘Subscribe’, you receive a ‘thank-you’ email from them instantly, then a day later you get an email that gives you more valuable information.
Then a few days later you get an offer of some sort via email that you like the sound of and end up buying.
Like you, they may have hundreds or even thousands of subscribers.
Take The Washington Post, for example.
Their subscriber count might even be in the millions.
In that scenario, is it possible for every company or business to send every single email manually? The answer is no.
This is where email marketing automation comes in.
Email automation tools like Klaviyo allow you to automate this entire process of sending emails while keeping them relevant and personalized.
Using email campaign automation (often called email flows or email sequences), you can set up a series of emails that are triggered when users take specific actions (or when they don’t take those actions).
Not just that, tools such as Klaviyo allow you to target people based on previous sales data, preferences, and behaviour.
Let’s understand the benefits in detail:
Benefits of Email Automation
Both SMBs and large multinational corporations can benefit from email marketing automation.
In every business, time is of the essence. Sending emails manually might work in the beginning, but it’s not scalable in the long run.
There are other benefits of investing in free email automation tools like Klaviyo:
- Increase revenue: By sending personalized, automated emails, you can offer a ‘welcome discount’ to new users, for example, and encourage them to make their first purchase. Apart from that, by nurturing existing customers with valuable content, you can increase their lifetime spending. You can run re-engagement campaigns for existing customers who haven’t bought your products or services for a while. These automated emails usually include product information, downloadable guides, additional links, etc. so that people feel more comfortable in spending their money. The result is increased revenue for your business.
- Avoid spamming people’s inboxes: This is one of the top benefits of email automation. Since you can target people on the basis of their purchase history, location, or demographics, you will send fewer irrelevant emails to people who don’t need them or want them. Without email marketing automation, you might end up spamming inboxes. This is bad for your business’s credibility.
- Reduce costs: Another benefit of creating an email automation flow is the reduced cost of hiring a large sales team. You no longer need admin teams who are responsible for sending multiple emails right on time. You only need a few people in your sales team who can talk to your prospects when needed.
These are the major benefits of email automation. Let’s move on to some examples.
Email Automation Examples
You can as explained in the first scenario, automate welcome emails (common to all types of businesses).
For an e-commerce site, one can automate the ‘similar product recommendations’ email after someone places an order.
Similarly, you can automate ‘reminder emails’, sent after someone moves a product in their shopping cart but doesn’t proceed with the purchase.
The type of business you are in determines the email automation sequences that can be set up.
The examples include:
- Feedback emails
- Event announcements
- Transactional emails
- Re-engagement emails, etc.
But how do you automate emails?
You’ll need a reliable tool. And Klaviyo is one of the best email automation software out there.
That’s what the next part of our email automation tutorial is all about.
How to Use Klaviyo Automation?
Let’s learn how to use Klaviyo automation, this is where the real value is…
Klaviyo Email Automation Software
For this email automation tutorial, we’ve connected our Klaviyo account to our Shopify store.
But you can integrate Klaviyo with any website builder of your choice.
The process of creating a Klaviyo email flow is the same.
To get started with Klaviyo email automation:

- Head over to Klaviyo and sign up for free if you don’t already have an account. And if you are completely new to Klaviyo, watch our beginner’s tutorial on navigating Klaviyo and then come back to this guide.
- Select ‘Flows’ from the menu on your left
- Click on ‘Create Flow’ in the upper-right corner to set up a new email automation sequence
Select a Klaviyo Email Template
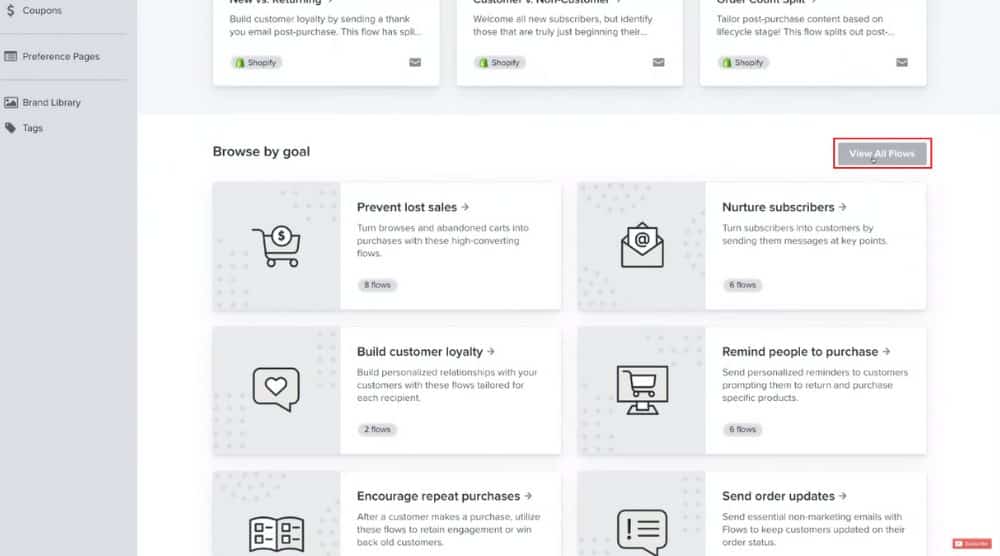
Because this is a beginner’s tutorial, we want to simplify the process for you. Therefore, we’ll go with a Klaviyo email template. Click on ‘View All Flows’ to view the collection of all the email automation based on the goals.
For example, you’ll find a separate ‘Nurture subscribers’ category.
Similarly, there are categories for ‘Customer loyalty’, ‘Remind customers to purchase’, ‘Encourage repeat purchases’, and more.
For this email automation tutorial, we’ll focus on nurturing the subscribers.
Under that, we’ll pick the ‘Welcome Series: Customer vs. Non-Customer’ sub-category.
Customize Klaviyo Email Flow

That includes customizing the:
- Trigger
- Conditional split
- Different emails sent within the flow
- The duration between the emails sent
Refer to the screengrab to read the default description for this email automation sequence.
You may modify this description before proceeding to add a name, tags, and the trigger.
Once you’re done, click ‘Create Flow’ in the bottom-right corner.
Don’t let the structure of email flows scare you. It can be a bit daunting but we’ll walk you through it one step at a time.
- Notice the actions on your left: Email, SMS, Update Profile Property, Notification. Each of these actions can be dragged and dropped to the email flow on your right. As of now, we have three emails in our sequence (refer to the screengrab).
- Time delay: Notice that between Welcome Email #1 and Welcome Email #2, we have a delay of 3 days. Email #1 is a thank you email sent when a customer places an order. And if they are a new customer, a different welcome email is sent with a discount.Trigger: This is what ‘triggers’ our email automation sequence. In this case, our Klaviyo email flow is triggered when a person subscribes to our newsletter from our Shopify store.
Customize Email #1
Now, follow these steps:
- Ensure that the sender’s name and email address are accurate
- Modify the subject line if required and enter the preview text – ‘Get Insider Deals!’ This is what the recipients will see before they even open your email. Therefore, your preview text and subject line should be compelling and enticing to generate
- Click the ‘Save changes’ button.
Click ‘Edit Content’ to start modifying the email content.
Conditional Split: Below ‘Timing’ we have ‘Conditional Split’. The condition explained before where customers are sent different welcome emails based on whether or not they are repeat customers is called conditional split. Click on ‘Conditional Split’ on your left to customize these conditions.
- Ensure that the sender’s name and email address are accurate
- Time delay: Notice that between Welcome Email #1 and Welcome Email #2, we have a delay of 3 days. Email #1 is a thank you email sent when a customer places an order. And if they are a new customer, a different welcome email is sent with a discount.Trigger: This is what ‘triggers’ our email automation sequence. In this case, our Klaviyo email flow is triggered when a person subscribes to our newsletter from our Shopify store.


How to edit the email content?

These blocks can simply be dragged and dropped on the Klaviyo email template.
To customize the existing blocks on your template, click on them.
Once you do that, the formatting options will appear on the left-hand side.
This is where copywriting skills come in handy!
In this welcome email, your copy should describe the benefits of subscribing to your newsletter.
Now, to add an image, simply drag-and-drop the image block below the text.
Click on ‘Browse’ to upload an image from your computer.
Also, to delete any of these blocks, just hover over them and click the bin icon that appears as a result. Select ‘Yes, Delete Block’.
Below ‘Blocks’, on the left-hand side menu, we have ‘Styles’.
This is where you can alter the overall style of your email sequence template in terms of fonts, layouts, colors, and more.
Click ‘Save’ to save your changes.
Preview Your Email
After making all the modifications in the email sequence template, you want to see how it looks at the recipient’s end.
To do so, click on the preview icon below ‘Save changes’ (refer to the screengrab).
You can preview the email for both mobile and desktop.
And if you are happy with how it looks, click ‘Save & Return’.
That’s going to take you back to the Klaviyo email flow.
Customize Email #2

To customize the said email, click on the three dots, and select ‘Edit’.
Now, follow the same steps as explained in the preceding sections.
While editing the content, make sure you edit the coupon code too. Before that, you’d need to create a discount code in Shopify.
Watch this beginner’s tutorial if you’re not too sure how to create one.
Take the time to customize the Klaviyo email template and save changes.
Read more: How To Use Shopify Discount Code
Set the Time Delay

To change it:
- Click on the time delay element in the Klaviyo email flow
- On your left, you have the option to set the time delay. For this email automation tutorial, we’ll select 1 day.
- Next, you can select a specific time of day, say 11:00 am
- Hit ‘Save’
Now, you can customize Welcome Email #2.
Add More Points

For example, you can drag the time delay element and place it below Welcome Email #2.
Edit it to change the delay duration if you like.
The delays can range from minutes to days, hours, or even months.
Now, drag the email element and place it below the delay element we just added.
This is the fourth email in our sequence.
Go ahead and customize it. For each email, you can turn off the ‘Smart Sending’ option.
This skips over recipients who have received too many emails from you.
Of course, you can delete any email if you like.
Activate the Klaviyo Email Flow

- Hover over an email and click on ‘Manual’
- Select ‘Live’ from the drop-down
- Repeat the above two steps for all the emails in the sequence
- When you’re ready to go live, click ‘Save and Exit’ in the upper-right corner
Your new email automation sequence is now live!
You’ll notice it in the ‘Flows’ section on your Klaviyo dashboard.
Read more: Create a Free Popup Form in Shopify (Klaviyo Tutorial)
Klaviyo: Email Automation Tutorial (Video Guide)
Klaviyo is one of the best email marketing automation software for e-commerce websites today.
It’s easy to use and specially designed for e-commerce businesses.
Use the process explained above to set up various email sequences, such as ‘Back in stock’ sequences to notify customers when certain products are restocked in your inventory or ‘Price drop trigger’ to notify customers via email about discounts and special offers.
Klaviyo email automation, will undoubtedly, be a game-changer for your business!
Check out our full video tutorial down below to help you get started with email automation.
