Before we get started with this Monday.com CRM tutorial, it’s important we clarify what CRM is and how it can and will benefit your business.
CRM (Customer relationship management) is a type of software that enables you to manage your customer’s journey and your sales pipeline in one place.
A CRM allows you to better manage, organize and build relationships with your contacts, ultimately providing an all-in-one sales platform to help your business grow and scale online.
Monday.com is known for its popular Project management software, suitable for all shapes and sizes of any business, but did you know that Monday.com also offers an equally impressive and feature-packed CRM sales platform?
Well, you’ve been missing out!
Monday.com is becoming one of the best CRM software for small businesses.
Make sure you read my full Monday.com CRM review for 2023 here.
This is the perfect tutorial for you if this is the first time that you’re taking a look at Monday’s feature packed and easy-to-use CRM platform.
Read more: Our top 5 free CRM software for small businesses
How to use Monday.com CRM?
Our focus is to show you how you can set up, use, and navigate this visually pleasing, user-friendly, and integrative CRM software to benefit your business.
Right, let’s get stuck into our 2024 Monday.com CRM tutorial for beginners!
1) Get started with Monday.com CRM.

Get started with Monday.com for FREE here.
*The link above is an affiliate link, which means we will get a commission if you upgrade to a paid plan (at no extra cost to you). This helps support our education-based website and we thank you in advance!
Want to get started? Follow these steps:
- Head over to Monday.com and click “Get started” if you don’t already have an account.
- Follow the simple step-by-step process and answer a few basic questions to create your free account.
It’s as easy as that! Okay, let’s meet you inside your account.
Also read: Asana vs. Monday.com
2) How to enable your CRM workspace

Once you’ve completed the signup process, you’ll be taken to your main Monday workspace.
This is the place where you can manage your tasks and projects.
If you are interested in learning more about Monday.com’s project management software, check out our tutorial here.
However, let’s jump back and guide you through how to use their CRM.
These next steps are for you to actually enable the CRM capabilities:
- Navigate down to the bottom and click on the dots on the bottom left side of the screen.
- Click on ‘Explore more products’. This will take you to the product store.
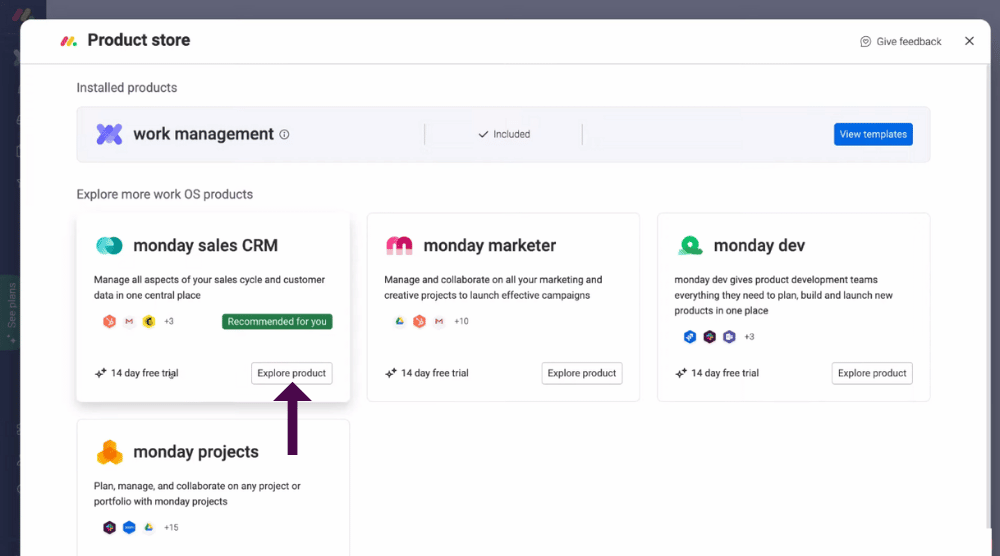
- Head up to Monday sales CRM.
- You can get started with the 14-day free CRM trial, so you can make use of all premium features.
- Go ahead and click on ‘Explore product’ and then.
- Navigate up to ‘Try for free’
- This will install the Monday sales CRM into your Monday account.
- This will be a separate workspace that allows you to navigate between your projects and your CRM.
3) Pricing

Follow these steps below to understand how their pricing works:
- Navigate over to ‘See plans’ over in the middle of the very left-hand side of your workspace.
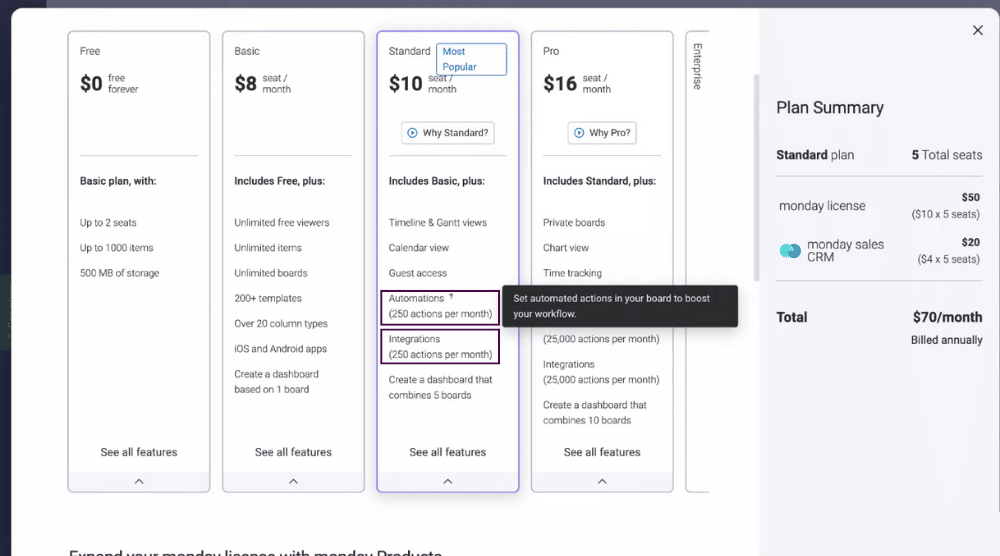
This is where you have the option to upgrade to a paid plan after the 14-day free trial.
- You’ll see Monday’s core product selected ‘Work management’
- Scroll down to check out all the Monday sales CRM add-on plans (see screengrab).
You can choose from the following:
Free CRM software plan (ideal for teams of two or less)
Basic ($8 per seat plus $2 per seat for the CRM add-on per month)
Standard ($10 per seat plus $4 CRM add-on per seat per month)
Pro ($16 per seat per month plus $8 CRM add-on per seat per month) or Enterprise (custom price).
We recommend the standard plan for small teams that want to scale their business in terms of managing projects as well as leveraging their CRM.
However, you should think about how many people you collaborate with within your team as that will determine the price of how many seats you need.
Note – There are two main key characteristics of a good CRM you should look out for when choosing your plan. These are:
- Automations: This allows you to automate many tasks that you do within your CRM, reducing the amount of time spent jumping between different tasks.
- Integrations: You want a tool that seamlessly integrates with other popular business tools that you use on a day-to-day basis.
4) CRM workspace

As previously mentioned, your ‘Main workspace’ is the place where you can manage all your client projects.
If you jump back up to your workspace, In the top left-hand corner you’ll see your ‘CRM workspace’.
Note – you can easily switch between workspaces hereby:
- Clicking ‘Browse all’.
This will show you all of your workspaces.
Your CRM workspace is where you can manage all things CRM-related.
5) Layout and structure

It’s important to understand the structure of Monday.com so you can make sense of all the different components and how they work together to form your CRM.
Your account is broken down into workspaces (as previously mentioned).
Think about workspaces as different departments within your organization.
In addition to having your main workspace and CRM workspace, you can create an additional workspace for your sales team, HR department (or any other department you have).
Within each workspace, you have folders.
To create a folder:
- Simply click ‘+ Add’ at the upper left-hand side of your workspace.
- Then, navigate down and click ‘New folder’.
- This will create a new folder. You can rename it anything you like. For the purpose of this Monday.com tutorial, we will name our folder ‘Learning’ (see screengrab).
You can use these folders to essentially group your different boards or documents.
To do this:
- Drag and drop any boards from the left-hand sidebar into your new folder.
Folders are a great way to organize your workspace in a way that suits you.
Next, you have boards.
These are the different areas that make up your CRM.
Monday.com provides a bunch of recommended boards to help you get started and optimize and add different components to your CRM.
These templates include:
- Contacts – All your individual contacts
- Accounts – All the organizations
- Leads – These are your prospects
- Activities – Activties happening in your account
- Deals – This is your sales pipline
Play around with how you want to view and organize your different boards (on the left-hand sidebar) to what suits you best.
- You can do this by simply selecting and dragging and dropping your selected board below or above other boards.
If you want to add your own boards you can by following these steps:
- Navigate back up to ‘+ Add’
- Scroll down and select ‘New board’
Boards are used to organize specific activities.
These activities are called groups.
For example, we have our ‘Deals’ board selected. We can see all of our active or closed deals within our deals board
You can create new groups within your board by clicking ‘+Add new group’ for any additional information you want to organize.
Within your board, you also have Items. For example, for our ‘deals’ board, items include different deals.
Depending on the relevant board, you will have different items.
For example:
Items on your ‘Contacts’ board will consist of individual contacts.
Items on your ‘Accounts’ board will consist of all of your companies.
Also, you can create new items within your groups. For example, if you want to add a new deal on this deals board, simply:
- Select what group your new item relates to (is it an active deal, or Closed won deal?)
- Click ‘ + Add deal’.
- Type your item name (your deal name)
Additionally, you can create or share documents within your CRM. You can do this by:
- Again, click ‘+ Add’ in the upper left corner of your screen.
- Then select ‘Create doc’.
- Type what you want your document to be called – we will call ours ‘Team notes’ for this Monday.com tutorial.
- You can then select if you want your document to be shareable or private.
- Finally, click ‘Create doc’.
‘Team notes’ can now be a document that our team can use to collaborate with.
To sum up our explanation of the layout and structure of your CRM, we will now show you an example of a default dashboard on our CRM workspace.
You can find this in your left-side panel
This is a ‘Sales dashboard’ and is used to manage your KPIs and track performance.
We will go into further details about your sales dashboard later on. (see screengrab)
However, note that you can create your own new dashboard in a similar way to folders, boards and documents:
- Select ‘Add’ again, then ‘New dashboard’.
6) Adding team members

What about adding team members so you can collaborate with them directly on your CRM?
- Simply navigate down to the far lower-left-hand sidebar.
- Click on ‘Invite members’ to add any new team members.
7) Navigating around the far left-hand sidebar menu

- Notifications: If there are any activities that have been assigned to you, you will see those there.
- Inbox: You can connect your email directly with Monday.com so that you can manage all conversations with your contacts directly within the same platform.
- My work: This is where you can see all the upcoming work that’s related to you.
- Favorites: For any favorites of yours that you have labeled
8) Managing your account

- Navigate down to your account in the bottom far left-hand corner
- Click on ‘My profile’ to change any settings
It’s that simple!
9) Adding your contacts

Firstly – make sure you have created a contacts board and have it selected.
This is the place where you can manage all your contacts.
You’ll see there are a few default contacts that were added when you signed up (see screengrab).
Now, there are a few ways that you can add contacts to Monday.com.
Follow the below steps for more information:
- Select ‘New contact’ on your board to manually add a new contact.
- Enter all your contacts details
Or
- Navigate up to ‘New contact’, click the drop-down arrow and select ‘Import contacts’. This is where you can import your contacts directly into Monday.com from either a spreadsheet or a list of contacts from other platforms.
9.1) Creating a Form on Monday
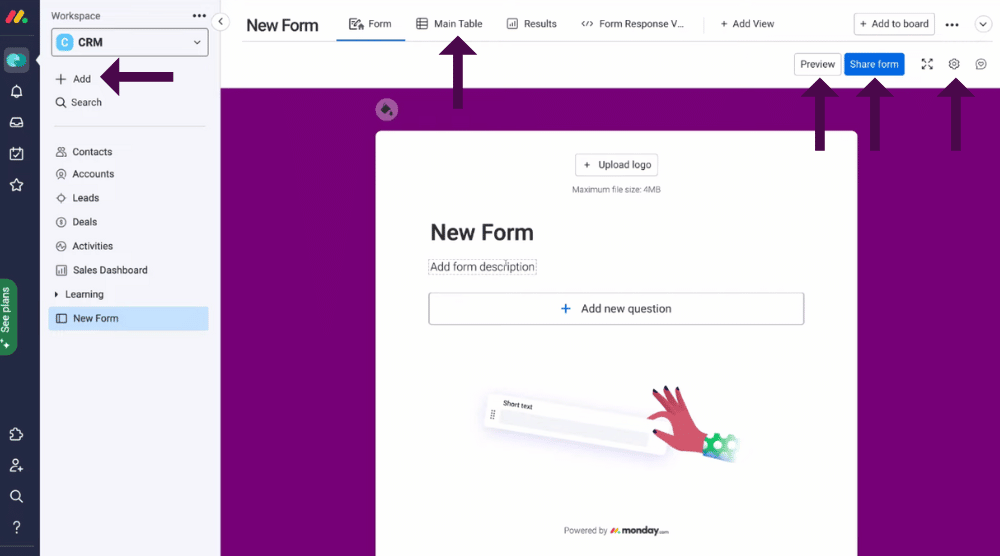
You can also now add your contacts through a form by following these step-by-step instructions:
- Click on ‘+Add’ to the left of your board then click on ‘New form’ . This will create your form.
- From here, you can simply create and edit your form to send to potential contacts.
- You can embed this form on your website or add the form onto your different channels
How do you edit your form? (see screengrab)
- Upload your business logo.
- Add the ‘Form name’.
- Add a ‘Form description’.
- Add a ‘New question’. This could be an email, text, or phone number.
- You can add multiple questions if you want, and you can add a description for each question.
- You can then select ‘Required’ if the contact must answer the question on your form.
Once you are happy with your form:
- Navigate up and select ‘Preview’.
- Here you have the option to embed the form on your website, or you can share the link across different platforms or on social media.
- You can also directly send your form to any potential contacts.
You can then choose which group the responses from your form will be sent to by doing the following:
- Click ‘Settings’ then ‘Group for answers’.
- We will select ‘Incoming responses’.
Once you are happy with your settings, navigate over to the ‘Main table’ in the upper section of your workspace.
This is where you can find all incoming responses.
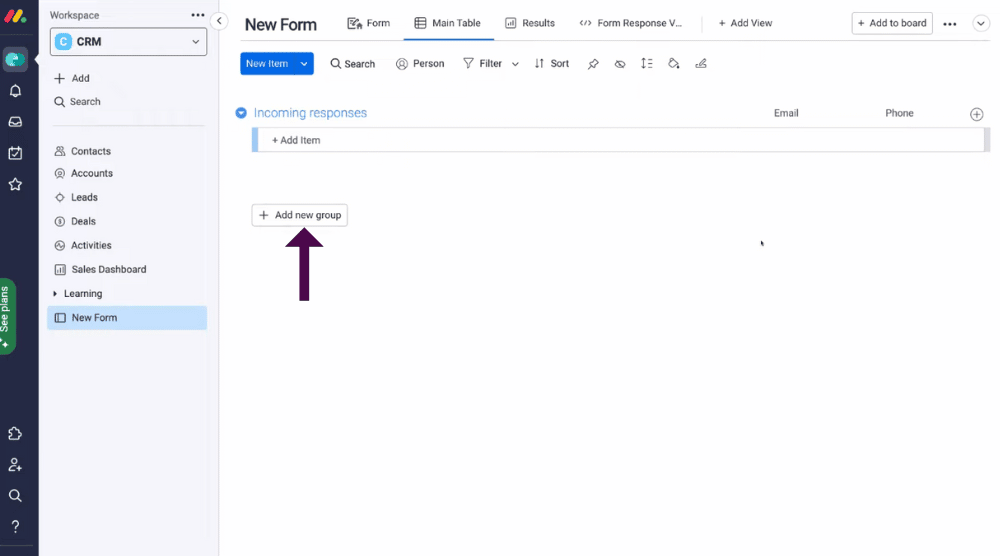
Ideally, your columns here should include the name, company, email, and phone number.
However, you can add a bunch more additional columns if you like.
You can add different groups for responses under ‘Main table’. Simply click ‘+ Add new group’ (see screengrab).
10) Managing your contacts

Once you’ve created your contact:
- Click on that contact.
You can search for or add a new account related to that contact (the name of the company that contact is associated with).
- Select the accounts column, click ‘+ Add’ and select the company or start typing to add in a new one. It will automatically sync with your contact (see screengrab).
- We will name our new account ‘Steelmaster’ for this tutorial.
- Head over to the ‘Deals’ column to associate this contact with a new deal.
- Add a new deal by clicking ‘Add’ in the same way as you did with accounts. For this Monday.com CRM will name it “website design”
- In addition to this, you can also add a title for your contacts in the same way.
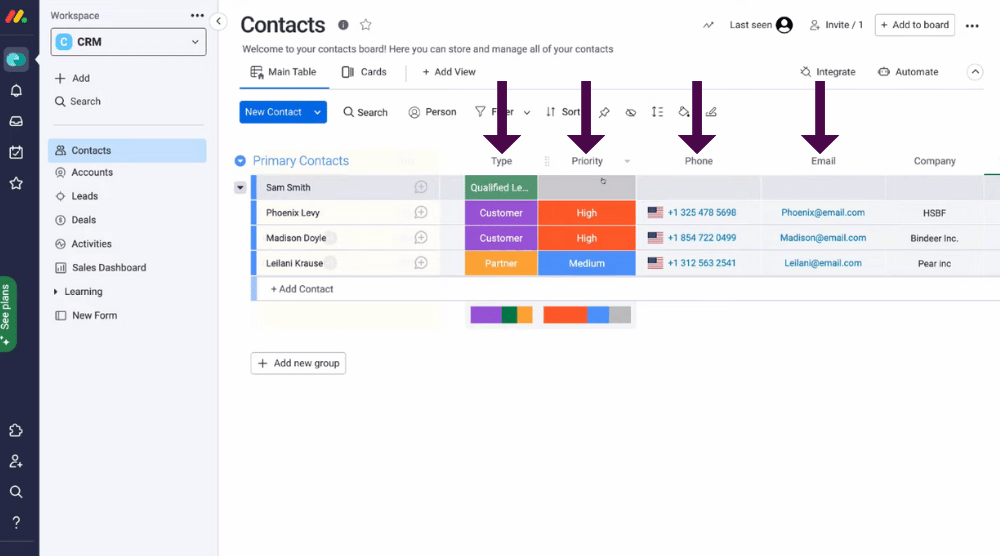
You can add a type, priority, phone, email address, deal value, and more. (see screengrab).
You can also add more columns if you need to by heading over to the right of your screen and pressing the ‘+’ button next to ‘Comments’

If you navigate back over to your contact names, you can simply click on each contact to get more information.
Here you will see:
- An overview tab of this contact includes contact information (on the right-hand side). You can edit this information, and see recent activities and emails.
One of the things we love about Monday.com Is that you can click on any contact and interact with that contact directly from within the platform (for example by sending an email or adding a specific activity).
- Next, you will see an ‘Updates’ tab. This is where you can add important information about this contact.
- Following this, navigate over to the ‘Activity log’ tab to view all activities in regards to this contact, (for example, any deals that have been created).
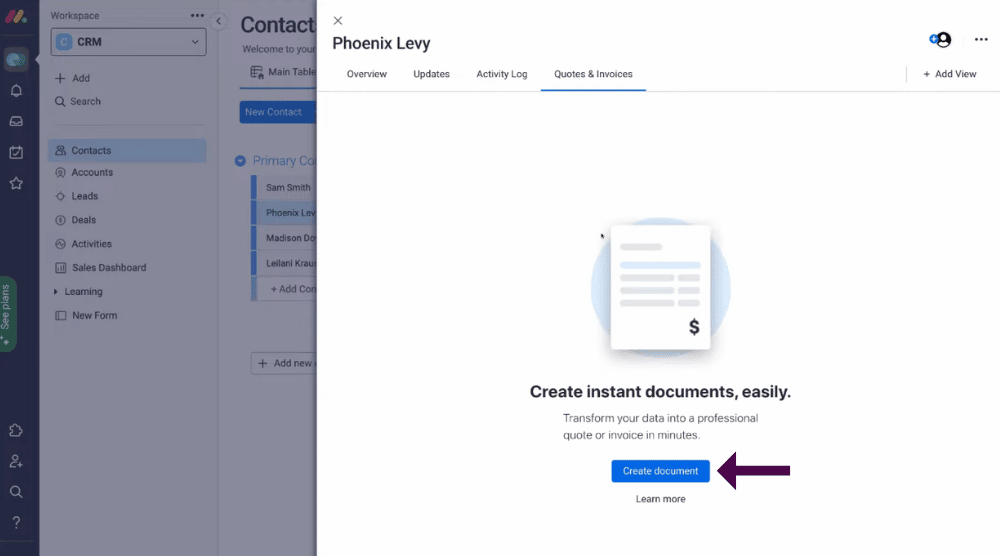
- Lastly, there’s ‘Quotes and invoices’. You can create these right here within your CRM and then send those directly to your contacts.
To do this:
- Simply come down and click ‘Create document’.
Additionally, you can add your own tabs (views):
- Head over to the right-hand side and click ‘+Add view’
- Click on ‘Go to item views center’
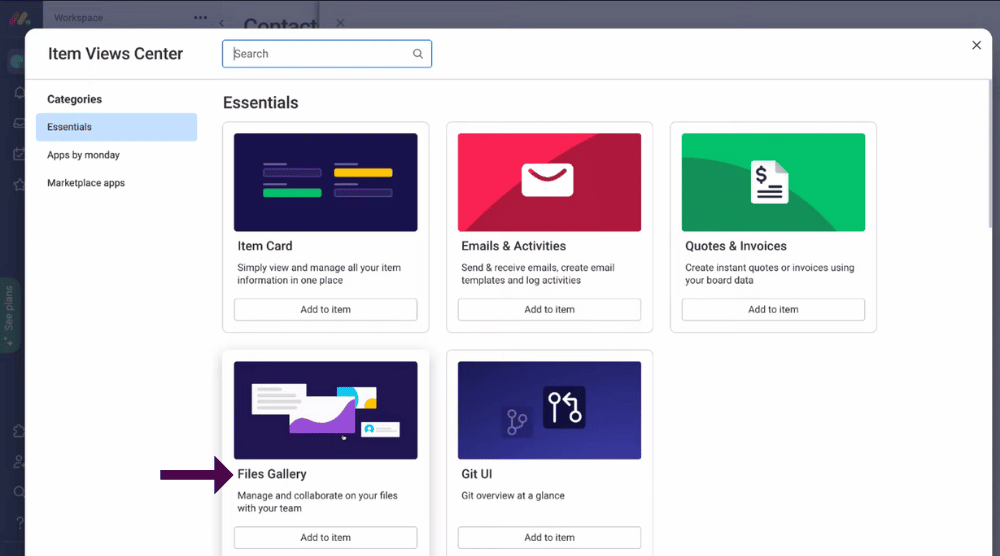
- Simply add any other item views you want.
- We will add ‘Files gallery’ so we can add any files relevant to that contact.
- This will then be added next to ‘Quotes and invoices’ within your contact details (see screengrab).
11) Managing your accounts

Head back over onto the left-hand side of your workspace and click ‘Accounts’.
In this board, you will find all companies that you’ve created.
You can see the company we created earlier ‘Steelmaster’ (see screengrab).
You’ll also see the contacts within each company, deals, and deal values
If you scroll across, you’ll see that you can also add a priority and a type for each account.
You can also add and customize the different columns if you like, depending on your business.
To do this:
- Simply click on each column and start typing.
You can add a new account manually, or you can use a form. Additionally, you can add an integration by following these steps:
- Click on ‘Integrations’ just above your columns to the right.
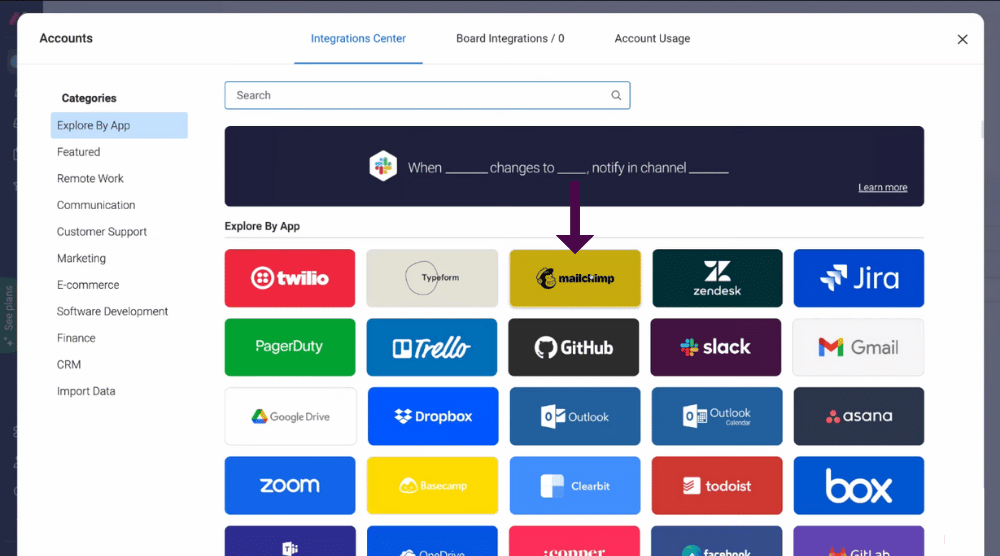
- From here, you can simply integrate any popular tool to enhance your CRM (for example, you can integrate with an email marketing tool like Mailchimp to create integrated email automations that link with a specific group on Monday.com).
If you’re interested in learning more about email marketing with Mailchimp, you can check out How to use Mailchimp to help you get started.
Integrations are actually another easy way you add any contacts, accounts, or leads to your CRM!
We will go into a bit more detail on integrations down the track in this tutorial.
Read more: Create Email Automations with Mailchimp
12) Managing your leads

Like your contacts and accounts boards, you can easily create a form that drives leads to your CRM – making it super simple for beginners
You can also add any relevant leads to your contacts and customize your leads by adding a title, company, email address, and more! (see screengrab).
13) Managing your deals (your sales pipeline)

- Under leads, you’ll find your deals board.
You will see all your default deals and information that is added when you first sign up to Monday.com (see screengrab).
This gives you an overview of how you can structure your own CRM.
All your boards on the left-hand side are interconnected.
If a contact is added to an account, this will also get added to the accounts board.
If you’ve also added a deal, then they’ll be added to your deals board.
- Navigate over to ‘Stage’ and select or edit the stage that each deal is in.
- For example, it could be on the lead, proposal or contract sent stage.
- We’ll take a look at the deal we created earlier ‘Website Design’.
- You can come down and select ‘Add/edit labels’ to edit and add any additional labels for different stages relevant to your business (see screengrab).
- Navigate across and click the ‘+’ button (Start conversation) next to the deal name i.e ‘Website design’. This will generate the same general overview, updates, activities and quotes and invoices headings as we saw earlier in your contacts.
Or
- Simply click on the deal. This will generate the same information
From there, you can, for example, send a follow-up email directly from Monday.com to the contact that’s associated with this deal.
What about when you’ve completed or closed a deal?
- Once you have completed the project, select the ‘Won’ stage. We will do this for our deal ’Website Design’.
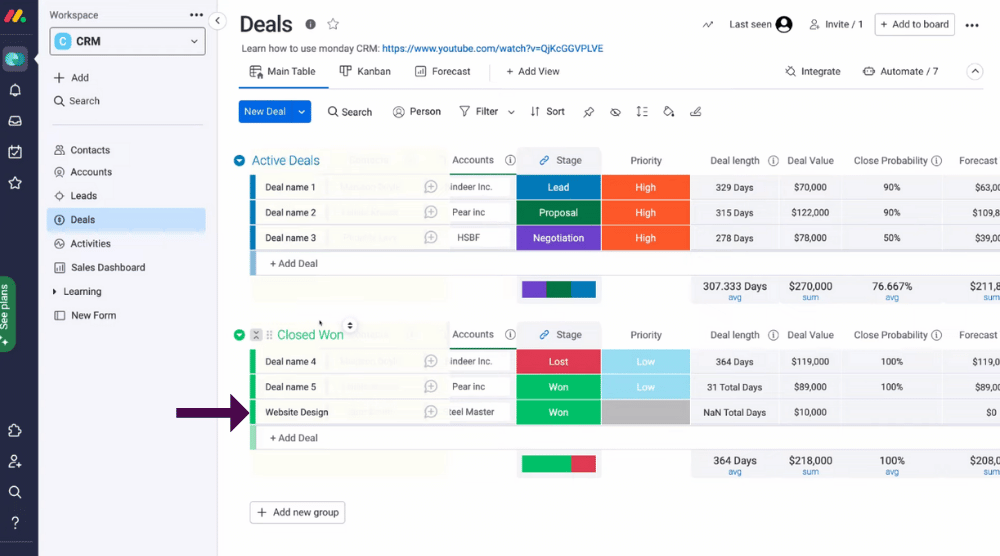
- This will shift our deal automatically from ‘Active deals’ to ‘Closed won’ where you can now see our deal ‘Website Design’ (see screengrab).
This is an example of Monday.com’s CRM automations.
14) Automations

Let’s go into more detail using our example above:
If a particular action happens within ‘Active deals’ (or within another group), then the automation that’s set up will add that deal down under ‘Closed won’ group.
If you navigate up to ‘Automate’ on the same page as your deals,.
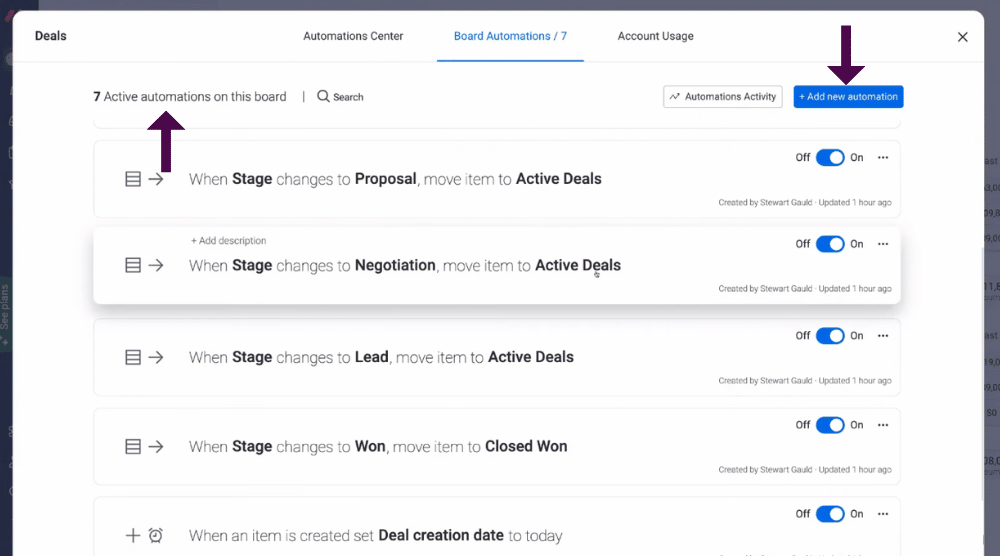
You’ll be able to see all the active 7 automation that have already been set up by default for this specific board.(see screengrab).
Let’s take a look at the automation we just triggered by scrolling down.
You can also find all other default automation (for all boards) under the ‘Automate’ heading.
Monday.com is unique and allows you to simply create automation between different boards and groups.
You can even add automation for notifications (for example, sending an email to a manager when a specific deal has been won) and more.
Adding a new automation
If you want to add new automation, you’ll find this in the same place as where all your default automation are explained above.
From here:
- Simply click ‘Add new automation’ and edit your automation from scratch to your liking.
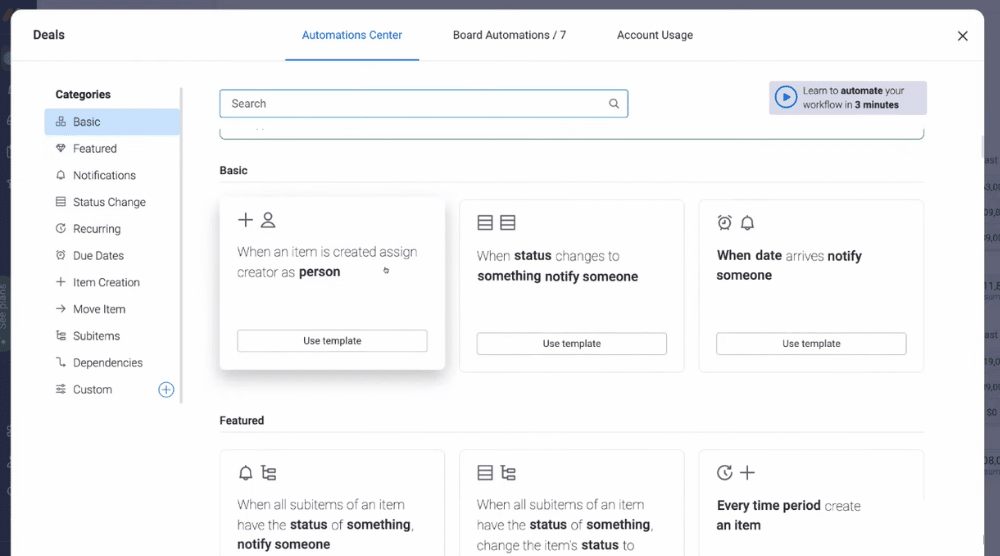
Now, click ‘Back’ to get back to automation:
- Currently, we are on the board ‘Deals’ for your automation.
- You can come down and view different categories for automation (see screengrab)
Want to customize your automation?
You can do this by selecting any pre-made automation template and customizing it in the way that suits you. Amazing, right?
This is where Monday.com stands out from other CRMs!
Simple and understandable automation that anyone can learn and leverage.
Want to know more about this powerful tool?
You can check out our beginner’s guide Monday.com Project Automation tutorial that will guide you through a comprehensive automation tutorial for Monday.com if you’re interested in learning more about automation.
- Exit out of automation.
- Then exit out of your deals.
15) Activities

- Navigate your way back over to your boards.
- Over on the left-hand side of your CRM you’ll see activities.
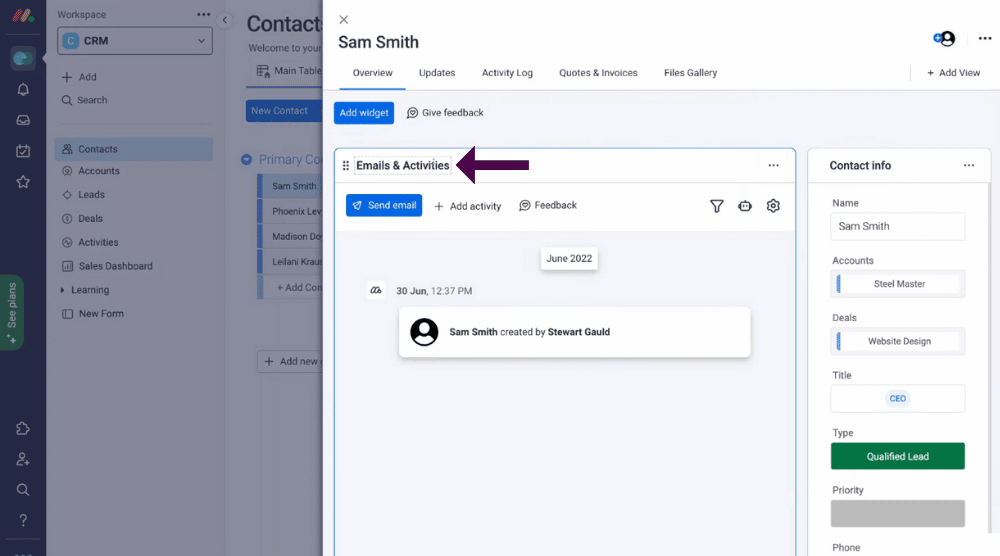
Here you’ll see your activities board that shows any activities that you’ve added using the ‘Emails and activities’ page (see screengrab).
If you head back up over to your contacts board:
- Click on any individual and you’ll see all emails and activities relating to that contact.
- You can also add a new activity here.
- This will also automatically show on your activities board.
Monday.com makes it super easy to get started with your CRM by creating default board templates all on the left-hand sidebar.
In addition to this, all your automation have already been set up.
All you need to do is delete any default items you don’t want and add your own items within each board.
For example, you can remove all default contacts and add your own in the board we have on the left:
- Contacts
- Accounts
- Leads
- Deals
That way all automation will stay the same. You can even add your own if you like as I showed you in automation!
16) Sales Dashboard

Your sales dashboard is the last default board – you can find it directly below your activities board.
This is essentially a custom sales dashboard that you can control.
If you click on ‘Sales dashboard’, you will be taken to a bunch of different visual widgets displaying important data about your CRM activties. (see screengrab).
Your sales dashboard is the place where you can manage all your KPIs and your team’s performance.
This sales dashboard is a default board, however, you can create different dashboards if you want.
These widgets are connected to the rest of your boards, so for example, if a deal changes stages, then you’ll notice that change within your dashboard.
For example, the widget ‘Active deals’ is the sum of all your ‘Active deals’.
You can also find this information if you navigate back to your deal board under ‘Deal value’.
A step-by-step guide on your dashboards:
- With each widget, you can select ‘More options’ (the three dots next to the widget).
- Next, click on ‘Settings’ and choose which columns (what information) you want to include in that specific board.
- You can customize any of the widgets
- If you navigate up and click ‘+ Add widget’ you can create a new widget.
- For example, we will select a chart.

- This will generate a chart view of all our deals.
- Now we can drag different layouts to different positions and rename the layout of our chart.
- Click on ‘More options’ (the three dots in your new widget).
- Then, click on ‘Settings’
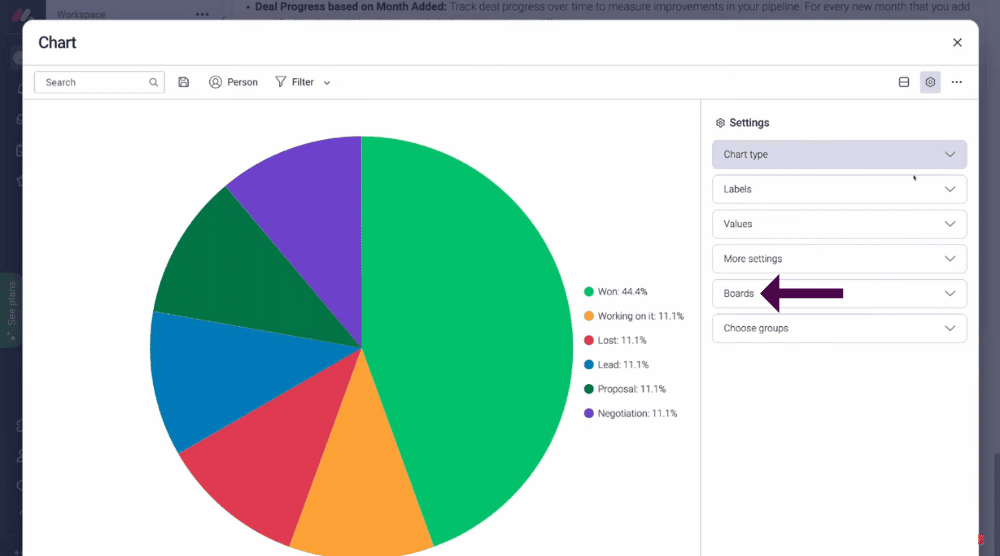
- Select the chart type to choose how we want to visually view our performance (see screengrab).
If you minimize this and navigate down to ‘Boards’, you can add additional boards to this widget.
- Click ‘Add boards to this widget’. For this Monday.com tutorial, we will choose ‘Contacts’.
- Click ‘Done’. This will add the information from your chosen board as well.
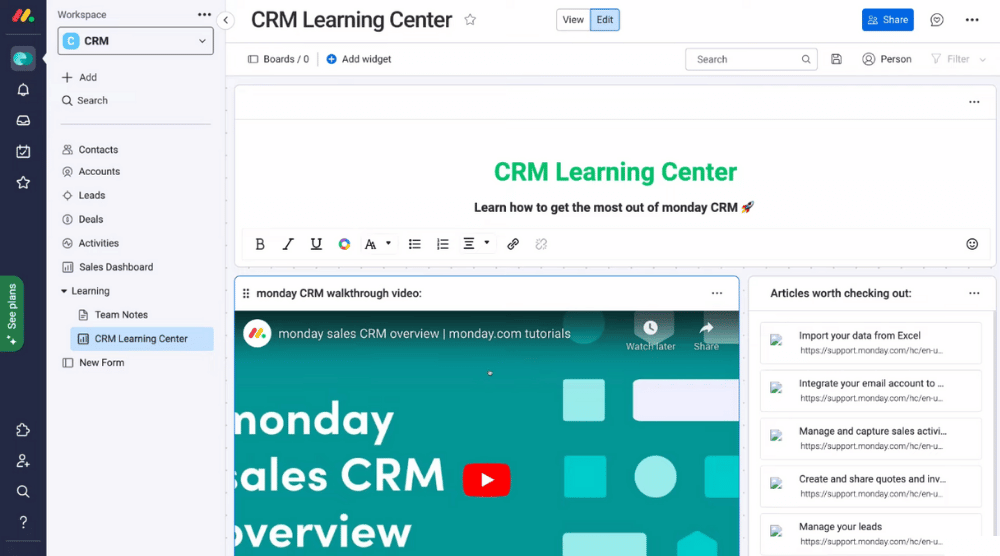
In addition to all of your boards, you have access to Monday.com’s ‘Learning center’ at the bottom of your left-hand sidebar.
This is a space that provides you with some learning resources to help you on your journey to better understand how Monday’s CRM works.
17) Integrations

As previously mentioned, you can integrate Monday.com with all your favorite platforms!
- Navigate over to your contacts board, select ‘Integrate’ and then click on ‘Integration center’.
We suggest you take the time to search through and find all the important apps and tools that you use daily so that you can engage in different activities from other platforms directly within Monday.com.
Some incredible examples include:
- Google drive for accessing files within Monday.com
- Connecting your calendar/business emails
- Email marketing
- And many more!
However, that’s it for our 2022 Monday.com CRM tutorial!
Complete Monday.com CRM Tutorial For Beginners (Video Guide)
This covers everything you need to know to help you understand and navigate all the impressive features that Monday.com’s CRM has to offer.
We hope you gained value.
Feel free to watch our video tutorial below for an in-depth visual guide to get you started with this impressive CRM.
