And a whopping 9 out of 10 people expressed a desire to see more video content from their favourite businesses and brands.
Driven by consumer demand, businesses of all sizes are now realizing the significance of video marketing as a core component of their marketing strategy.
The good news is – learning how to create videos for your business is fun, super easy, and affordable.
In this tutorial, we’ll introduce you to the best video editor for beginners and explain how to make professional, engaging videos within minutes (no previous video design or editing experience required!).
InVideo: Best Video Editor for Your Business
An intuitive, easy-to-use video editor, InVideo gives you access to thousands of video templates that can be customized to your liking.
When you make video content every day, these templates save you an incredible amount of time and this is one of the leading reasons we love using this video editor and maker.
Not just that, you also get access to transitions, filters, music library, iStock media, and more.
Okay so let’s learn how to create videos using InVideo.
To begin with InVideo, head over to their website to get started (use the code STEWART25 for a 25% discount – if you decide to upgrade to a premium plan)
Step 1: Create Account and Complete Initial Setup
Once you arrive at InVideo:
Click on ‘Get Started – It’s Free’
Add your personal information and click ‘Create Account’
Select the best option that best describes you or your business. For this io tutorial, we’ll go for ‘Small Company’. Hit ‘Next’
You may add unlimited members to collaborate with on InVideo in this step. However, you can also click ‘Close’ and do this later on
Once you’re inside the InVideo dashboard, click on ‘Upgrade’ in the upper-right corner to browse through the two affordable premium plans offered by InVideo.
A great thing about this video editing software is that you can create compelling videos absolutely for free.
However, to remove the watermark you’ll need to upgrade your plan to one of the two premium plans.
If you go for the yearly billing cycle, you can access the Business plan for just $15 a month!
This video editing tool is ideal for both complete beginners and experts. Here are the reasons we love using the paid plan:
– Simple to use for beginners.
– Access to millions of stock images and videos to use.
– Access to over 5000 pre-made (customisable) video templates.
– Affordable plans for small businesses on a budget.
– Unlimited users can join your account (no extra cost).
– Quickest way to create professional videos (our opinion!)
Remember to begin with InVideo, head over to their website here to get started (use the code STEWART25 for a 25% discount – if you decide to upgrade to a premium plan)
Let’s show you how to access the most exciting features of InVideo (head back to your Invideo dashboard):
Point your cursor to ‘Pre-made Templates’ at top-left
Click on it to browse through InVideo’s professional templates
Hover your cursor over any of them to preview
As mentioned before, InVideo is one of the best video editors for beginners that also gives you access to millions of stock images and videos from Shutterstock and iStock.
Next to ‘Pre-made Templates’, we have ‘Text to Video’.
This allows you to select a premade video theme and add your text, which would then automatically be converted into an engaging video. With just a few clicks, you’ll have a custom video!
Of course, you can further customize that video by changing different elements using the best video editing software.
Step 5: Navigate Over to ‘Blank Canvas’
Adjacent to ‘Text to Video’, we have ‘Black Canvas’.
As this suggests, this is where you can create videos from scratch. But why not leverage the thousands of templates and a powerful video editor to save time and still end up with beautiful, professional-looking videos?
Step 6: Select the Appropriate Video Format
Notice the search bar in the middle?
Use it to find specific templates based on the type of video you want to create.
Below that, you can also select an appropriate dimension for your video.
Wide (16:9) format:great for YouTube videos
Square (1:1) format:recommended for social media video posts
Vertical (9:16) format:perfect for YouTube Shorts, Instagram Reels, Facebook stories, Instagram stories, and TikTok videos
For this InVideo.io tutorial, we’ll opt for the wide video format.
Learn How to Create Videos for Your Business
Now that you’re familiar with InVideo’s amazing features and have selected a video format, we’re going to go ahead and create our first video from a professional pre-made template.
Say, we want to create video content around ‘Yoga’ in this InVideo.io tutorial.
What you would do is type in the keyword‘yoga’ in the search bar provided.
Click on ‘yoga’ in the suggestions and then you’ll be given access to 26 beautiful yoga vertical video templates.
To generate a larger preview, just click on the template that draws your attention. Again, you have the option to choose your video dimensions here. However, not every template is available in all dimensions.
To choose a square video template, for example, the best approach is to scroll back to the top and click ‘1:1 Square’ on your right. This will generate templates that are available in square video format.
If you like the look of a template, click ‘Use this Template’ to begin.
Pro Tip: The template you choose using this video editing software also depends on what your goal is. Using the same process explained above, you can choose an appropriate template for real estate business, gym promotion, end-of-season sale, and lots more.
Step 7: Use InVideo’s Visual Editor & Timeline
Once you select a template, this is when the video editing process begins.
Another cool feature of InVideo is the ability to switch between templates even after you’ve already added your elements and customized the video.
This is an incredible feature to leverage if at some point during the editing stage, you don’t find the template suitable – so you don’t have to go back to square one after all that hard work creating your video.
All you would do is navigate over to ‘Templates’ in the upper-left corner.
Locate an appropriate replacement and click ‘Use this template’ to switch.
Note: Before we move ahead in this InVideo.io tutorial, we suggest subscribing to their YouTube channel to stay updated with their useful tips to create stunning videos for your business. With time, this will also help you polish your video editing skills.
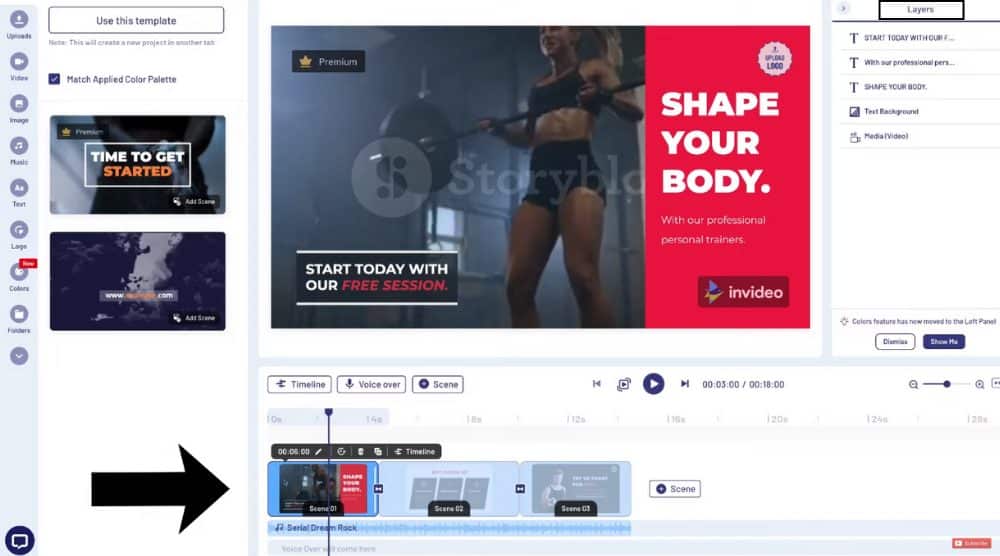
Step 8: Let’s get you familiar with InVideo’s visual editor:
What you see in the middle is the video template you’ve selected
The video is made up of three scenes. By clicking the ‘+’ icon, you can add additional scenes by either choosing a blank scene or picking a premade template
Each of these scenes can be extended in duration (or shortened), duplicated, or deleted (refer to the screengrab to view the editing options)
You can also see the music editing options below your scenes. Use the simple drag feature to fit the music according to the scene.
Above the scenes, you’ll find the option to add a voice over as well
See the text element on the template? Click on it and notice the highlighted text element above your scenes that also shows its duration.
On the right-hand side of your templates, you can see the ‘layers’. The top layer is always at the front of the screen. If you have multiple layers overlapping each other on your scene, you can simply drag those elements to their appropriate placements.
Keep the text element selected. Now, you can change the default text by removing it and adding your preferred text. Notice the text editing options above your template (see the screengrab). Feel free to change the color, alignment, font, animation style, and more.
Each element you see on the template can be customized the way that you like. Just click on the required layer, change the duration from below, and edit using the options above.
Step 9: Upload Media Files
Click on ‘Uploads’ on the navigation menu you see on your left.
Select ‘Upload Media’ to upload images and videos to InVideo. Drag and drop that media to replace the existing stock image/video.
Step 10: Select Stock Media Using InVideo
If you need to access the millions of stock images and videos instead, simply click on ‘Video’ or ‘Image’ or on the navigation menu.
To select a stock video, for instance, type in the keyword related to the media you are after (for example ‘gym video’), choose an appropriate stock video, and then you can either replace the existing media on your template or ‘add as a layer’ (see the screengrab).
We’ll choose ‘Replace’ for this InVideo.io tutorial.
It’s recommended to select “Trim video to fit screen” before replacing it.
Click ‘Done’. The original stock video has been replaced with the new one. Similar to videos and images, you can also add stock music using the same process.
Below ‘Music’, we have ‘Text’. This is where you can find all the text elements within InVideo.
Simply use the drag-and-drop editor to add those to your template.
Now, if you wish to upload your business logo, you can do so under ‘Logo’ and replace the default logo you see on the template.
To play around with the template color, head over to ‘Colors’ on your left.
If you make a mistake while editing your videos then In the upper-right corner of your screen, you’ll find the options to undo or redo your changes.
There are more advanced editing options but we’re not going to cover those in this InVideo.io tutorial for beginners.
However, this is everything you need to know to start creating stunning videos as a beginner.
Click on ‘Download & Share’ in the upper-right corner.
Select the video quality and hit ‘Export’.
However, in order to download your video in 1080p and remove the watermark, you’ll need to upgrade your plan.
On your left, you’ll see the preview of your video. Click ‘Download’ when you’re ready.
If you didn’t upgrade your plan, your video will have a watermark.
Remember to begin with InVideo, head over to their website here to get started (use the code STEWART25 for a 25% discount – if you decide to upgrade to a premium plan)
We hope by now, you’ve learned how to create videos for your business.
If you wish to join the InVideo Facebook community of marketing experts and video creators, click here.
This is a great place to learn and develop your video editing skill!
Disclosure: Some of these links on this page are affiliate links, meaning we will get a commission if you buy through them, this helps support our education-based platform – thank you in advance.
Create Business Video ( Video Guide)
Check out our full video In video tutorial down below that will visually guide you through the steps we mentioned above.
Hi! My name is Stewart, I have a strong passion for digital marketing, business software and small business strategy.
My #1 goal is to provide simple, understandable and actionable information for small businesses located all over the world.
I'm a lover of travel, water sports and spicy food!
We use cookies on our website to give you the most relevant experience by remembering your preferences and repeat visits. By clicking “Accept”, you consent to the use of ALL the cookies.
This website uses cookies to improve your experience while you navigate through the website. Out of these, the cookies that are categorized as necessary are stored on your browser as they are essential for the working of basic functionalities of the website. We also use third-party cookies that help us analyze and understand how you use this website. These cookies will be stored in your browser only with your consent. You also have the option to opt-out of these cookies. But opting out of some of these cookies may affect your browsing experience.
Necessary cookies are absolutely essential for the website to function properly. These cookies ensure basic functionalities and security features of the website, anonymously.
Cookie
Duration
Description
cookielawinfo-checkbox-analytics
11 months
This cookie is set by GDPR Cookie Consent plugin. The cookie is used to store the user consent for the cookies in the category "Analytics".
cookielawinfo-checkbox-functional
11 months
The cookie is set by GDPR cookie consent to record the user consent for the cookies in the category "Functional".
cookielawinfo-checkbox-necessary
11 months
This cookie is set by GDPR Cookie Consent plugin. The cookies is used to store the user consent for the cookies in the category "Necessary".
cookielawinfo-checkbox-others
11 months
This cookie is set by GDPR Cookie Consent plugin. The cookie is used to store the user consent for the cookies in the category "Other.
cookielawinfo-checkbox-performance
11 months
This cookie is set by GDPR Cookie Consent plugin. The cookie is used to store the user consent for the cookies in the category "Performance".
viewed_cookie_policy
11 months
The cookie is set by the GDPR Cookie Consent plugin and is used to store whether or not user has consented to the use of cookies. It does not store any personal data.
Functional cookies help to perform certain functionalities like sharing the content of the website on social media platforms, collect feedbacks, and other third-party features.
Performance cookies are used to understand and analyze the key performance indexes of the website which helps in delivering a better user experience for the visitors.
Analytical cookies are used to understand how visitors interact with the website. These cookies help provide information on metrics the number of visitors, bounce rate, traffic source, etc.
Advertisement cookies are used to provide visitors with relevant ads and marketing campaigns. These cookies track visitors across websites and collect information to provide customized ads.