The aim of this tutorial is to guide you through how to create video ads with Canva using their free video maker so you can get started with powerful video marketing for your small business!
Video marketing is an integral part of any marketing strategy for all types and sizes of business, however for small businesses it can sometimes be a daunting and expensive process to create video content (like video ads).
This is where Canva’s free video maker becomes an ideal solution.
You can simply create free video content in minutes!
Haven’t heard of Canva before? You’re missing out!
They are a leading (and free) online design and graphic design platform that lets you easily create posters, logos, presentations, social media content, and more for your small business.
If you’d like to learn more about how to use Canva, check out this video tutorial that walks you through step-by-step how to use Canva to create stunning designs!
How to create Video Ads with Canva?
In this Canva tutorial, we’re going to share how to create video ads for free in minutes with Canva’s video maker and video editor.
Let’s go ahead and dive into this free video maker tutorial so you can start creating dynamic video ads for your business with Canva!
1. Getting Started With The Canva Video Maker
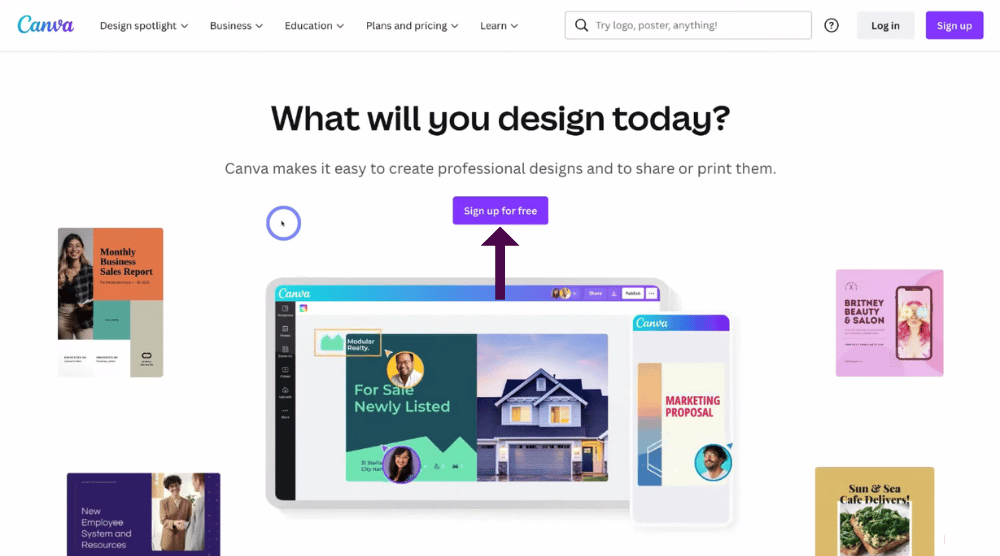
Get started with Canva for FREE here
*The link above is an affiliate link, which means we will get a commission if you upgrade to a paid plan (with no extra cost to you). This helps support our education-based website and we thank you in advance!
Firstly, you’ll need to sign into your Canva account on your website browser.
If you’re new to Canva, you’ll need to sign up and create an account for free. To sign up for Canva:
- Click here.
Let’s meet you inside your account and start creating video ads with Canva using their free video maker!
It’s important to note that during this Canva video maker tutorial, we’re using a paid Canva Pro account.
However, as this is a tutorial focusing on how to create video ads for free, we’ll point out the differences between the Free plan and the paid Pro Plan while navigating around so that you can understand the differences between a paid and free Canva plan.
There are actually a few ways that you can quickly start creating video ads with Canva (or any other type of video content).
We’re going to delve into these below.
Read more: How To Create A Free Website with Canva
2. Choose a Custom Video Size
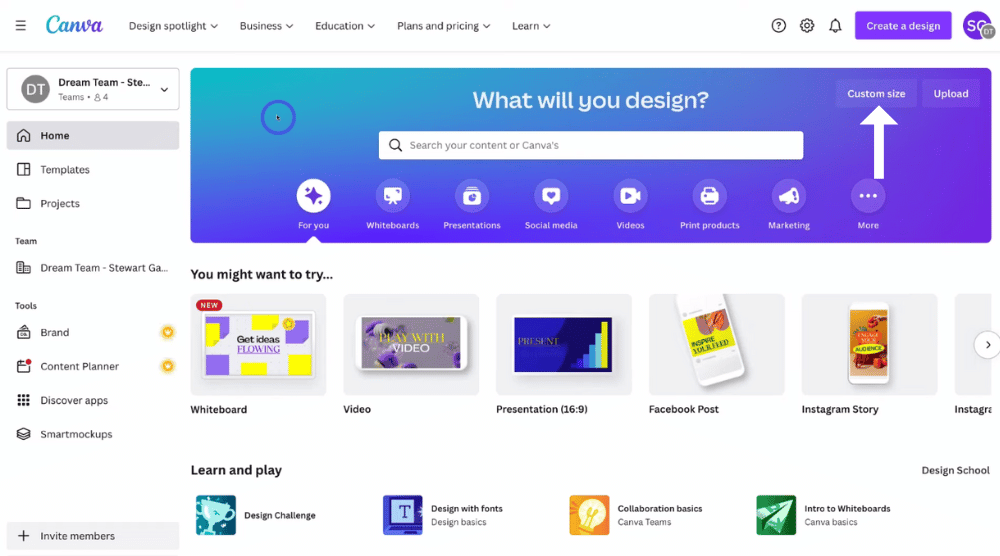
The first way that you can start creating video content within Canva is to choose a custom video size.
- Navigate over to the right-hand side of your Canva dashboard and click on ‘Custom size’.
You now have the option to add custom size to the template you want to use
- Simply type in the size you want the width of your template to be under ‘Width’.
- Type in the height under ‘Height’.
For example, if you wanted to create a template that’s square, you’d type in ‘500’ under the ‘Width’ field and ‘500’ in the ‘Height’ field.
This ‘Custom size’ option is ideal if you know exactly what size template you want to use.
However, for the purpose of this Canva video editor tutorial, we’re not going to choose this option.
Read more: Top 5 ways to create powerful business videos.
3. Video Templates
Next, we’ll show you how to create a Video ad with a template.
Firstly, you’ll need to search for a Video ad template by following the steps below:
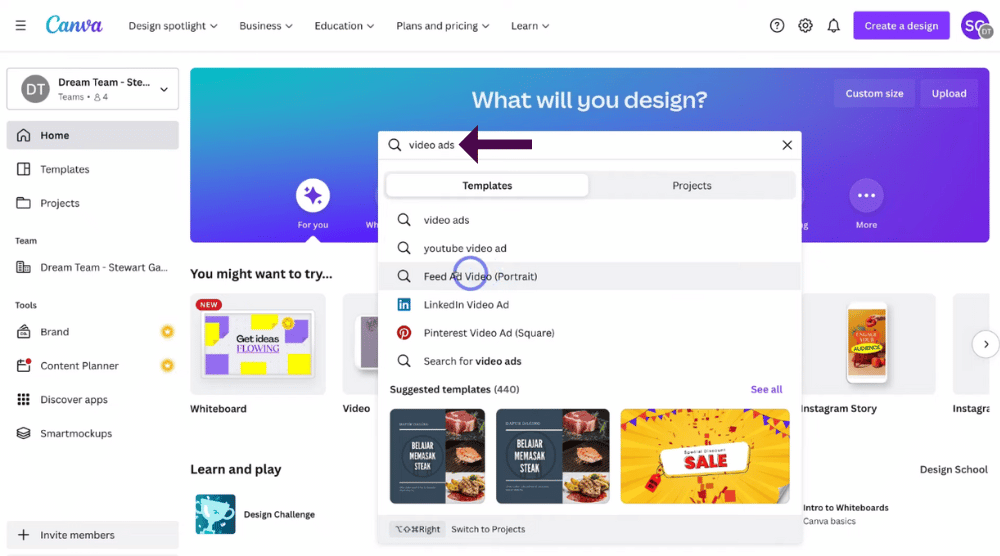
- Navigate over and click on the search bar in the middle of your dashboard showing the text ‘Search your content or Canva’s’.
- Type in ‘Video ads’.
As you can see, Canva is going to generate some options that you can click on to use to create your video (see screengrab).
Some of these suggestions options include:
- A YouTube video ad.
- A Feed add video (a portrait video that you can use in your Facebook, Instagram, or TikTok stories)
- A Pinterest video ad.
- A Linkedin video ad.
However, for the purpose of this tutorial, we’re not going to choose those options. We’re going to check out some of the different templates Canva has to offer instead.
- Navigate up to the search bar.
- Hit enter.
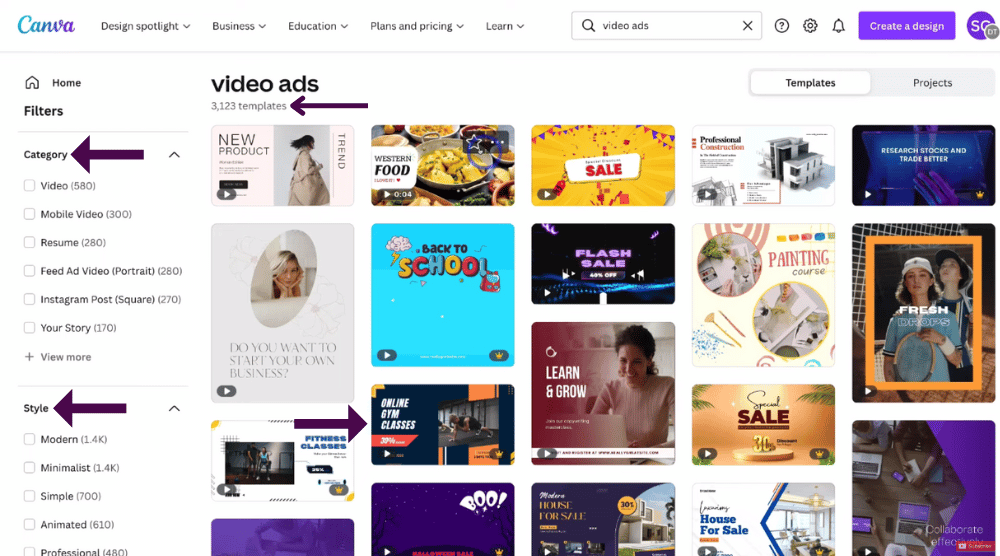
One of the great things we love about Canva is you can simply use pre-made templates in order to create your own designs!
For the purpose of this tutorial on how to create video ads for free with Canva, we’ll choose a video ad template and then customize that template.
As you can see, there are over 3123 templates relating to ‘Video Ads’ that we can now simply view, choose and customize to our liking (see screengrab).
You can filter your template options over on the left-hand side.
- Select and deselect the categories, styles, themes, or colors you want to filter and show for your video ad template.
For the purpose of this free video maker tutorial, we’re going to create a video ad for a gym (see screengrab).
Go ahead and take the time to pick a template that best suits your business and brand. Once you’ve done that:
- Simply go ahead and click on your chosen pre-made template.
Remember, you also have the option to create your video from scratch, however, if this is your first time creating a video with Canva or maybe you have very limited design and technical experience when it comes to crafting a video, then we suggest using pre-made templates.
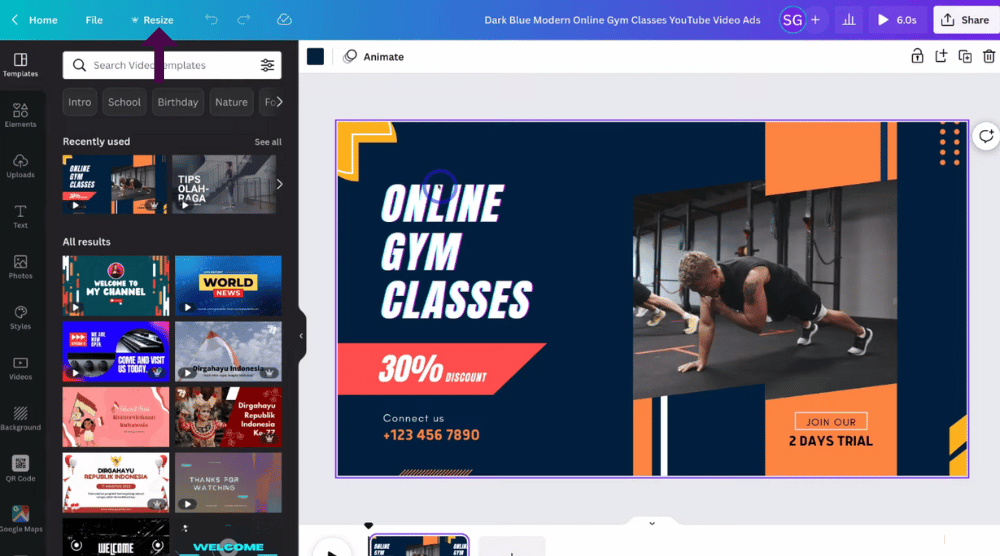
Once you’ve chosen your team plate, you can actually see the size of your template.
- Head up and click on ‘Resize’ in the top left-hand corner.
Our chosen template is going to be ideal for many different types of platforms.
With Canva Pro (the paid plan), you can actually change the size of your designs at any stage.
However, with the free plan, you can’t access this feature of resizing your designs.
Read more: How To Create QR Codes for FREE
4. Your Design Canvas

Here you can see that we have the template that we selected (see screengrab).
Our template is made up of different scenes, and each scene is made up of many different elements that you can simply click on and customize.
We’ll talk more about customizing each of these elements shortly, however, let’s continue with this tutorial to create video ads with Canva!
Read more: How To Create Videos for Your Business
5. Change The Video Template
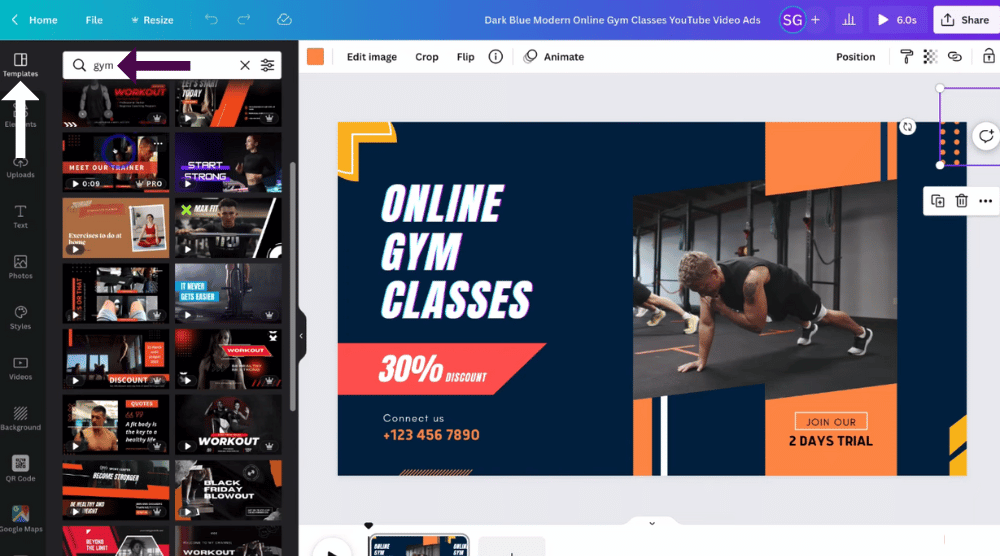
You can easily change your video templates if you’re not happy with the one selected.
- Navigate over to the left-hand sidebar to ‘Templates’.
- Type in a specific video template keyword in the search bar related to the type of design or video that you’re after.
Because we’re creating a video ad for a gym, we’re going to go ahead and type in ‘Gym’.
Once you’ve typed in your keyword:
- You’ll notice some suggested keywords underneath the search bar that you can also click on and use to find specific templates.
- Underneath these, you’ll see all the available templates relating to that keyword.
It’s important to note that some templates are only available on the ‘Pro’ paid plan.
You can identify these by hovering over each template.
If they have a crown icon and the word ‘Pro’, it means they are only available on the Pro paid plan.
We’ll go ahead and choose a free template to get stuck on how to create video ads with Canva for free!
6. Video Structure
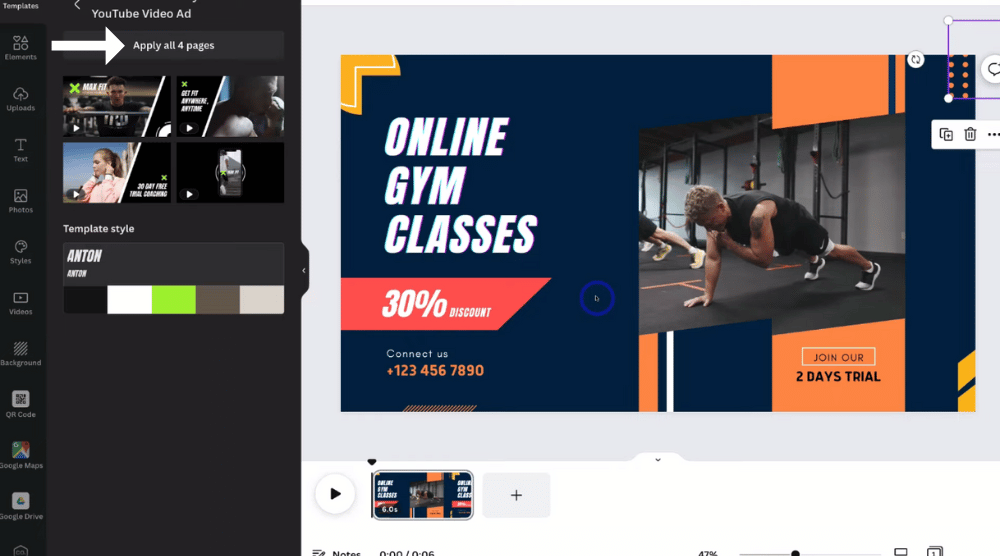
Once you’ve chosen your template, Canva will give you the option to replace your existing template with different suggested pages.
This is a page here on the left-hand side (see screengrab).
Make sure that you consider each of your different pages when creating your video.
You can think about each of your pages as separate ‘scenes’ to your video.
This template has multiple different pages and different scenes that we want to add to our video, so we’re going to click ‘Apply all four pages’ on the left-hand side.
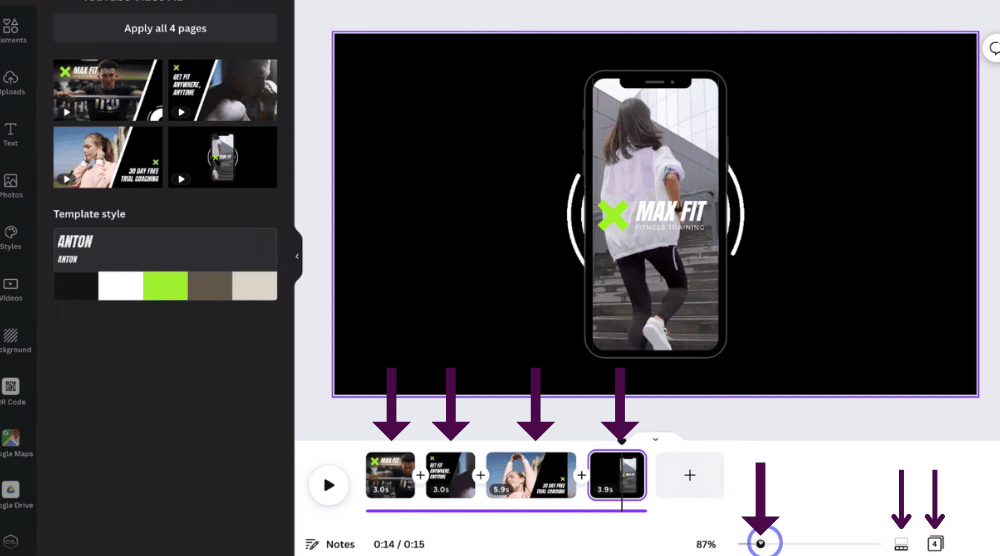
Once you click it will replace the existing template with the new 4 pages.
You can now see that our video consists of four separate pages (four separate scenes) (see screengrab).
Once you’ve added in your scenes, you can simply click on each scene to customize it.
Additionally, you can zoom in and out to have a better understanding of your video scenes.
- Head down underneath your scene thumbnails.
- Simply click and drag on the zoom slider to adjust the zoom in or out (see screengrab).
- Next to the zoom slider, click on the ‘Zoom thumbnails’ icon.
That’s going to allow you to actually zoom in or out to that particular scene and add finer details or small adjustments to your video elements.
- Next to the ‘Zoom thumbnail’ icon, click on ‘Grid view’.
That’s going to generate a grid view of all your different videos
- Simply come down and turn off ‘Grid view’ to exit out of ‘Grid view’.
7. Edit Video Elements – Free Video Editor
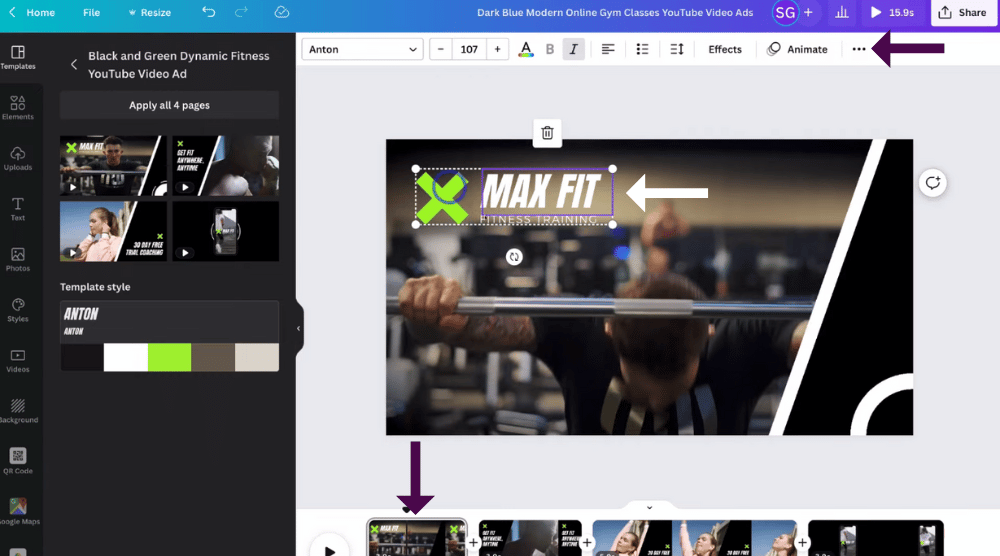
Now we’ll walk you through how to edit and customize your video elements within your scenes with Canva’s free video editor! Follow the steps to find out how:
First scene:
- Click on the first scene of your video.
As you can see, we’re using a free template.
- Navigate up to and click on one of the elements you want to edit.
We’ll use and click on our element ‘Max fit’ as an example.
Within this element, we have a title (Max fit), a logo next to the title, and a subtitle underneath (fitness training).
Each of these three items has been grouped (see screengrab).
If you’d like to ungroup your items within your elements to edit them individually:
- Navigate up to the three dots next to ‘Animate’ above your scene.
- Click on ‘Ungroup’.
This will allow you to edit each of these different elements separately.
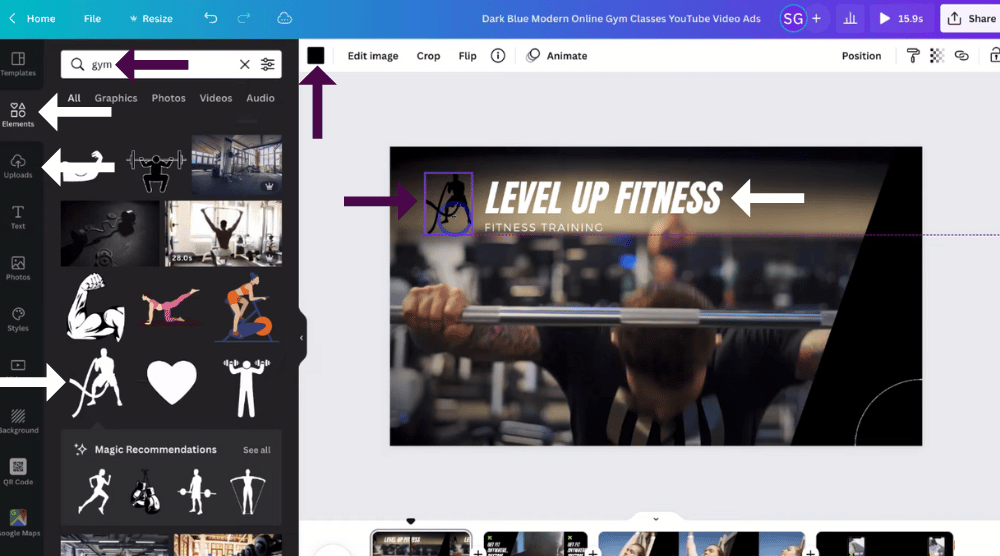
Let’s say we want to replace and customize our title ‘Max fit’ with our own gym name.
- Click on the ‘Max fit’ element.
- Type in the new name. We’re going to rename our element ‘Level up Fitness’.
Our new name is quite long so it doesn’t quite fit within our element. To change the size of your element:
- Simply click on the element and drag it out so it fits.
- Resize your element by simply dragging out the corners of the element.
Above your scene, you also have a bunch of formatting options where you can edit your text (see screengrab).
Here you can:
- Change the size
- Change the font.
- Change the color.
- Change the alignment.
- Make it a list.
- Change the spacing.
- Add a particular effect.
Next, we’ll show you how to replace an element within your scene.
We’ll go ahead and replace this logo with a different logo.
- Navigate over to ‘Elements’ on the left-hand sidebar below ‘Templates’.
- Type in your keyword in the search bar.
We’re going to type in ‘Gym’ again.
That’s going to generate all these different gym icons that you can now choose for your logo (see screengrab).
Alternatively, you can upload your own logo if you have one already.
- Navigate over to ‘Upload’ to upload your own logo.
You can actually also use Canva to create your own logo completely for free!
If you’re interested in learning how to create your own logo with Canva, you can check out our step-by-step beginners tutorial here.
However, let’s get back to this tutorial on how to create video ads for free with Canva.
For the purpose of this tutorial, we’re going to pick a logo from our search results.
We like the look of this logo here (see screengrab).
Once you’ve selected your chosen logo, click on the logo.
That will simply add your logo to your scene.
Now you’ll need to delete the original logo.
- Click on the logo you want to delete.
- Click the rubbish bin icon.
To resize your new logo:
- Select your new logo.
- Drag and drop your logo to place it where you want within your scene.
- Drag out the sides to the size that you like (like we showed you earlier).
Additionally, you can change the color of your logo.
- Navigate up to the color icon next to ‘Edit image’.
- Simply click on the color you want. This will automatically change your logo color.
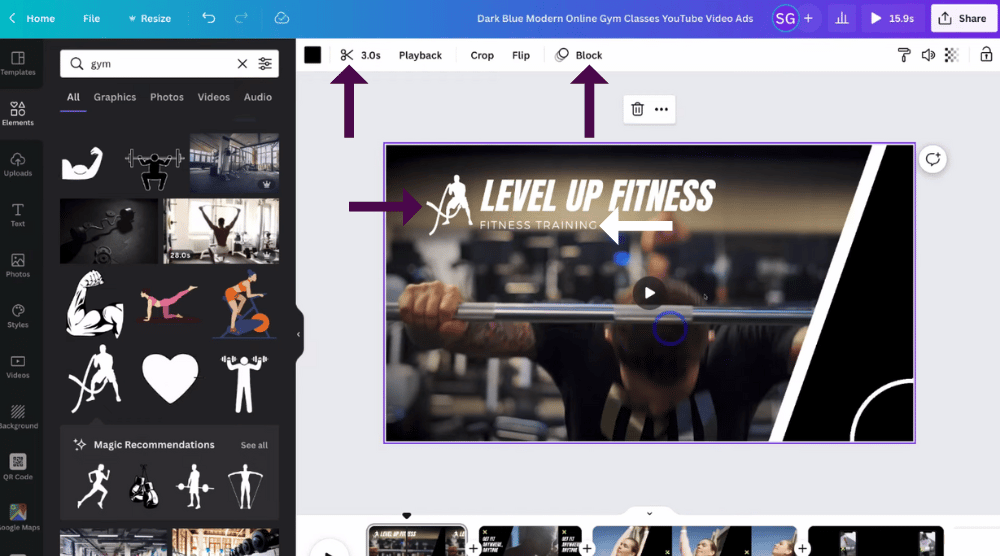
We’re going to change the color of our logo to white (see screengrab).
Next, we’re going to quickly go ahead and change our sub-text i.e ‘Fitness Training’ within our element using the same process as we showed you with our title.
However, we’re going to keep it as it is.
Within this scene, there’s a background video behind the elements we just edited.
To customize this video:
- Click on the background image (video).
- Navigate up to and click on the scissor icon to change the length of this particular video.
You can see the length of our video in the middle part (which is three seconds long).
- Simply drag the middle part to make it longer or shorter if you’d like to change the length.
- Click ‘Done’.
- Click ‘Play’ on the scene to preview the video.
There’s also an animation for this video that we’ll show you soon when we give this scene a preview.
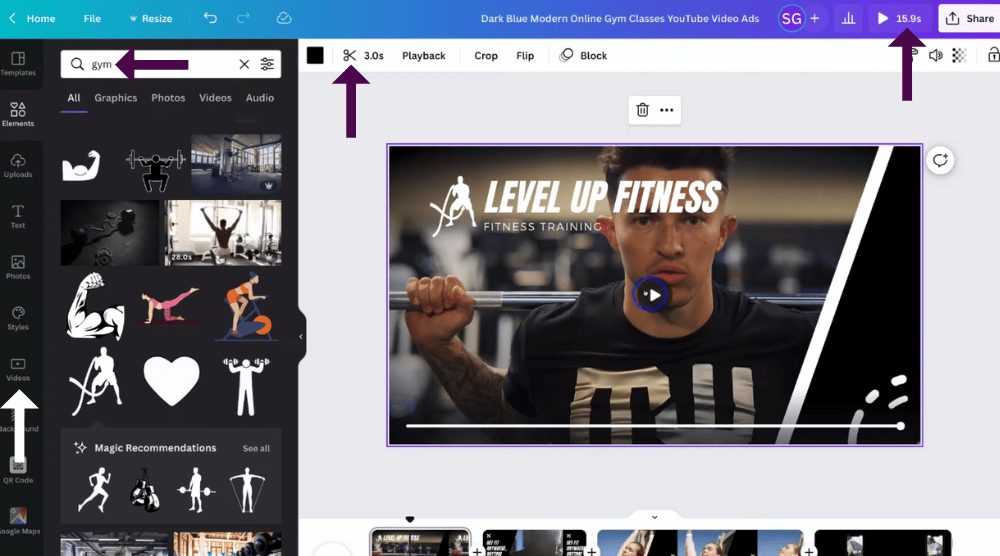
If you’d like to add a new video to your scene, follow these steps:
- Navigate down to ‘Videos’ on the left-hand sidebar.
- Type in your keyword again in the search bar.
We’re going to type in ‘Gym’ again.
That’s going to generate videos related to the keyword you typed in.
- Navigate through these videos to pick the one you like.
For us, most of these are ‘Pro’ videos, which means you need to upgrade to a paid plan.
However, there are some free videos to choose from.
We’re going to choose a darker video to replace our original gym video.
Once you’ve found a video you want to replace your original video with:
- Click on the new video
- Drag and drop this video onto your scene.
That’s going to replace your video with the existing one
- Navigate back up to the scissor icon.
- Simply click on and drag your video to your preferred length if you want to change your video length.
We’re going to make this video ‘Three seconds’ again.
Once you’ve edited the length of your video:
- Select ‘Done’.
To preview your video:
- Simply navigate up to the top right-hand corner next to ‘Share’
- Click here (see screengrab).
And that’s going to generate a full preview of your video where you can see all of your different scenes.
- Navigate back over to ‘Close’ once you’ve finished previewing your video.
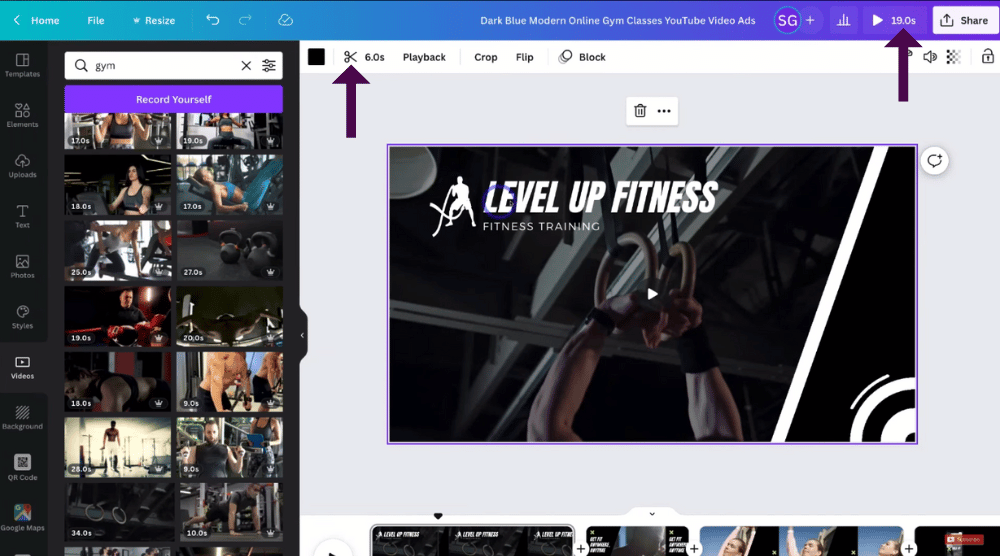
After previewing, you can again make more changes. For example, we’re going to make the video a bit longer.
- Click back on the video you want to make longer.
- Navigate up to the scissor icon again.
- Drag your video out to your preferred length.
We’re going to double the length of the video, so we’ll drag ours out to six seconds.
You can also change the video section you want to capture.
- Select the whole section that you want to change.
- Drag the whole section out to where you want to capture it.
- Click ‘Done’.
Again, you can click ‘Preview’ to preview your new video changes.
You can continue this process until you’re happy with your video length and the section of the video you want to capture.
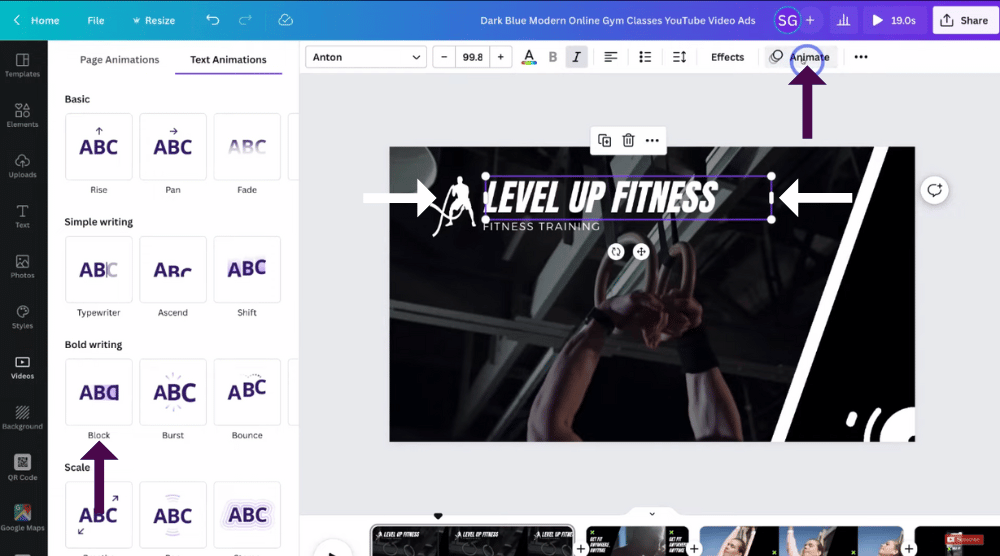
Next, we’ll show you how to add an animation for different text elements.
- Navigate over to the text element you want to animate.
We’re going to pick ‘Level Up Fitness’ again.
- Navigate up to and click on ‘Animate’.
- All of your animation options will appear on the left-hand sidebar (see screengrab).
- Simply click on each animation option to preview what it will look like for your text element.
We like the look of the ‘Block’ animation, so we’re going to click on ‘Block’.
- Click ‘Block’.
Our title ‘Level up Fitness’ is now a block animation.
You can also change other elements to have the same or different animations.
We’re going to choose ‘Rise’ for our logo, and ‘Block’ for both our title and sub-text elements.
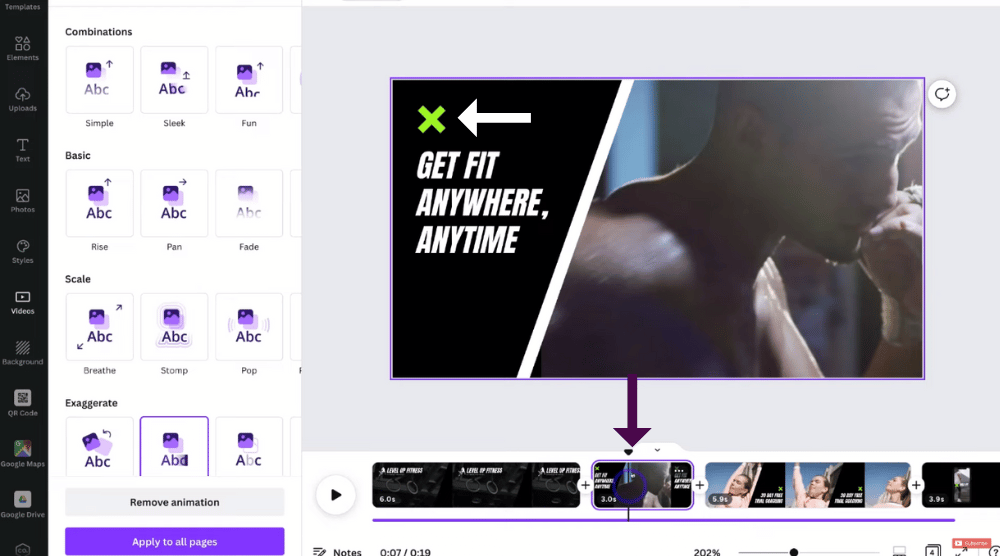
Second scene:
When you’re happy with your first scene, you can move on to the next scene to also customize it to your liking.
- Simply navigate over to the next scene of your video down the bottom of the page (see screengrab).
Remember the next scene is the next page.
As you can see, we have our logo up that we deleted from the first scene (see screengrab).
To replace this logo with the new logo that you chose earlier:
- Click on the logo element.
- Simply click the rubbish bin icon.
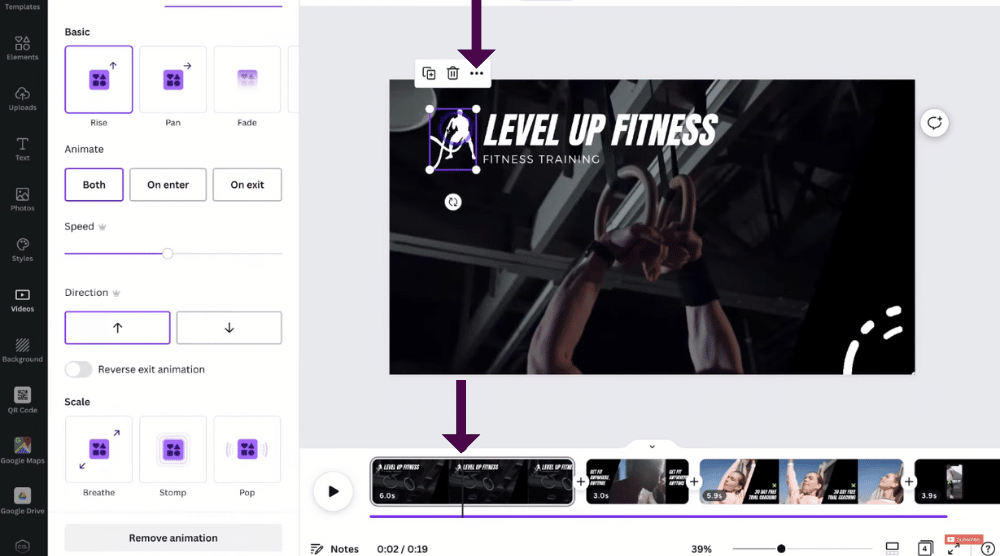
- Head back to the first scene.
- Navigate up to and click on your logo.
- Click on the three dots.
- Click ‘Copy’.
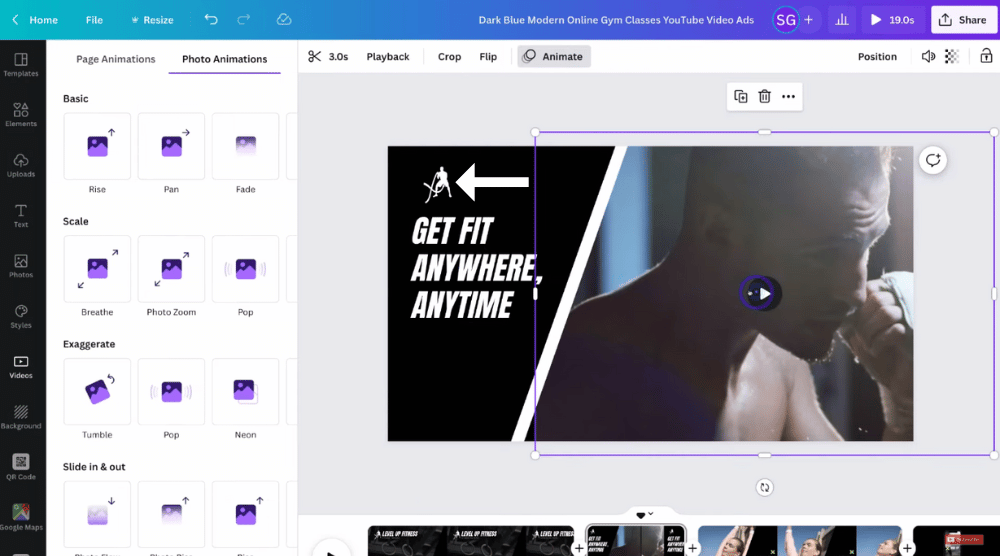
- Head back to the second scene.
- Simply paste that logo where you want it to go.
We’re happy with that.
You can again resize your logo by dragging the different sides.
Once you’re happy with your logo, you can again move on to customizing the different elements within this scene using the same process as we showed you for the first scene.
You can then go ahead and preview your second scene video!
- Select the ‘play’ button on the video to ‘Preview’ to preview the video.
Make sure you time the time to go through each of your different scenes using this process above to customize each of your different scenes.
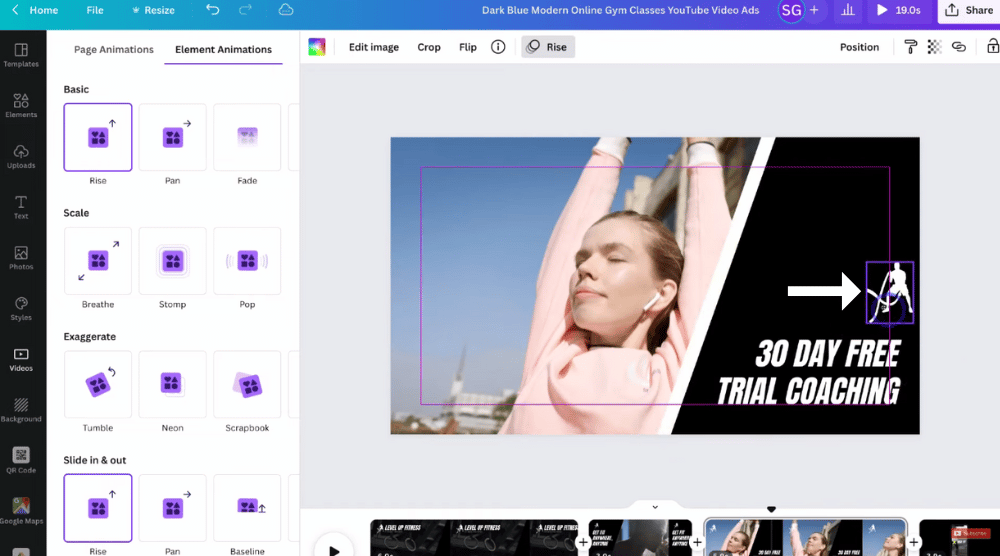
Third scene:
We will quickly go ahead and select our third scene to paste in our new logo (see screengrab) using the same process we showed you in our second scene, and again in our fourth scene.
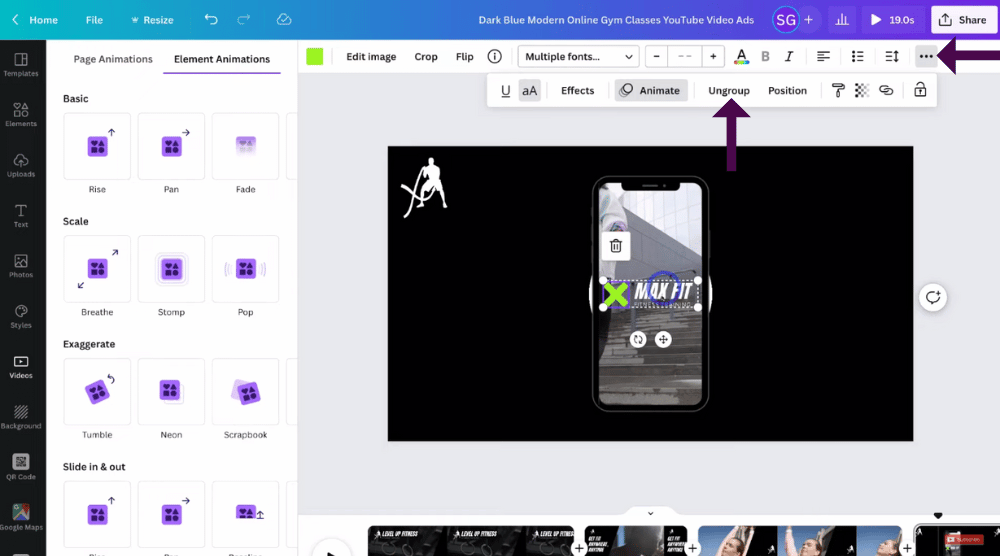
Fourth scene:
As you can see in our fourth scene, if we click on these elements, you can see they have grouped together again (see screengrab). To ungroup these and add in our new logo:
- Navigate up to the three dots next to your formatting options.
- Select ‘Ungroup’.
- Click on each of these elements.
- Click the rubbish bin icon to delete an element.
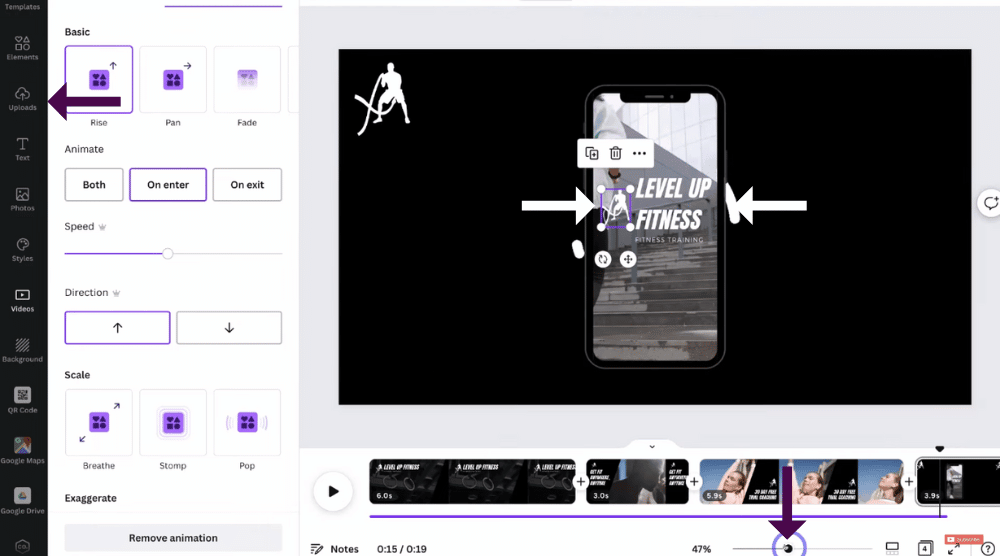
- Paste in your new logo again.
- Drag your logo where you want it to go.
Let’s say you want to edit an element, however, the element is quite small and you can’t quite see it.
You can zoom in to get a closer look.
- Head back down to the zoom slider.
- Zoom in.
Next, let’s change our text to our own branding. (see screengrab).
- Simply highlight the text you want to change and type in your own text.
We’re going to change ours from ‘Max Fit’ to ‘Level up Fitness’.
You can then move the element around or change the size to your liking using the same process as we explained in our first scene.
We’re happy with that
Once you’ve finished editing and changing you are zoomed in on the scene:
- Come down and zoom back out for a more macro view to see how it looks.
From there, if you’re not quite happy with it you can continue to edit your scene either zoomed in or zoomed out.
However, we’re happy with our video.
Additionally, you can upload your own elements, images, or videos to add to your video.
- Navigate over to the left-hand sidebar.
- Click on ‘Uploads’.
For example, if we already owned a gym and had already taken our own video shots of people working out at our gym, we could upload these or replace the default template videos with our own shots.
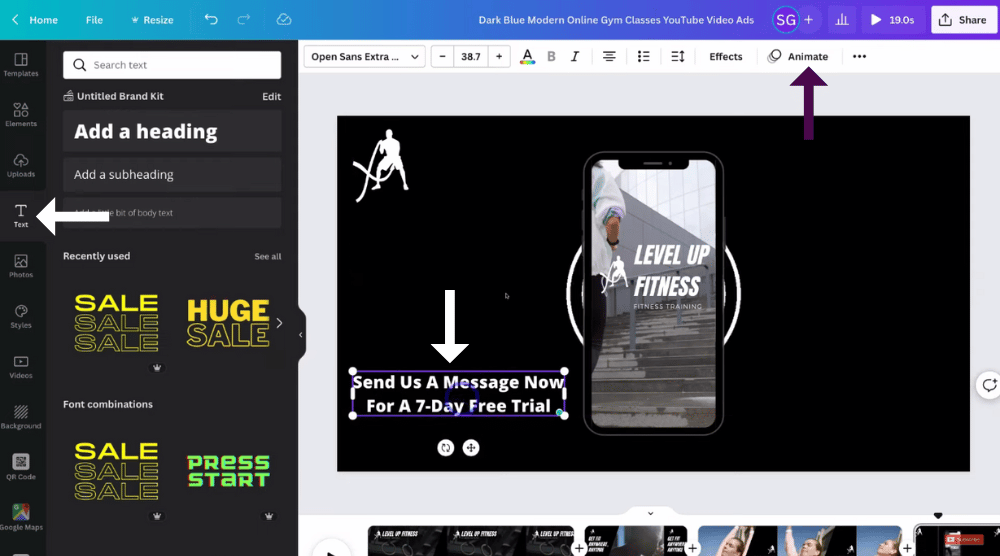
To add in your own additional text element:
- Click on ‘Text’ on the left-hand sidebar.
For example, we could add this header up here (see screengrab).
- Navigate over to the font to change the font.
- Simply type in what text you want to add in.
Because this is our last scene, we’re going to type in ‘Send us a message now for a one week free trial’ to add to our scene.
Again, you can simply:
- Drag the corners of the element to change the size.
- Click, drag and place the element to where you want it to go.
- Navigate up to ‘Animate’ to add an animation to the text element.
We’re going to choose ‘Block’ again, however, you can choose any animation you like.
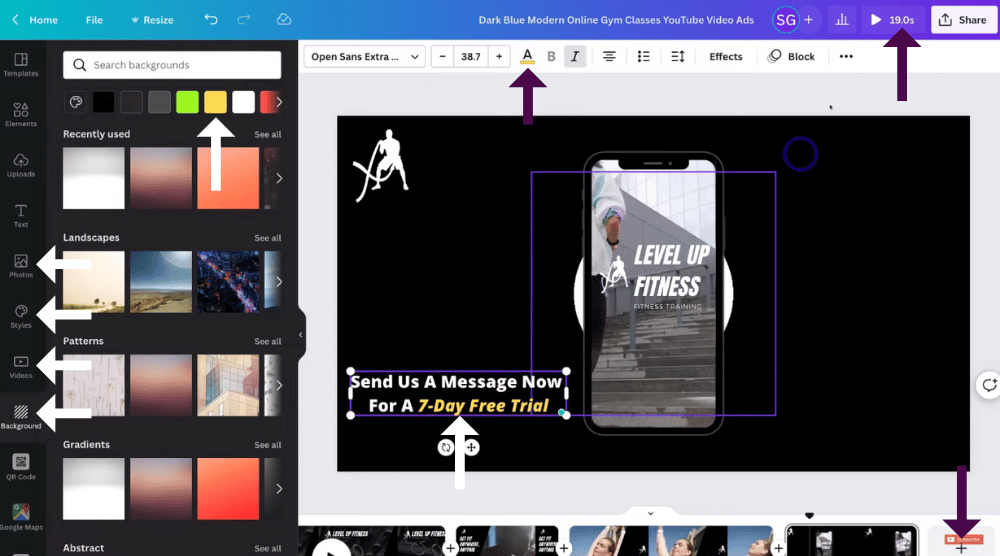
To edit a specific portion of your text element:
- Highlight the portion of the text element you want to edit.
We’re going to highlight ‘7 day free trial’:
- Click on the color icon (see screengrab) within the formatting options.
- Select the color you want to change that specific text to.
We’ll choose yellow, then select the ‘italics’ icon to change the text to italics.
As you can see, we now have a call-to-action message that stands out.
These small detailed changes will help people see our message once they’ve finished watching the video (see screengrab).
To find and add particular photos to add to your video:
- Navigate over to the left-hand sidebar.
- Click on ‘Photos’.
- Select a photo you want to add to your video (see screengrab).
If you’re not happy with the overall color scheme of your video, you can:
- Navigate down to ‘Styles’ and select another color scheme of your choice.
- You can also create your own brand kit color scheme (see screengrab).
This means you can change the color (the entire color) of your video elements.
Below ‘Styles’, you have ‘Videos’ again.
This is where you can replace videos (which we’ve talked about).
Below that, you have ‘Background’, where you can simply replace the background.
- Select ‘Background’.
- Type in a keyword related to the type of background that you want to add to your video scene.
Lastly, you can add audio to your video. You can do this by:
- Clicking ‘More’ down the bottom of the left-hand sidebar.
- Locate ‘Audio’.
We currently have four scenes within our video. If you’d like to add more scenes from scratch:
- Come down to the bottom of the screen to view your scene thumbnails.
- Click the ‘+’ button next to your last scene or one of the ‘+’ buttons in between your scenes (see screengrab).
Once you’ve customized the video template that you selected, or once you’ve finished creating your video from scratch (depending on what route you took), you can preview your whole video.
- Again click on the play button next to ‘Share’ in the upper right-hand corner.
That’s going to allow you to preview your whole video!
8. Share And Download
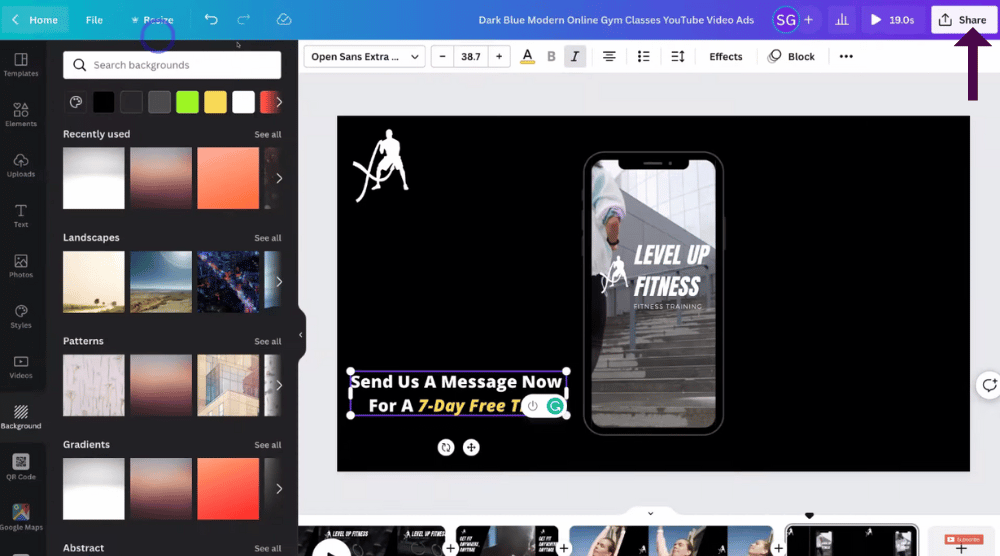
Once you’re previewed your whole video and are happy with it:
- Navigate up to ‘Download’ in the right-hand corner within your preview (see screengrab) or
- Simply navigate over to ‘Close’ in the left-hand corner within your preview.
- Navigate over to ‘Share’ to share this video with people.
If you’ve added people to your Canva account, you can:
- Type in their names to share this video with them (see screengrab).
Alternatively:
- Click ‘View-only link’ so that people can view this link.
We’re going to download this video.
- Click ‘Download’.
- Navigate up to ‘File type’.
- Make sure that you have ‘MP4 video’ selected.
- Come down and make sure ‘All pages’ are selected because you want to download the entire video.
- Come down and click ‘Download’.
Give Canva a moment to create and download your new video ad! (see screengrab).
- Click on ‘Copy’ to copy this link to share your video with anyone you like.
- Navigate down to the bottom left-hand corner (see screengrab).
You have now downloaded your video ad!
You can now use this video ad across all the different channels and platforms that you use to promote your business.
Remember, Canva allows you to create any type of video ad that you can think of.
And that is how you can create video ads with Canva in minutes!
Read more: Top 10 MUST HAVE digital tools for small business.
Create video ads for free with Canva (Video Tutorial)
That is it for this brief tutorial on how to create video ads with Canva.
We hope you are now confident in this process and are ready to start creating your own video ads using Canva’s free video editor!
Check out our video tutorial below.
