In this Facebook ads tutorial, we are going to guide you through the process of how to create a Facebook video ads tutorial for lead generation.
Are you looking to drive more high quality leads for your small business and brand?
Well, you’ve come to the right place!
Creating Facebook video ads is one of the most effective video marketing activities you can implement in order to collect more leads.
Why?
Facebook is one of the biggest online platforms available.
Therefore, by creating compelling paid video ads through Facebook, you’ll ultimately reach a wider target audience and as a result, your video ads should organically boost engagement, gain a more loyal following and drive more leads for your small business!
These all-important leads can be collected through simple forms, messenger, phone calls, and more.
Read more: How to use the Facebook Business suite App.
How to Create Facebook Video Ads?
We’re going to walk you through every step of the way of the process of creating your own lead generation ads inside of Facebook’s ad manager.
Additionally, we will show you how you can simply create your own videos for your video ads in just a few minutes with InVideo.
What is InVideo?
InVideo is an easy-to-use video editing software that lets you create compelling and professional video content for video marketing activities, and is the perfect choice for this lead generation Facebook ads tutorial.
One of the reasons why we love InVideo, is that they offer a huge amount of fully customizable video templates, stock images and videos, meaning that virtually anyone can easily create captivating content for their business.
You can get started with InVideo here (use the code STEWART25 for a 25% discount – if you decide to upgrade to a premium plan).
Read more: Beginners guide on how to use InVideo.
1. Getting started with Facebook Ads manager

Let’s dive into Facebook’s ads manager and get ready to start driving high-quality leads for your small business!
Firstly, head over to your browser and type in Facebook.com\adsmanager
2. Facebook Ads manager

That’s going to take you to your ads manager (see screengrab).
It’s important to note that if you’re not already signed into your Facebook account, you’ll be prompted to sign in before you can continue.
Is this your first time ever creating a Facebook ad inside the ads manager?
Watch our beginners tutorial here to find out how to set up your business manager and your ad account, then jump back into this tutorial!
Once you’ve arrived inside your ads manager, the first step is to make sure you have the correct ad account selected at the top of the page (see screengrab).
3. Create a Campaign for Lead Generation

You’re now ready to create a campaign!
To do this:
- Below ‘Campaign’, click ‘Create’.
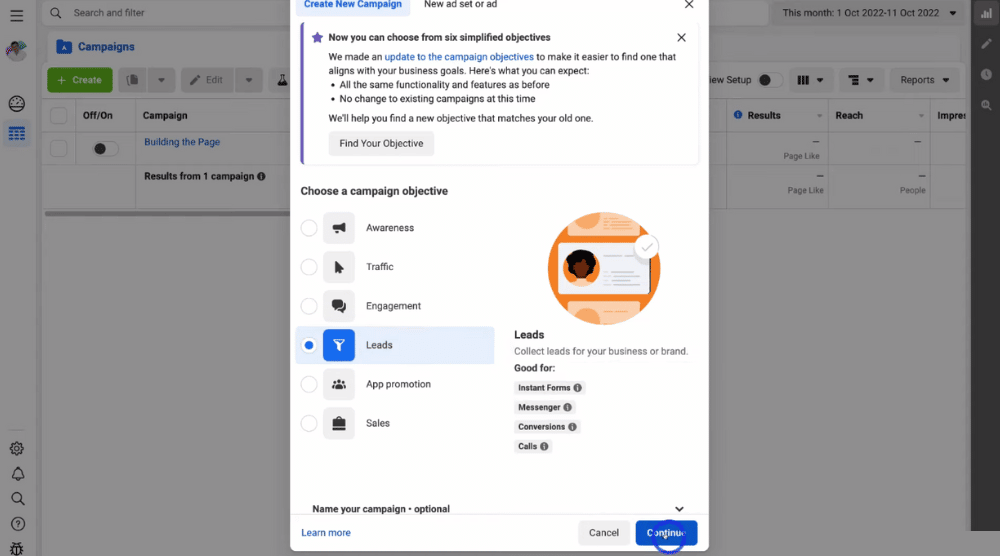
- Select your ‘Campaign objective’.
We’re going to select ‘Leads’, as this tutorial is focusing on lead generation with Facebook ads tutorial.
Therefore our campaign objective is to generate leads for our small business.
- Click ‘Continue’.

- Type in your campaign name below ‘Campaign name’.
We’re going to call our campaign ‘Lead generation – Stewart Gauld’ as we’re focusing on how to create Facebook Video Ads for lead generation for our brand ‘Stewart Gauld’.
Once you’ve added in your campaign name:
- Click ‘Next’ in the bottom right hand corner.
4. Ad Set (Targeting)

That’s going to take you to the ‘Ad set level’, which is basically where you can customize your campaign and set up your targeting.
To do this:
- Simply type in your Ad set name below ‘Ad set name’.
We’re going to call this ad set name ‘Lead Generation Ad Set #1’.
Once you’ve added your Ad set name, you can choose the location where you want to generate leads:
- Select your chosen ‘Conversion location’ below ‘Conversion’
We’re going to select ‘Instant Forms’, because, for the purpose of this Facebook ads tutorial, we want to generate leads by asking people to fill in a form (see screengrab).
This means that when a potential lead watches our Facebook video ad (and like the look of what we’re offering) they’re able to simply fill in a form that is automatically generated by Facebook!
Next, you can see there is a ‘Review error’ on the right-hand side of the page (see screengrab).
This is because our Facebook business page needs to accept the terms and conditions.
To fix this:
- Head down and click the drop-down menu below ‘Facebook page’ and select the right Facebook business page.
You should select the Facebook page that you want to use to promote your ads.
If you currently don’t have a Facebook business page, an option to create one will pop up.
Additionally, if you want to learn how to create a Facebook business page for your small business, you can read our beginners’ article here to guide you through this process.
Once you’ve selected the correct Facebook business page:
- Click ‘View terms’.
- Select ‘I Agree to Terms and Conditions’.

When you’ve done this, you’ll notice that the error message has disappeared (see screengrab).
Next, you can set a budget and schedule:
- Scroll down the page to ‘Budget and Schedule’ (see screengrab).
- Below ‘Budget’, you can choose to set a ‘Daily budget’ or a ‘Lifetime budget’.
This is where you want to take the time to think about how much you want to spend for your campaign.
We recommend selecting ‘Lifetime budget’ if this is your first time creating a Facebook Ad.
Alternatively, if you choose ‘Daily budget’, you have to remember to turn your ads off.
If you forget to turn these off (which can be easy to do!) you can end up spending a lot of money!
So again, we recommend selecting ‘Lifetime budget’.
Once you’ve selected your budget type:
- Type in the price of your budget.
We’re going to start off with a $100 ‘Lifetime budget’.
Next:
- Add in the start date and time under ‘Start date’ for your campaign.
- Below ‘Start date’, add in the end day and time for your campaign.
For the purpose of this lead generation Facebook Ads tutorial, we’re going to run our campaign for 7 days.
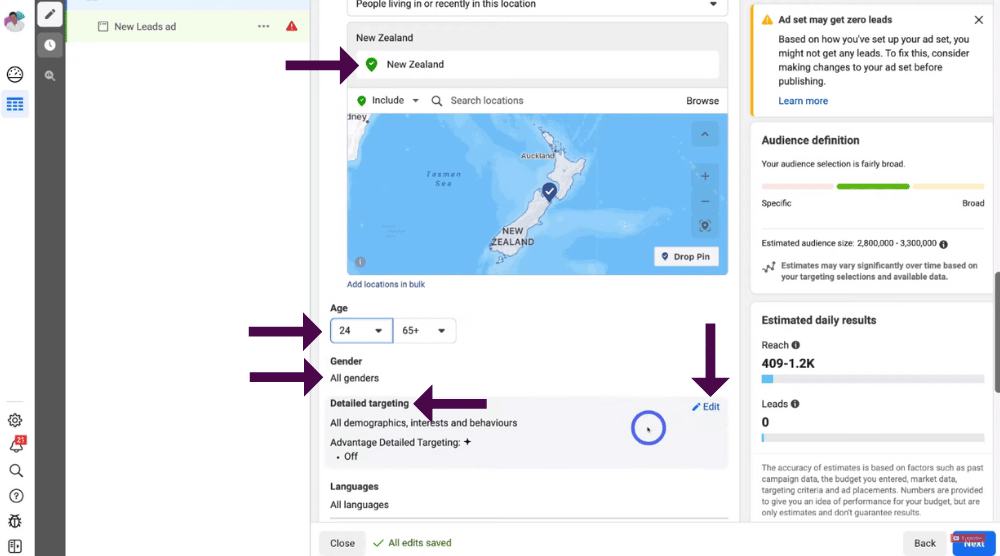
- Scroll down further to ‘Audience’.
This is where you can define the audience that you’re aiming to target with your video ad, in other words, who do you want to see your ads?
You can do this by:
- Coming down to ‘Locations’.
- Clicking ‘Edit’.
- Typing in the location that you want to target.
For the purpose of our lead generation Facebook video ad, we want to target an audience that is based in New Zealand, as our small business is based in New Zealand.
Alternatively:
- Simply navigate down to ‘Search locations’ and type in a specific location that you want to target (see screengrab).
It’s important to note that when selecting your location, you can also select a region within a country.
For example, you could select a city that your small business operates if you specifically wanted to just target people within that city.
We’re going to keep ours as ‘New Zealand’.
Once you’ve chosen your target location:
- Scroll down to ‘Age’.
- Click ‘Edit’ to select the age of the audience you’re aiming to target.
- Select the drop-down arrow next to ‘18’ to change the age.
We’re going to change the default age range from ‘18’ to 24’, as our aim is to target potential leads that are 24 to 65+ years old.
Additionally, you can edit the gender you want to target:
- Click ‘Edit’ next to ‘Gender’.
However, we’re going to keep ‘All Genders’ selected.
- Below ‘Gender’, you have ‘Detailed targeting’.
This is where you can further break down the type of audience that you want to target.
- Click ‘Edit’.
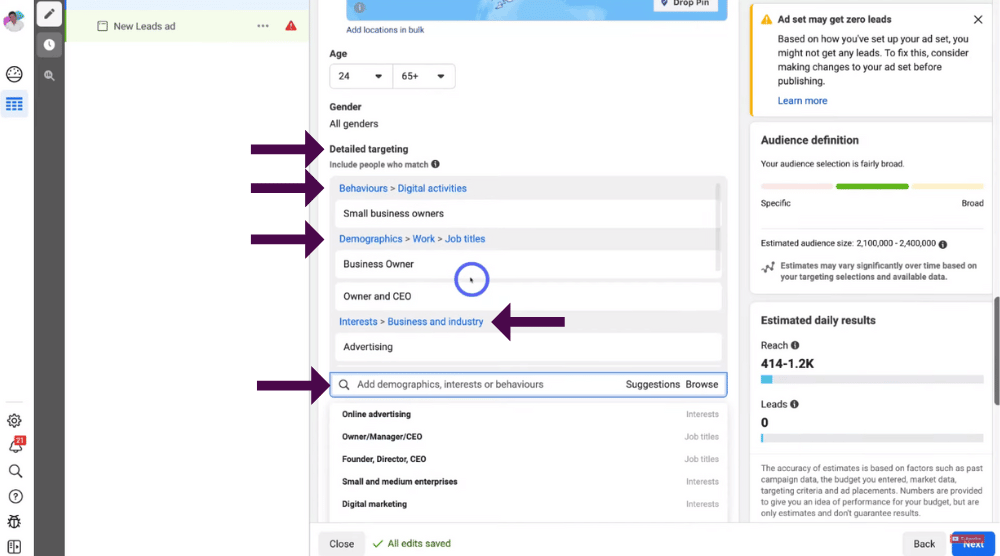
- Head down to ‘Add demographics, interests or behaviors’.
- Select ‘Browse’ then ‘Interests’ (see screengrab).
- Select the correct interest for your target audience.
For the purpose of this tutorial, we’re going to show you how to create Facebook Video Ads for lead generation with the aim to target small business owners.
The aim of our Facebook Video Ad is to offer a free strategy session for small business owners, therefore, we’re going to select the ‘Business and Industry’ interest.
Within ‘Business and Industry’:
- Select the drop-down menu.
- Tick the relevant subcategory interests for your target audience.
We’re going to select ‘Advertising’, ‘Agriculture’, ‘Marketing’ ‘Sales’ and ‘Small business’.
Make sure you take the time to choose the specific Interests you want to target for detailed targeting.
In addition to ‘Interests’, you can also choose specific ‘Demographics’ or ‘Behaviors’ to target.
- Simply select ‘Suggestions’.
- Choose the relevant behaviors or demographics suggested.
We’re going to select ‘Small business owners’ as a behavior, as well as a few other relevant interests, behaviors and demographics.
Once you select these, they’ll show up within these categories under ‘Detailed Targeting’.
Make sure you take the time to really research your audience before filling out these selections, this will allow you to target your audience well.
Once you’re happy with your choices:
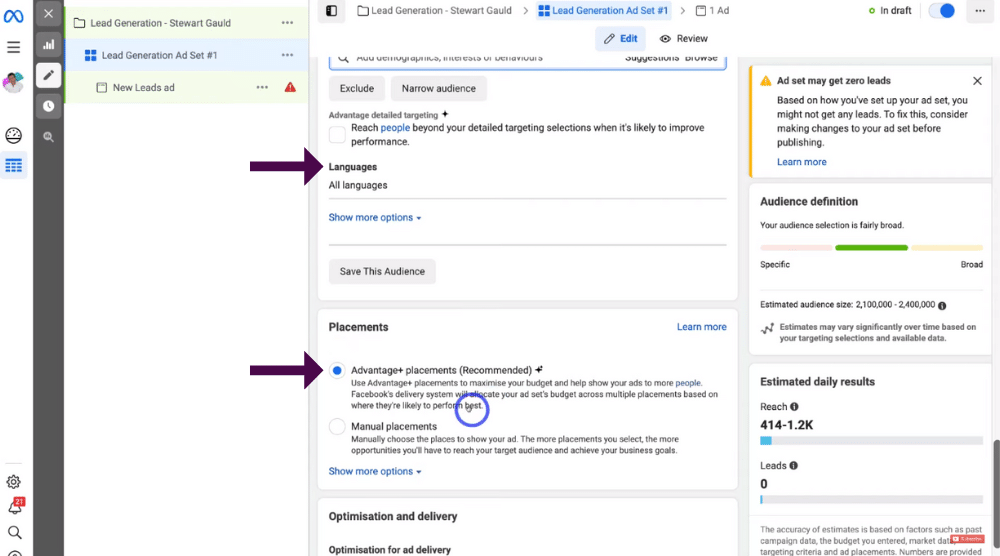
- Scroll down and add specific languages below ‘Languages’.
We’re going to keep all languages selected.
Below ‘Languages’, you can choose to select ‘Manual placements’, or you can keep ‘Advantage+ placements’ selected (see screengrab).
We recommend keeping the ‘Advantage+ placements’ option placement selected if this is your first time creating a Facebook ads tutorial for lead generation.
Next:
- Scroll down to the very bottom and click ‘Next’.
5. Create Ads and Simple Form

This will take you to the place where you can upload a video ad (which we’re going to create shortly), as well as where you can create the form for generating leads (see screengrab).
However, the first step is to actually create the video ad!
6. How to Create Video Ads with InVideo

As mentioned earlier, we’re going to show you how you can use the incredible video content maker and editor software called InVideo to create your lead-generation Facebook Video Ad.
We truly do love InVideo and personally use it almost every day to create video content for both our own brand and business clients!
InVideo’s user-friendly interface and easy-to-use tools allow virtually anyone to easily create professional video ads (or any video content for that matter) in just a few minutes.
Again, you can use the code STEWART25 for a 25% discount – if you decide to upgrade to a premium plan.
*The link above is an affiliate link, which means we will get a commission if you upgrade to a paid plan (with no extra cost to you). This helps support our education-based website and we thank you in advance!
Read more: How to Create Videos for your business.
7. InVideo Pricing plans
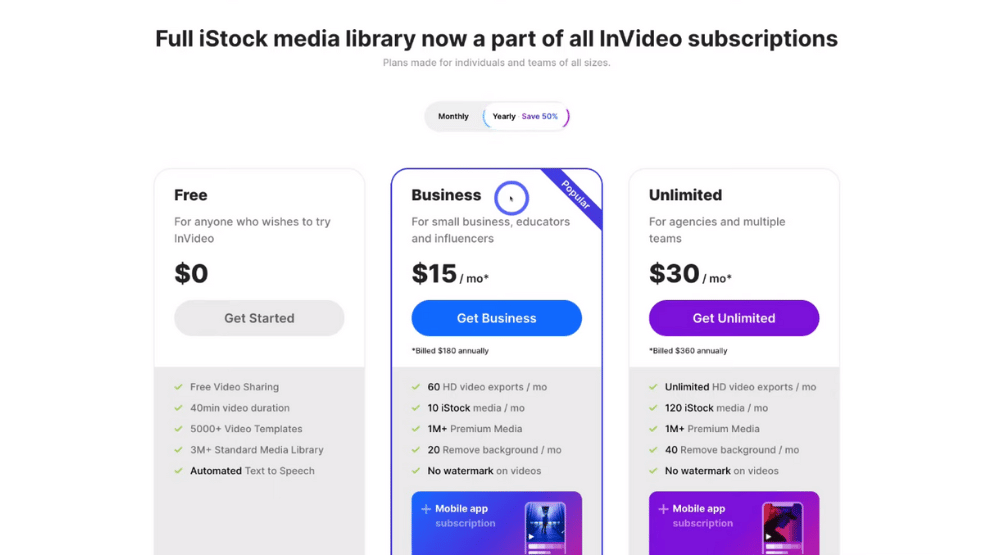
InVideo’s offers three different pricing plan options (see screengrab).
If you’re a small business and are wanting to create captivating video content for your small business, we recommend opting for the business plan as you really do get the most value for money.
One of the biggest benefits of choosing the business plan is that you get access to over a whopping 5000 completely customizable video templates!
This means that instead of creating video content from scratch (requiring both technical knowledges, skills, and time), you’re able to simply select from InVideo’s selection of pre-made and polished templates and customize those video templates to suit both you and your brand.
Additionally, you receive access to over 10 million digital assets (meaning stock images and videos from platforms such as Shutterstock and iStock).
Another awesome feature InVideo offers on the business plan is 24-hour live support!
This is such a valuable feature, especially for beginners as you’re able to simply ask any questions at any hour about creating a video.
Finally, the business plan lets you collaborate with a team through the ‘Collaboration feature’.
This means you can invite your team to InVideo to work on all your video projects together.
Alternatively, if you’re not ready to take the plunge and pay for the ‘Business’ plan, you can always select the ‘Free’ plan to test out their video editor and video maker to see if you like it.
It’s important to note that if you go for the free plan, your videos will always have an unprofessional watermark that you, unfortunately, can’t remove (when you download your video).
If you want to get rid of this watermark, you’ll have to upgrade to the ‘Business’ plan or ‘Unlimited’ plan.
We recommend starting with the ‘Free’ plan, then once you’re ready to download your first video, upgrade to the business plan.
This allows you to get used to InVideo and fall in love with all the incredible features they offer first before you upgrade to a paid plan!
Remember, you can use the code STEWART25 at the checkout for a 25% discount if you choose to upgrade to one of the premium plans.
Before we get started, it’s important to note that we already have an ‘Unlimited’ account, and we will be using this account for the rest of this Facebook Ads tutorial.
Alright, let’s get started with InVideo!
Read more: How to make Video Ads with Canva.
8. InVideo Video Templates

Once you’ve signed up and signed into your InVideo account, you’ll be redirected to your dashboard.
Now you’re ready to start creating your lead generation Facebook ads tutorial video!
As we mentioned, InVideo offers 5000+ completely customizable professional templates, allowing you to quickly create compelling video content.
To get started with InVideo’s video templates:
- From your dashboard, simply click ‘Templates’ below ‘Create new video’

Remember, for the purpose of this lead generation tutorial, we’re going to show you how to create Facebook video ads through InVideo.
Next, you’ll need to filter InVideos large range of templates to suit what you’re looking for:
- Within templates, come down to ‘Filters’ on the left-hand side bar.
- Choose the ‘Aspect ratio’ type (see screengrab).
We’re going to click ‘Square’ because we want to create a square video, however, you can also select ‘Landscape’ or ‘Portrait’ depending on what type of video you want to create.
- Below ‘Aspect ratio’ select ‘Type’.
- Click ‘Ads’.
- Below ‘Type’, select an ‘Industry’ relevant to your brand.
Under ‘Industry’, you’ll find a number of general industry types.
- If you can’t see an industry type relevant to your business, select ‘More’ below these options (see screengrab).
This will bring up more industry types.
We’re going to select ‘More’ and then click ‘Professional Services’.
That’s going to generate these templates over here that correlate with the filters we selected, and are therefore more relevant to our business, brand, and the ad we want to create (see screengrab).
Alternatively, you can search for a keyword related to the ad you want to create:
- Simply type in a keyword related to the ad that you want to create in the search bar over on the round side of the page.
However, we’re going to scroll through some of the videos our filters brought up for us.
To choose your template:
- Hover over each of the different video templates you like the look of to preview what they will look like in video form.
Make sure you take the time to find one that you like, then:
- Simply click on the ad you like the look of.
We are going to select the ad which is in the middle.
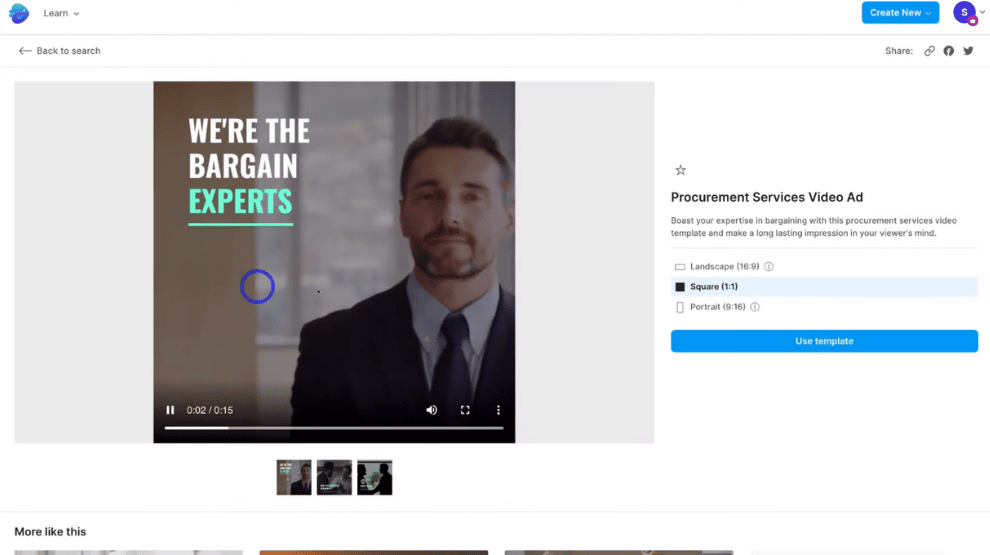
This will bring up a larger preview of that video ad (see screengrab).
- You can then change the aspect ratio here if you like.

- Additionally, if you scroll down, you’re able to see more video ads that are similar to the template you selected and choose another one if you like.
We actually prefer the look of this other video template (see screengrab), so we’re going to simply select this template to use.
Once you’ve chosen a template you like:
- Click ‘Use template’.
- Give InVideo a moment to load.
- You’ll then be taken to the video editor and timeline.
Read more: Top 5 ways to Create Powerful Business Videos.
9. InVideo Video Editor and Timeline

Now you’ve chosen your template, you’re ready to make it your own with InVideo’s powerful and easy-to-use video editor and timeline.
In the middle of the screen, you’ll see the video ad you selected that you can now customize (see screengrab).
You’ll also notice that over on the left-hand sidebar, ‘Templates’ is selected.
Here you can actually replace your current video template with another one if you change your mind.
To do that:
- Type in a different keyword through the search bar on the left-hand side of the screen.
However, we’re happy with our template and are ready to get customizing:
- Head over to your chosen video again (in the middle of the screen).
- Click on each of the different elements.
- Options will then appear above your video ad to customize that specific element you’ve selected.
Within these options you can:
- Crop your image.
- Change the Fit type.
- Adjust the colors.
- Remove the background.
And some other options over here such as flip, add effects and animation (see screengrab).
Again with each of the different elements on your video, you can simply click the element to customize that element using the available formatting options above.
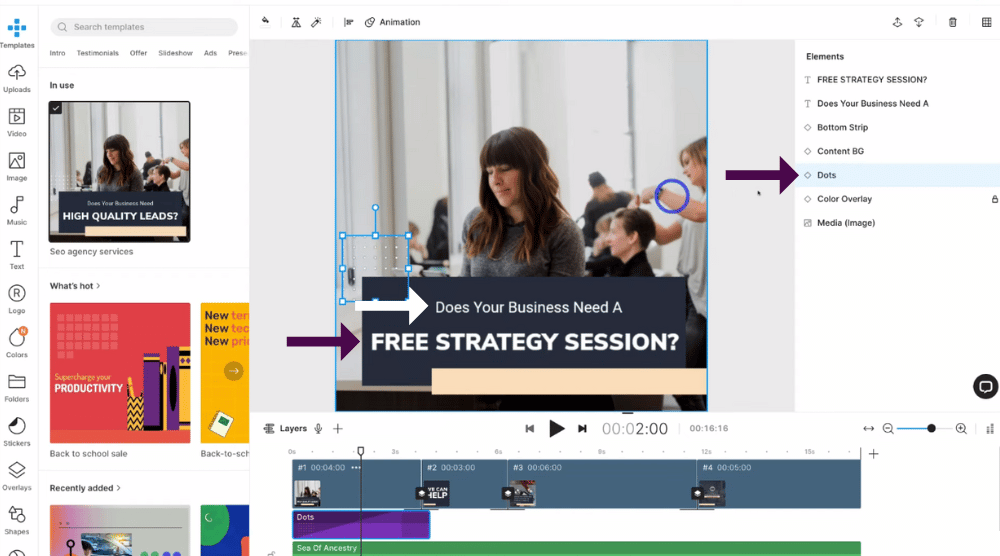
For example, we have a square element and two text elements here on our video ad (see screengrab).
Next, we’ll show you how to edit a text element on your video ad within InVideo:
- Click on the text element you want to edit.
- Click ‘Edit’ within the formatting options above your video ad.
- Simply type in what text you want on the text section here (see screengrab).
We’re going to change our text to ‘FREE STRATEGY SESSION?’.
Once you’ve changed your text you’ll also be able to further format your text up above your video ad that you can select and play around with (see screengrab).
We’re also going to change our second text element to ‘Does your business need a free strategy session?’ using the same process.
Additionally, once you’ve changed your text elements to show what message you want to convey, you can change the size and placement of your element.
To do that:
- Click on the text.
- Drag the text element out so that it fits nicely on your ad.
- Drag, drop and place the text where you like.
Basically, all the different elements within your video ad can be simply dragged and dropped and changed to the way that you like (with the formatting options up above).
You can also see and click on all the different elements that make up your video on the right-hand side of the page.
For example, if we click on ‘Dots’, that’s going to highlight the dots over in the middle. (see screengrab).
So here are two ways you can edit your elements.
- Click the element on the screen.
- Select the element over on the right-hand side.
Once you’ve edited your elements, you can then see where that element fits into your video ad timeline:
- Simply click on the element.
- Navigate down to your video ad timeline at the bottom of the page and see where it fits into your timeline (see screengrab).
We love the timeline feature as it is super easy to use and intuitive!
Now you can view how many scenes are within your video ad through the timeline.
You can see our video ad has a total of four scenes (see screengrab).
- Click on each of your scenes (through the timeline) to see the elements within that scene.
- The elements will appear on the right-hand side of the page.
For example, we have four scenes in our first scene, two in our second, and six in our third.
- Make your way through each scene and make changes to each element.
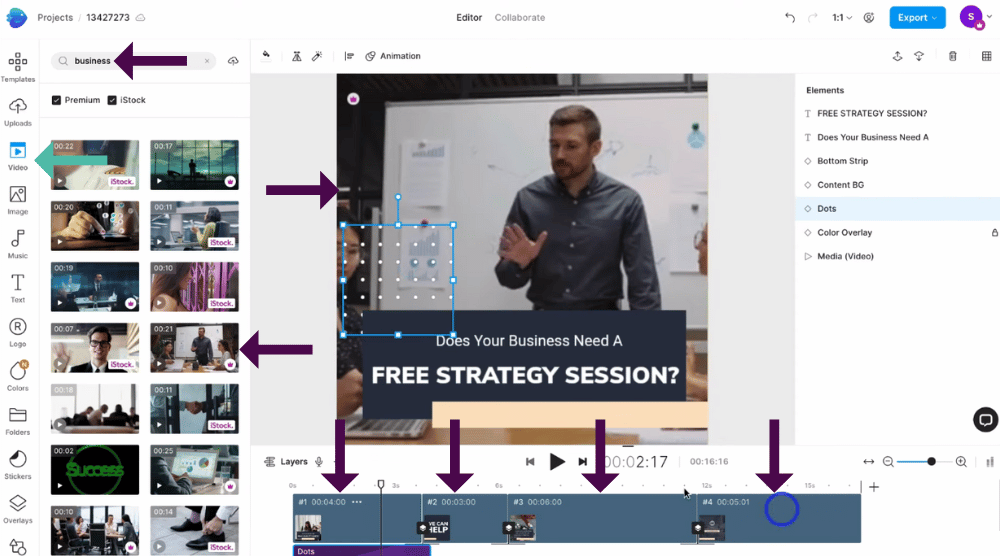
For the purpose of this Facebook Ads tutorial, we’re going to click on our first scene and show you how to change the background video on this scene.
To do this:
- Select ‘Uploads’ on the left-hand sidebar to upload your own video or images you want to use in your video ad or
- Click ‘Video’ to use a premium stock video.
We’re going to click ‘Video’ and choose a video from one of InVideo’s available stock videos to use in our ad (see screengrab).
Next:
- On the search bar, type in a keyword related to your video ad
We’re going to type in ‘Business’.
That will generate relevant stock videos based on the keyword you entered.
- Simply look through these static images of each video.
- Hover over each video to preview what the video will look like.
Once you’ve chosen a video you like:
- Click on the video.
- Drag and drop that video into the scene you want the video in.
- Click ‘Add as a layer’ or ‘Replace’ to replace the current video with this new video.
We’re going to choose this video and select ‘Replace’.
Now our scene is only four seconds, so rather than adding the entire video to the scene (which is longer than our scene length), you’ll need to trim the video so that the length fits the scene length.
To do this:
- Click ‘Trim video to fit scene’ (see screengrab).
- Change the video length to match the scene length.
- Click ‘Add’.
Additionally, You can click on any element here to make it slightly bigger.
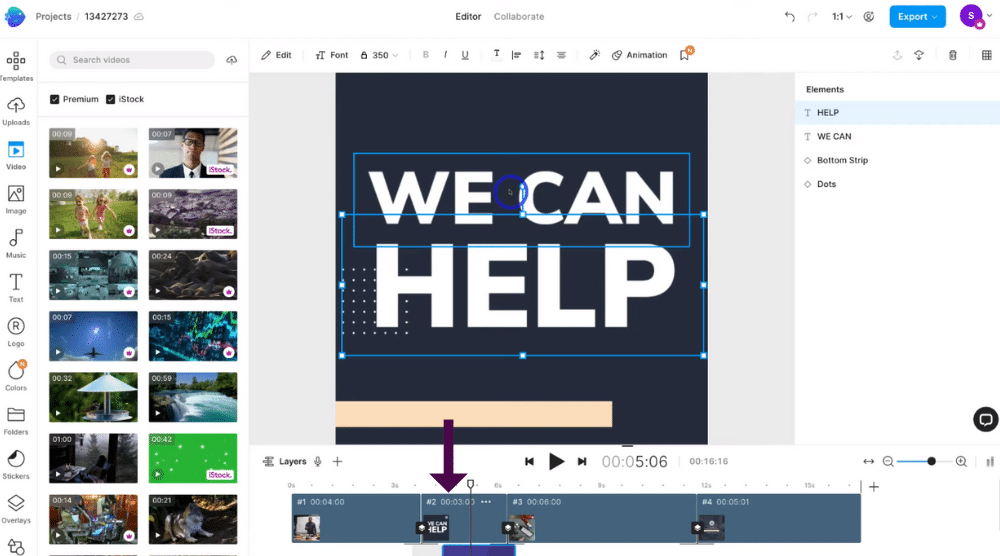
Once you’re happy with and have made all your changes to your first scene:
- Head over to your second scene to customize any of the elements within that scene.
However we’re happy with our second scene, so we’re going to leave it as it is.
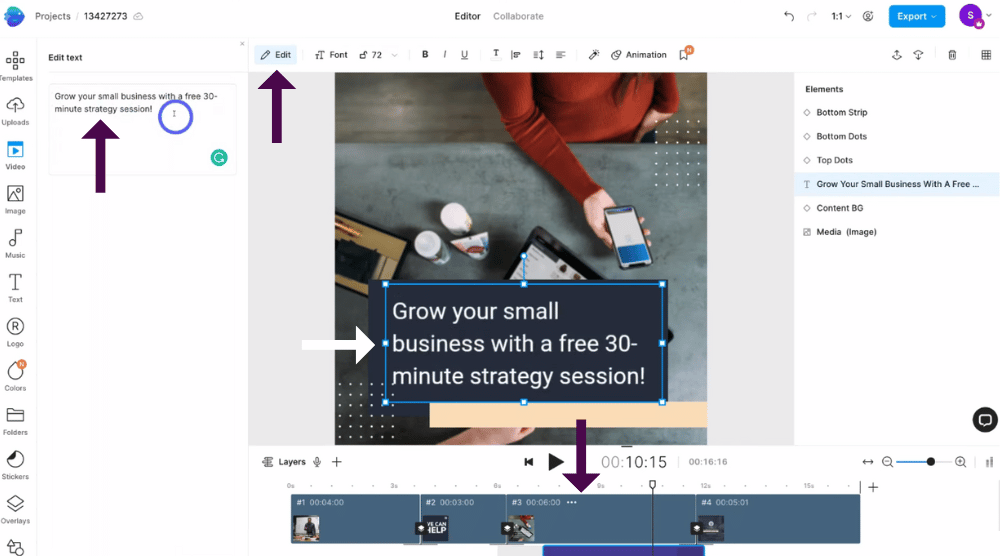
Next, we’re going to look at scene three for our video ad and edit the text element:
- Click above scene three on your timeline to take you to the different areas of scene three.
- Select the text element and navigate up to ‘Edit’.
- Simply type in the new text on the left-hand side.
We’re happy with our text ‘Grow your small business with a free 30-minute strategy session!’
Again, if you don’t like the look of the video within scene three or any of your scenes, you can go ahead and change the video (like we showed you in our first scene).
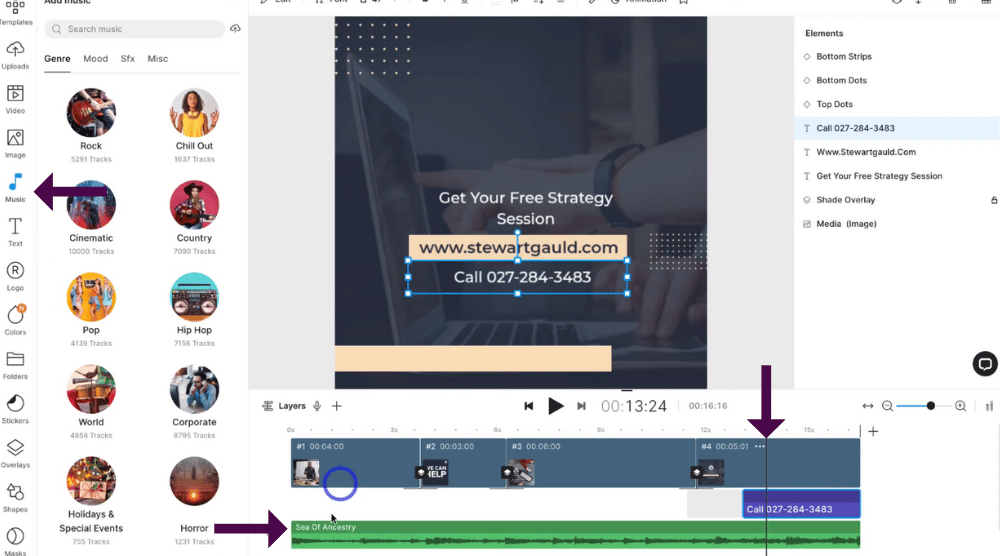
Finally, we’re just going to quickly change some text elements in our fourth scene in the same way as previously shown.
Additionally, you can add music to your video!
To do this:
- Click ‘Music’ on the left-hand sidebar.
- Scroll down and select from all the music options that InVideo offers.
- Alternatively, you can type in a keyword in the search bar.
- Once you’ve added your music, you’ll be able to see your music clip below your timeline (see screengrab).
Once you’ve added your music:
- Select the start of your video (on your timeline) and then preview what your video looks like with your edits and music for each scene.
As you can see, we’ve made small changes to our chosen video template, and overall we are happy with the look, feel and call-to-action of this video ad (see screengrab).
As we mentioned, you can change your template, upload your own videos and images or use the abundance of stock videos and images available to your video, add music and add other text elements to your video.
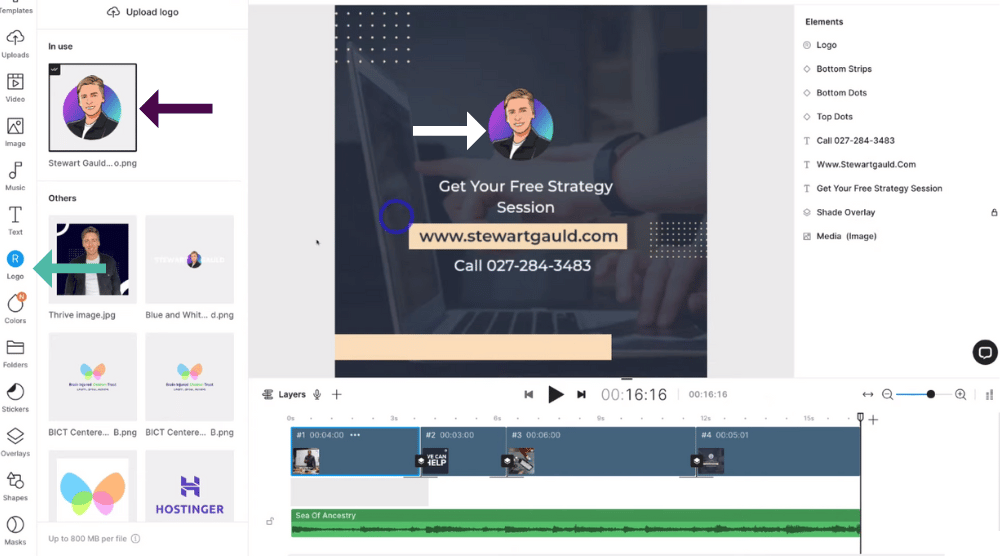
Additionally, you’re able to add your own logo to your video ad!
To upload a logo:
- Click ‘Logo’ on the left-hand side bar.
- Select ‘Upload logo’.
- Choose what image you want to use as your logo.
- Click on the logo.
That’s going to automatically add your logo to every scene of your video.
You can read our blog on How to create a logo for FREE using Canva.
You can see our logo is on the right-hand corner of every scene (see screengrab).
Also, at the very end of the video, it automatically appears in the middle of the screen (see screengrab).
Before we move on to the next step to create a lead generation Facebook ads tutorial, we’ll quickly run through the rest of the left-hand sidebar below:
- Below ‘Logo’, select ‘Colors’ to customize the colors within your video.
- Under ‘Colors’, you have ‘Folders’, where you can easily manage your media.
- Below ‘Folders’, you also have ‘Stickers’, ‘Overlays’, ‘Shapes’ and more.
Also, remember InVideo allows you to have up to 100GBs of cloud storage!
10. Export and Download

When you’re happy with your new video ad and have finished fully customizing each element and scene within your video ad, you’re ready to export your video.
To do this:
- Select ‘Export’ in the upper right corner.
- Click ‘Export’ from the drop-down menu.
This will export your new video ad in 1080p (which is high definition).
As previously mentioned, if you’re using a free plan you’ll have an unremovable watermark when you download your new video.
Therefore, this is the point where we recommend upgrading your plan to at least the business plan before downloading your video (if you want to remove this watermark and download your video in high definition).
Once you’ve clicked ‘Export’:
- Give InVideo a moment to render your video.
- As you can see over here on the left-hand side our video has been rendered! (see screengrab).
- From here, you can view a preview of your video.
- Your video should have also been automatically downloaded.
If your video hasn’t automatically downloaded:
- Simply click ‘Download’.
Read more: Top 10 Digital Tools for Small Businesses.
11. Upload Video Ad to Facebook Ads manager

Once you’ve used InVideo to create your lead-generation Facebook ad, you’re now ready to upload your video ad with Facebook ads manager!
Follow the steps below to find out how:
- Head back inside your Facebook ads manager.
- Navigate up to ‘Ad name’.
- Type in your ad name.
We’re going to call ours ‘Lead generation video’.
- Below ‘Identity’, make sure the correct Facebook business page is selected.
- Under ‘Instagram account’, select your business Instagram account (if you have one).
This means that your Facebook lead generation video ad will not only be distributed to the different areas on Facebook, as well as on Instagram.
You can read our blog to know How to connect Facebook to Instagram.
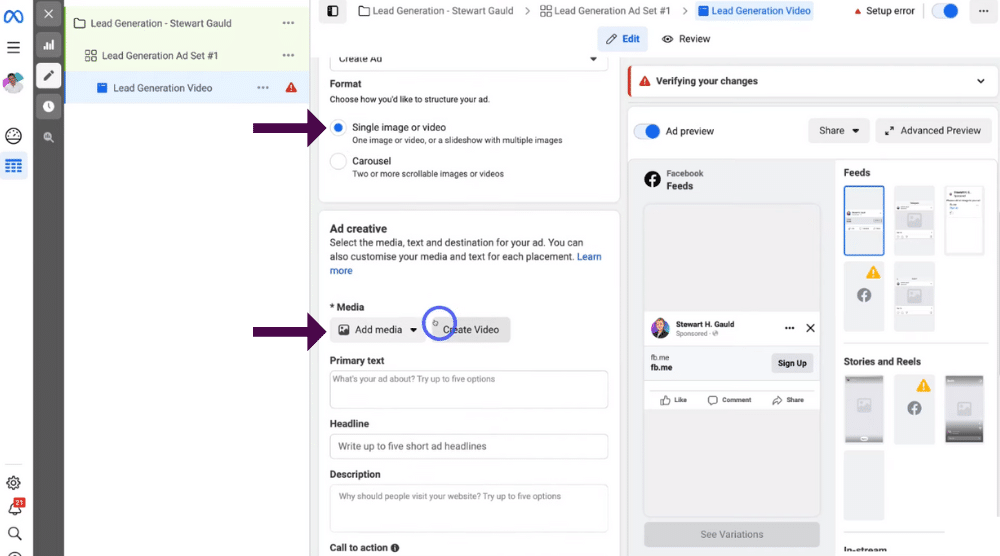
- Scroll down to ‘Ad setup’.
- Make sure that you have ‘Single image or video’ selected.
- Below ‘Ad creative’, click the drop-down arrow next to ‘Add media’.
- Select ‘Add video’.
- Click ‘Upload ‘ to upload the video that you just created and exported.
- Select the ‘Video’ We created in InVideo.
- Click ‘Open’.
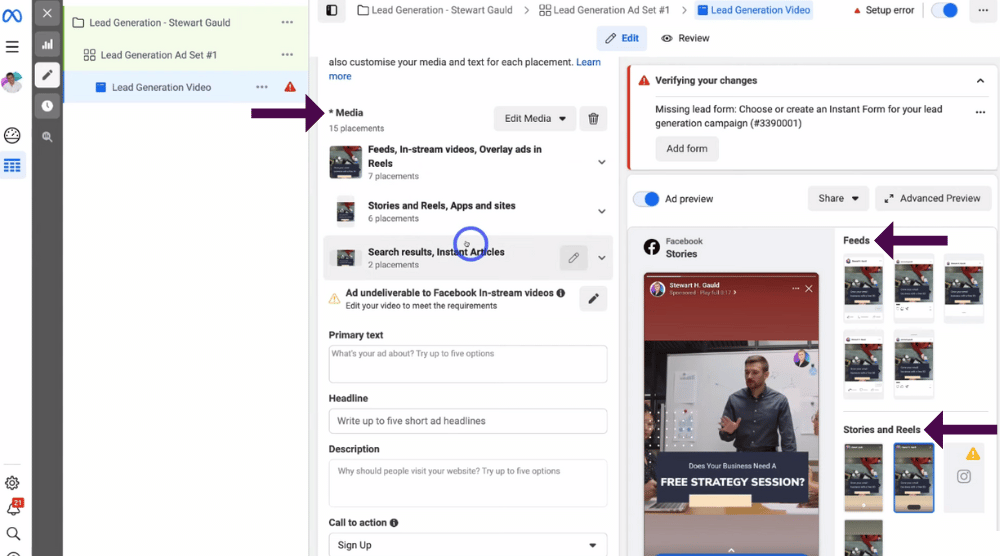
- Facebook will then process your video ad.
- Preview what your video ad will look like on the different placements within each platform over on the right-hand side.
For example, below ‘Feeds’ you can simply click across each different feed type to see what your video will look like on different platforms’ feeds. (see screengrab).
In addition to ‘Feeds’, you’re able to see what your video ad will look like on your ‘Stories’.
This is what our video ad will look like on ‘Stories’ (see screengrab).
Below that you’ll see other placements across Facebook and Instagram where you can preview your video ad to see what it will look like.
Once you’re happy with how your video ad looks over these different platforms and placements within these platforms, you can actually customize where you want your video ad to show.
To do this:
- Navigate over to the left-hand side below ‘Media’ .
- Take the time to customize each of the placements (if you only want your video ad to appear in certain places or spots)
For example, say you just wanted your video ad to appear in the Facebook feed and Instagram feed only:
- Simply remove all of these other placements.
However, we recommend keeping all these placements selected if you want maximum exposure for your video ad.
Next:
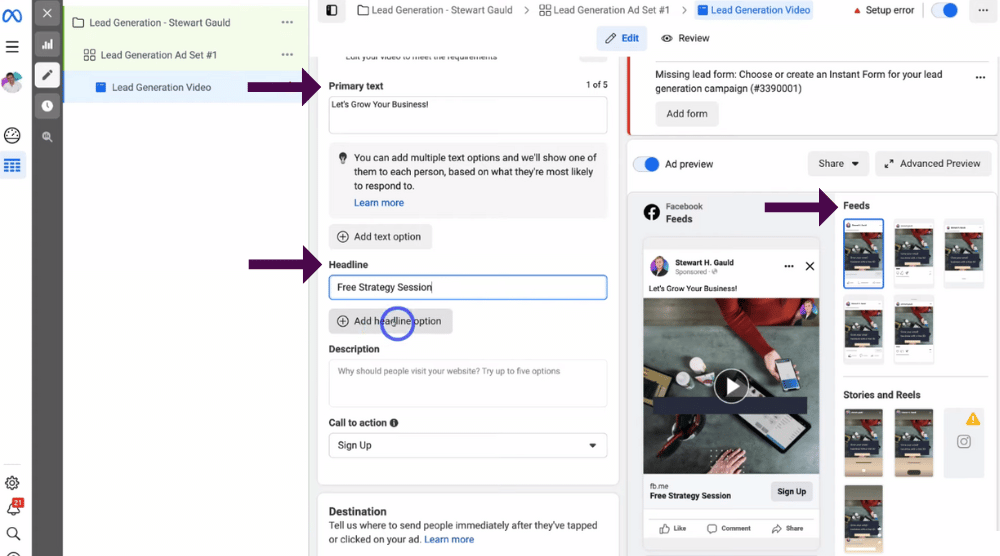
- Under ‘Primary text’, add your primary text for your ad.
- Click ‘Add text option’ below ‘Primary text’.
It’s important to note that you can add up to five options for each of these different text types, for example, you can add up to five for text options as well as headline options (see screengrab).
It’s important to add a variety of options, as it’s going to help Facebook identify the best text options depending on your audience and how they respond.
We’ll next show you how to add your headline text:
- Make sure you have ‘Feed’ selected.
This will help you gain a better idea and understanding of what your different text types will look like on your ad.
- Add the headline text and up to five additional headline text options (see screengrab).
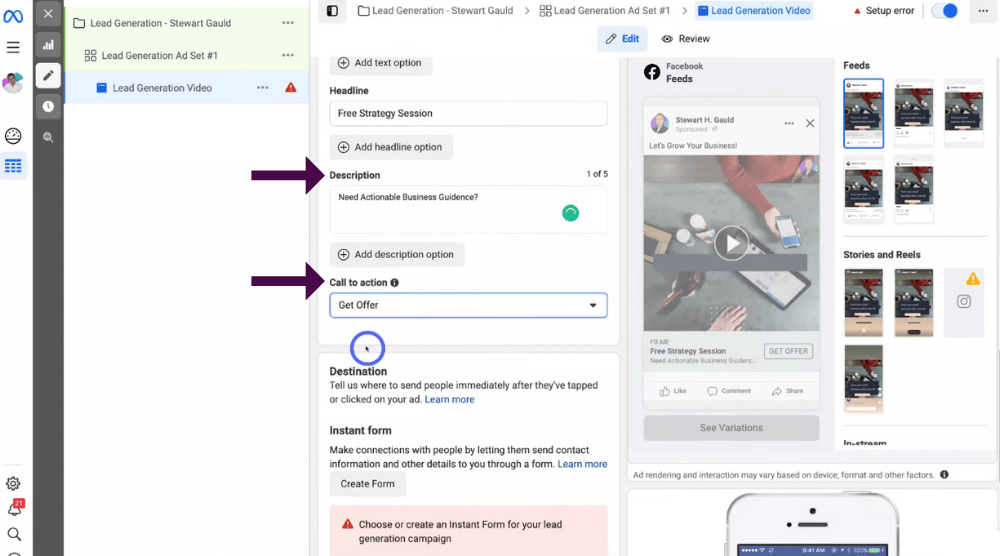
- Add multiple descriptions under ‘Description’.
- Select your call-to-action from the ‘Call to action’ drop-down menu.
This is where you really need to think about the type of call to action that you want to add to your video ad.
We’re going to select ‘Get offer’, as we’re offering a free strategy session.
12. Create a Lead Capture Form

Once you’ve added your call to action, you can make an instant form that people can easily fill in and submit.
To do this:
- Below ‘Instant Form’, click ‘Create form’.
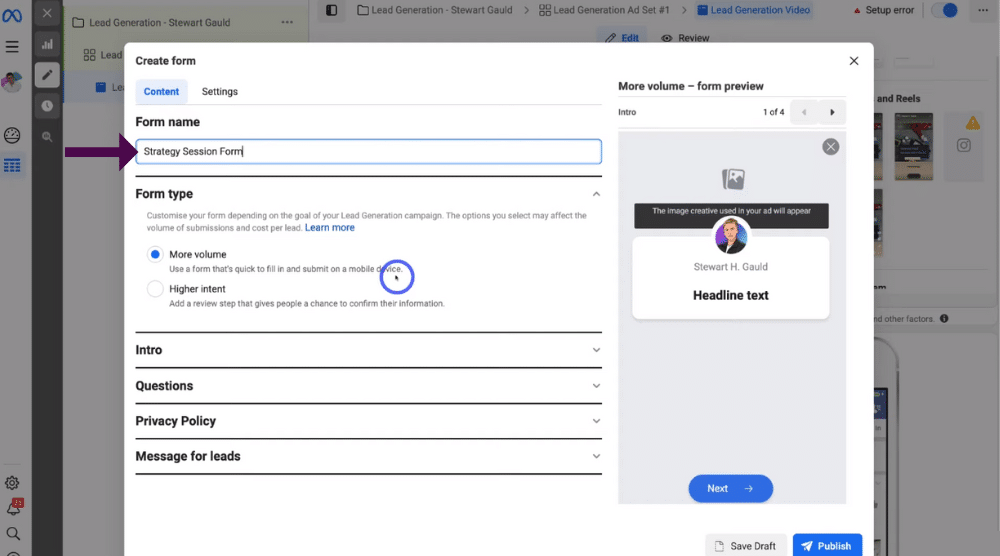
- Name your form under ‘Form Name’.
Ours is going to be called ‘Strategy session form’ (see screengrab).
- Under ‘Form Type’, click ‘More volume’.
This form is quick to fill in, meaning it will be as easy as possible for potential leads to add their contact information on a mobile device.
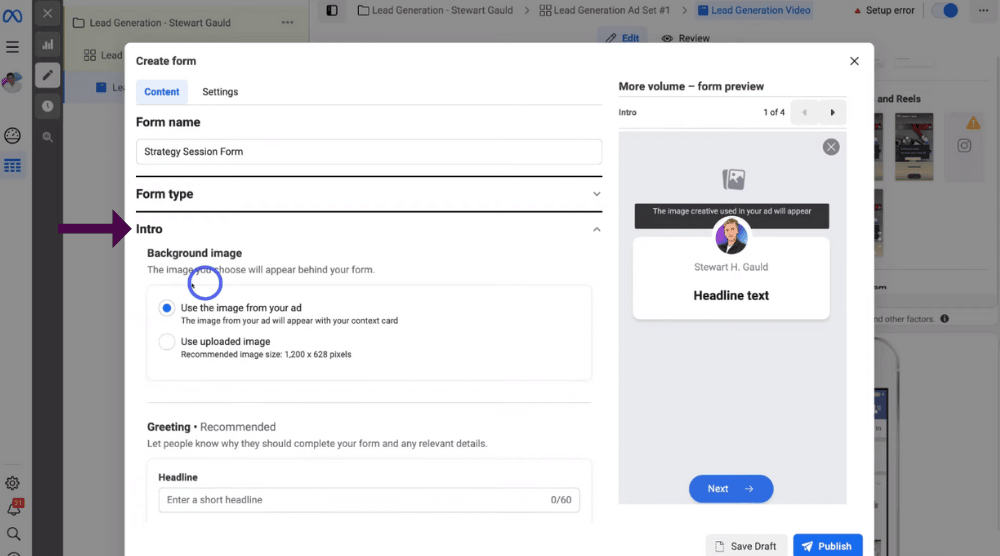
- Select ‘Intro’.
- Choose to upload a background image or
- You can choose an image from your ad.
We’re going to select ‘Use the image from your ad’.
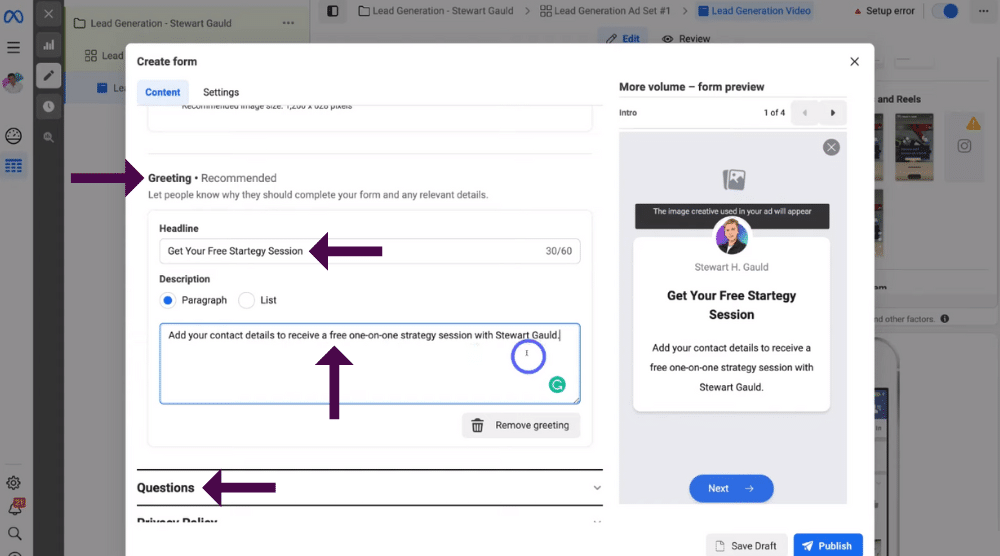
- Scroll down to ‘Greeting’.
- Add your greeting under ‘Headline’.
We’re going to add ‘Get your free strategy session’.
- Add a description below this.
We’re going to add ‘Add your contact details to receive a free one-on-one strategy session with Stewart Gauld’.
The key to your description is to add details about what you’re offering, whilst keeping it short, sharp and compelling.
We’re happy with our greeting and description (see screengrab).
- Select ‘Questions’ to add custom questions to your form.
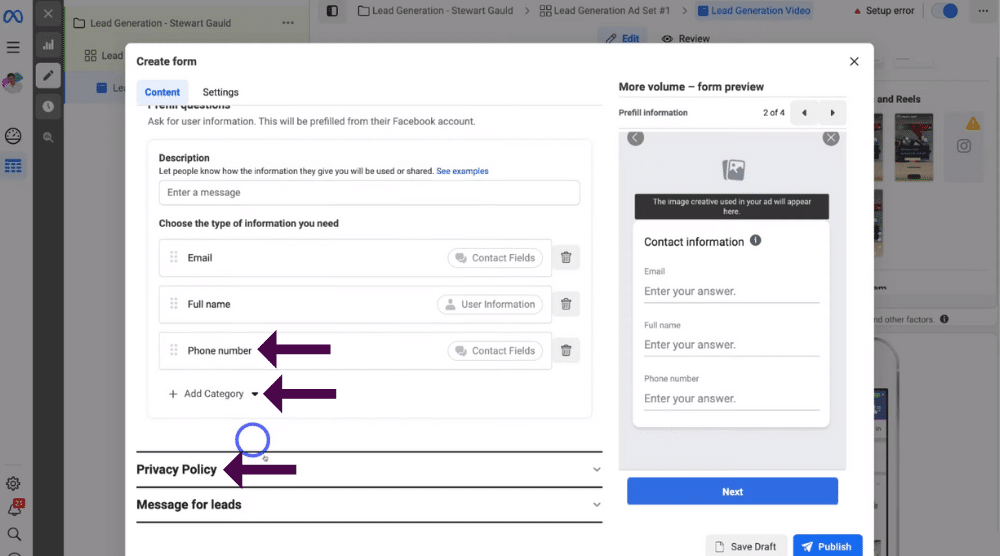
- Below ‘Questions’, click ‘Prefill questions’.
We’re going to add a phone number to our form because we want the lead to add their email, full name, and phone number.
To do that:
- Click ‘+ Add category’.
- Select ‘Contact fields’.
- Click ‘Phone number’ (see screengrab).
Once you’ve added any additional contact fields relevant to your business:
- Select ‘Privacy Policy’.
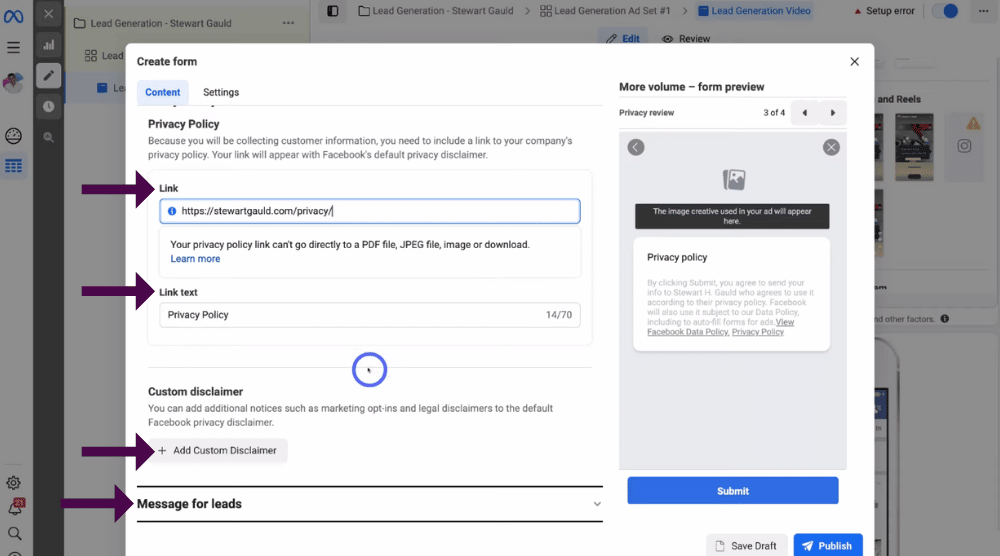
- Add the URL link to your privacy policy under ‘Link’
It’s important to note that if you don’t already have a privacy policy for your website, you’ll have to create one.
Next:
- Under ‘Link text’, type in ‘Privacy policy’.
- Select ‘Add Custom Disclaimer’ if you like.
- Click ‘Message for leads’.
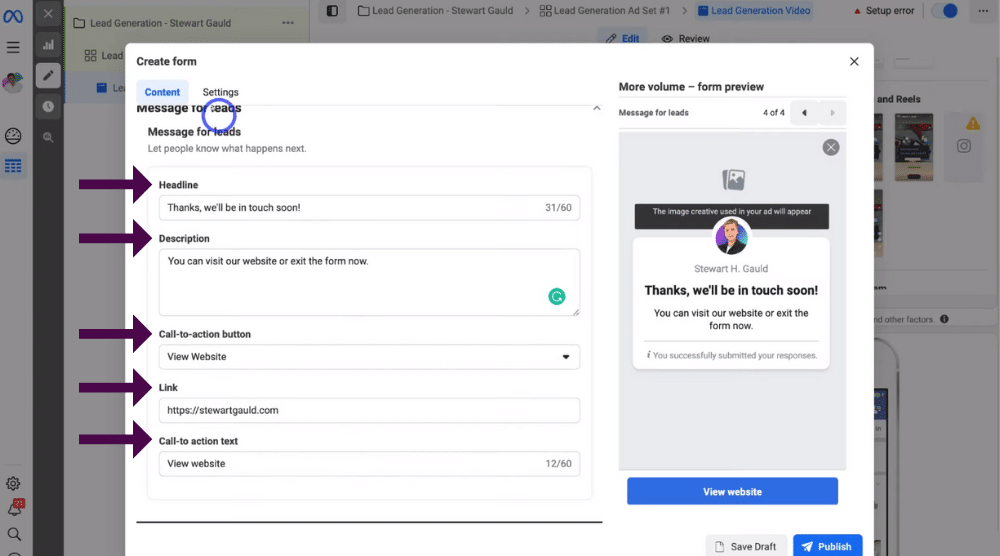
Here you can add a ‘Message for leads’ that will appear once you’ve had a successful submission.
For example, we’ve customized the headline, description, call-to-action button, link, and call-to-action text (see screengrab).
Once you’ve customized your ‘Message for leads’:
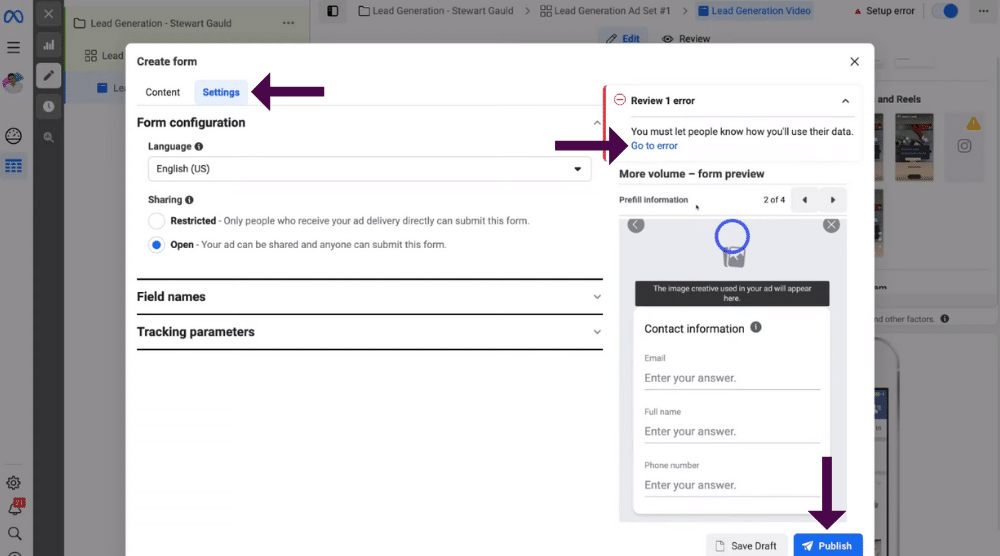
- Click ‘Settings’.
- Select the sharing options.
We want our ads to be shared with anyone who can submit this form (not just people that receive the ad directly) so we’re going to select ‘Open’.
- Click ‘Publish’!
If you see this error up here: (see screengrab),
- Click ‘Go to error’.

This will then tell you what the error is.
For us, all we need to do is add a description to let people know how the information will be used (see screengrab).
Once you’ve fixed your errors, click ‘Publish’ again to add your form!
Read more: Top 5 Digital Marketing Strategies for small businesses.
13. Publish Video Ad

We’ve now shown you how to set up a lead generation campaign, created a video ad within InVideo, and created a form inside Facebook.
- Come down & Click ‘Publish’ at the right-hand bottom corner.
Once you’ve published your video ad, just like that multiple items have been published.
If this is your first time creating ads and you haven’t yet added your payment details, you might also see the option to add your payment information at this stage.
- Close out of this.
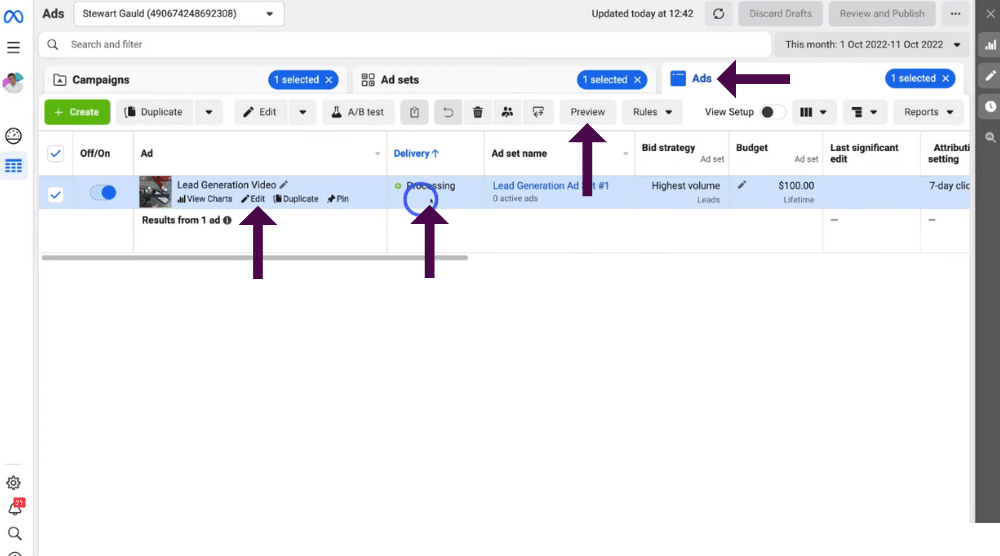
- On the right, Click ‘Ads’.
You can see down here that our ad is processing (see screengrab).
This usually takes around one hour before your ads are live and active.
To preview your ad:
- Simply click ‘Preview’.
Here you’ll be able to preview your ad to see what your ad will look like across these different destinations on Facebook and Instagram (see screengrab).
Take the time to go through each of these different destinations where your video ad will be displayed on Facebook and Instagram.
You can then edit your text descriptions if you’re still not happy with them:
- Simply exit out of your ad preview.
- Click on your video ad.
- Simply click ‘Edit’
You’re then able to view your leads:
- Click ‘Download (CSV) under ‘Results’.
- Open in Google sheets to see all lead information.
However, that is everything we wanted to cover in this Facebook ads tutorial for beginners helping you create Facebook video ads for lead generation!
Facebook Lead Generation Ads Tutorial – Full Video Guide
That brings us to the end of this lead generation tutorial for beginners on how to create Facebook video ads using InVideo and Facebook ads manager.
We hope you are now able to successfully create a professional video ad for lead generation using InVideo’s video maker, then upload this to Facebook ads manager to drive more leads for your small business!
If you have any questions on this process or require a more detailed video guide, check out our Facebook ads tutorial for beginners video below.
