Are you currently using an old version of Google Analytics for WordPress?
In this tutorial, we are going to show you how to switch to Google Analytics 4, which is the newest and most updated version.
If you want to make sure you’re still able to collect and measure analytics on your WordPress website, it’s important you make the move over to Google Analytics 4 as soon as you can, as the old version of Google Analytics (Universal Analytics) properties will no longer process data from July 2023.
What is Google Analytics?
Google Analytics is a popular online platform within Google that every business owner should be using to measure analytics within their website.
In other words, Google Analytics analyzes your website’s data so you’re able to understand and measure things like website visitor behaviors and the traffic and performance of your website (all in real time!) which you can then use for search engine optimization (SEO) or marketing purposes.
The best part about Google Analytics is they offer a free and paid version, meaning that anyone can access this incredible tool, all you need is a Google account!
Read more: How to use Google Workspace
How to Switch to Google Analytics 4?
In 2021, Google Analytics introduced a new version of the tool called Google Analytics 4 (named the future of Google Analytics) which offers more integrations and features to provide you with a more thorough understanding of your website and customers!
We are going to show you how easy it is to move everything away from Universal Analytics to Google Analytics 4 by installing the new version of Google Analytics for WordPress.
It really is quite simple, yet so important for your business to continue reaping the benefits of this powerful analytics tool.
Let’s get stuck in and show you how to setup Google Analytics 4 for your website!
1. How to Get Started With Google Analytics 4
So again, the purpose of this Google Analytics for WordPress tutorial is to show you how easy it is to shift away from using Universal Analytics (the old version of Google Analytics) so you can get started with the new version, Google Analytics 4.

To do that:
- Head over to your browser of choice & type in analytics.google.com or click here.
This will automatically redirect you to your dashboard.
If you don’t have Google Universal Analytics or Google Analytics 4 installed, watch our complete and updated beginners Google Analytics Wordpress tutorial, where we help you get up and running with this incredible platform.
However, if you have Universal Analytics installed on your WordPress website and you want to learn how to switch to Google Analytics 4, then you’ve come to the right place!
Now before we get started, it’s important to note that you shouldn’t delete Universal Analytics.
All we’re going to do is show you how to add the new version, as well as keep the older version of Google Analytics for WordPress up and running,
That way, you’ll still be able to collect data with Universal Analytics will continue up until July 2023 (when it stops collecting data).
It’s important you install the new version before July 2023, so that Google Analytics 4 can start generating data and you don’t lose anything in between the version changes.
Let’s get started and show you how to do that!
Read more: How To Add Google Analytics To Google Sites
2. How to Set Up Google Analytics 4 Property
Once you’ve arrived inside Google Analytics, you’ll next need to learn how to set up Google Analytics 4 property.

To do this:
- Check you have the correct account selected on the left-hand side.
- Click ‘Admin’ in the bottom left-hand corner of the screen.
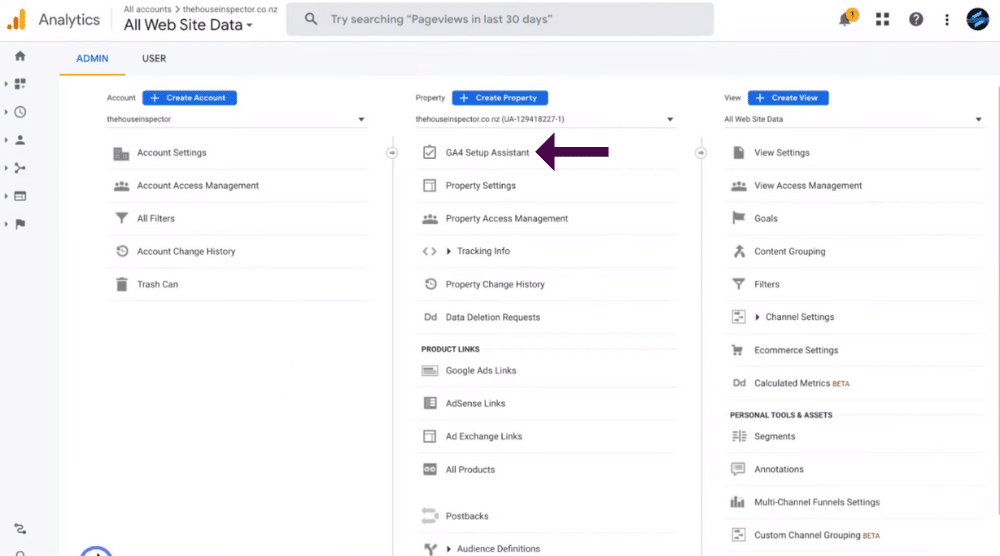
- Navigate up to ‘GA4 Setup Assistant’ (see screengrab).
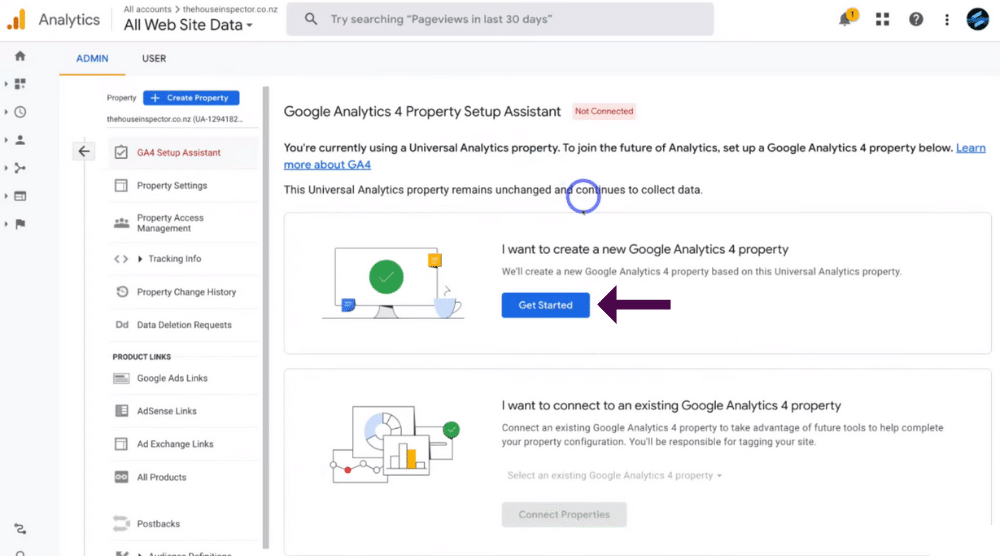
- Below ‘I want to create a new Google Analytics for property’, click ‘Get started’.
Google Analytics will then create a Google Analytics 4 property based on the Universal Analytics data you currently have installed.
- Click ‘Create and continue’.
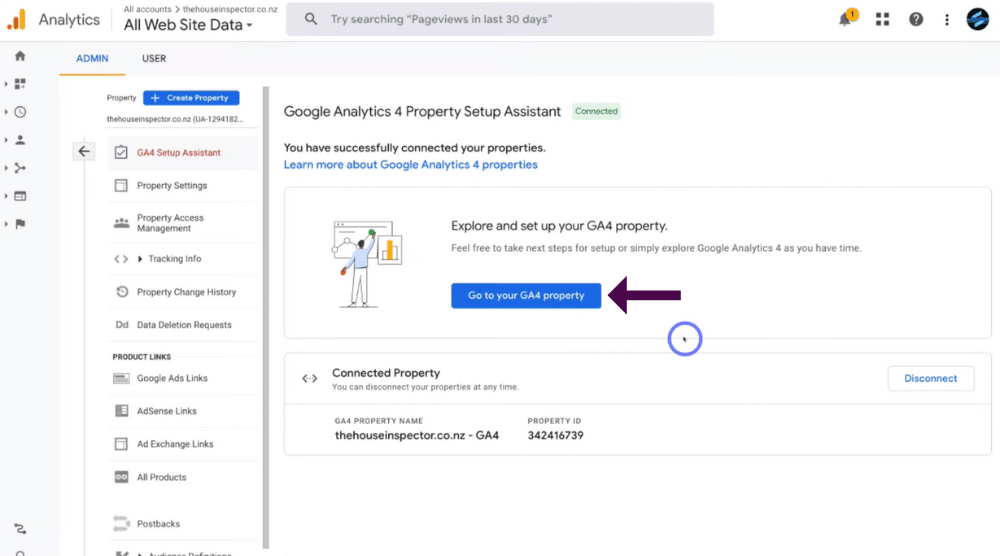
- Select ‘Go to your GA4 property’.
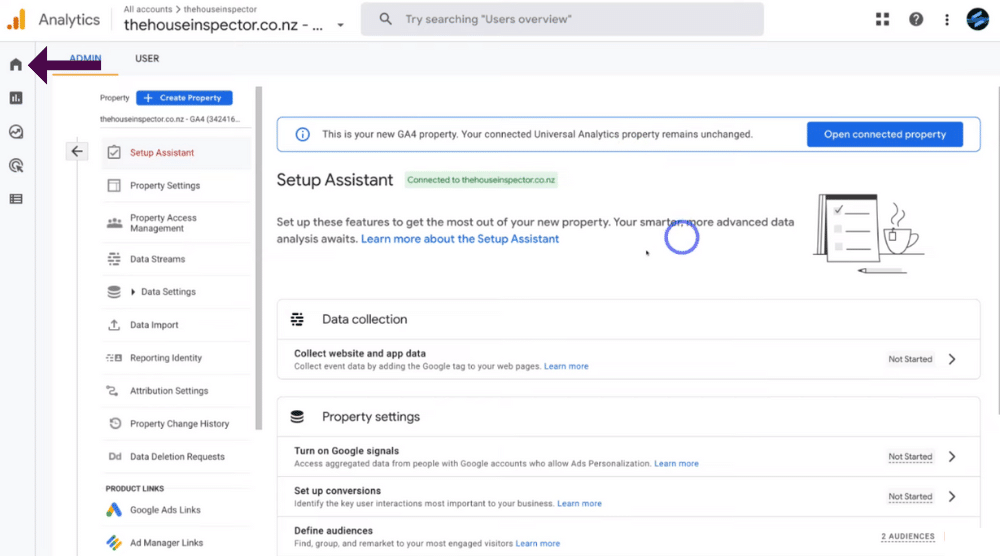
And as you can see this is your new Google Analytics 4 property (see screengrab) and your connected Universal Analytics (which is the older version of Google Analytics) property remains unchanged.
The next step is to show you how to find your data stream so that you can install Google Analytics 4 onto WordPress:
- Head back over to the left-hand side bar.
- Click the ‘Home’ icon.
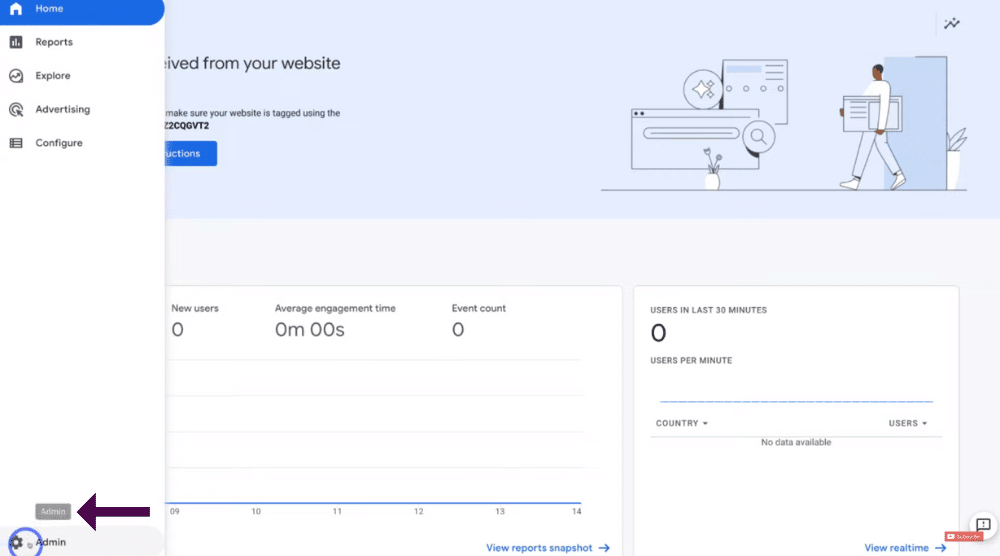
- Simply navigate back down to the left-hand side.
- Click ‘Admin’ again in the bottom of the left-hand side bar.

- Select ‘Data streams’.

You’ll then see the data stream that you just created (see screengrab).
- Click on the data stream.
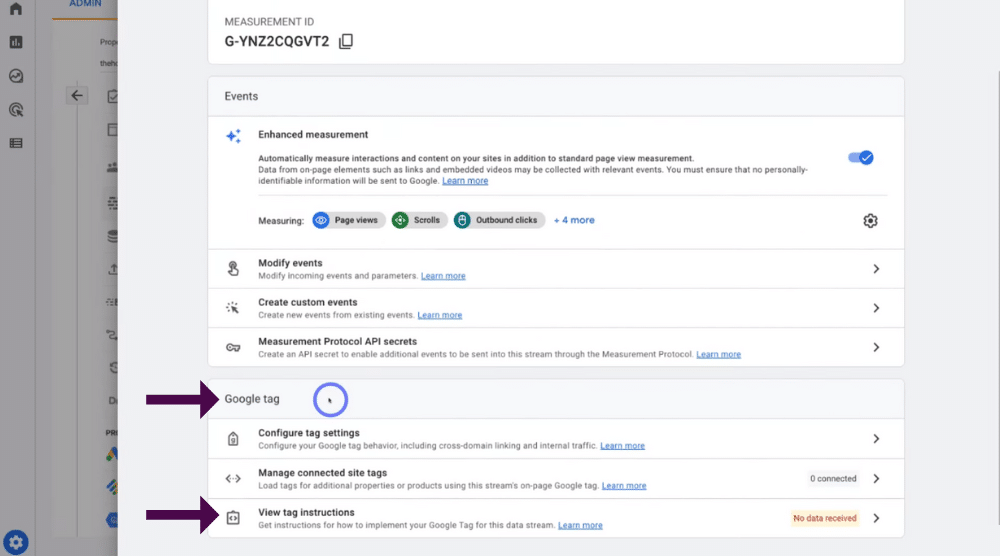
- Scroll down to the ‘Google Tag’ heading.
- Click ‘View tag instructions’.
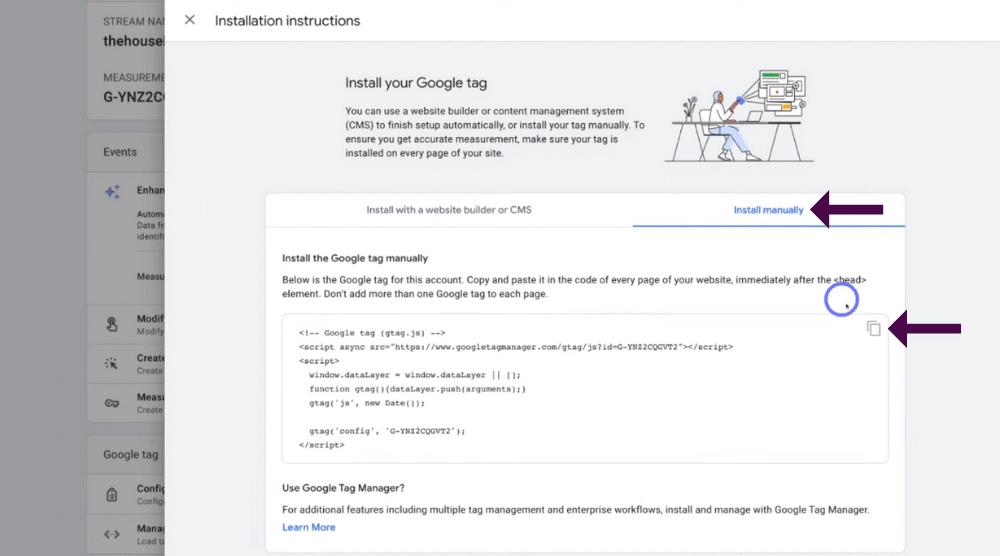
- Select ‘Install manually’.
- Copy the code snippet (see screengrab).
This is the Google tag that you want to install on every page of your header element.
It’s important to note that if you want advanced measuring capabilities and more control, you should install the Google tag manager and use the Google tag manager with Google Analytics 4.
However, for most small and local businesses, this method we are showing you is more than enough.
Read more: How to connect Google Analytics to Wix and Squarespace
3. How to Install Plugin on WordPress (headers and footers)

Once you’ve copied the code:
- Head over to the backend of your WordPress website.
- Navigate over to ‘Plugins’ on the left-hand side bar (see screengrab).
- Click ‘Add new’ from the drop down menu.
- Navigate over to the search bar.
- Type in ‘Insert headers and footers’.
- Find the ‘WPcode insert headers and footers’ plugin (see screengrab).
This popular WPcode plugin has over 1 million active installations, with 1000+ five star ratings!
Before we go ahead and show you how to install this plugin, it’s important to mention that you should always backup your WordPress website anytime you’re installing any themes or plugins into your WordPress website.
Why?
This is in case a new plugin or theme clashes with your other already installed themes or plugins, which can then cause your website to crash.
You can read more about how to backup your WordPress website here.
Once you’ve backed up your WordPress website:
- Select ‘Install now’ on the ‘WPcode insert headers and footers’ plugin.
- Click ‘Activate’.
Read more: Google Analytics 4 Tutorial for Beginners
4. How to Insert Google Tag

When you’ve installed the plugin:
- Click ‘Code Snippets’ on the left-hand sidebar.
- Select ‘Header and footer’ from the drop-down menu.
- Below the ‘Header’ title, past in that Google tag you copied earlier (see screengrab).
- Paste in that Google tag.
- Click ‘Save changes’.
And there you go, done!
You now know how to switch to Google Analytics 4 for your WordPress website as well as still keep the old version of Google Analytics for WordPress.
Read more: How to setup Google Ads Conversion tracking in WordPress
5. How to Check Google Analytics is Working
Next, you’ll need to check if Google Analytics is working.

To do that:
- Navigate over to your website (see screengrab).
- Simply scroll through some of your website pages.
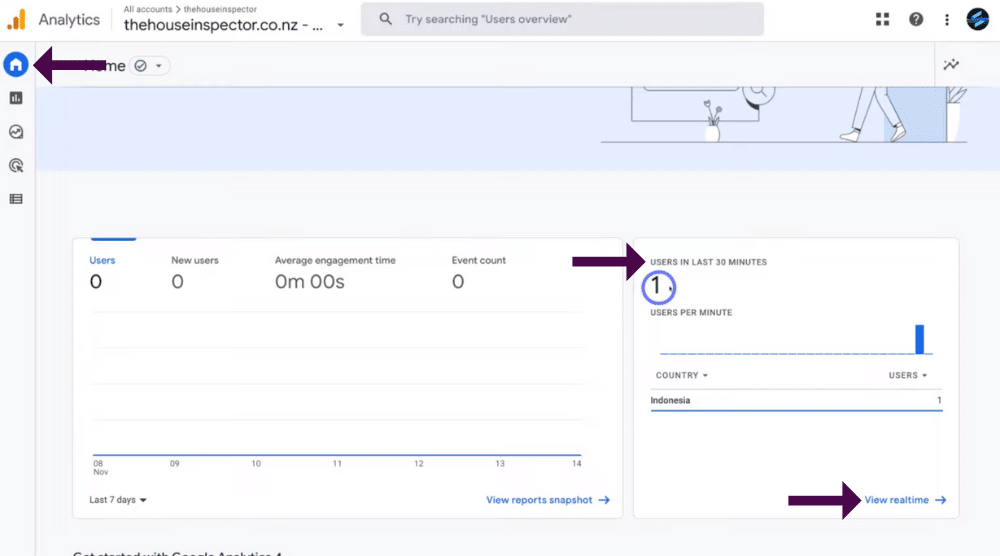
This will start generating data into Google Analytics to check if Google Analytics for WordPress is working.
- Head back to Google Analytics 4.
- Exit out of these instructions and ‘Web stream details’.
- Select the ‘Home’ icon on the left-hand sidebar.
Now it’s important to note that it can take up to 24 hours for your new Google Analytics 4 data to appear in your analytics, however, this may be shorter.
For example, for us, you can see that in the last 30 minutes, we’ve had one user, (which is us) (see screengrab).
Next:
- Click ‘View real time’ to see users in real-time (see screengrab).

- Here you can see ‘Views by page title and screen’.
- Below that, you can see where that user navigated to.
For example, when we were scrolling through our website, we were on the home page, services, and contacts page (see screengrab).
So now we’re able to see that Google Analytics 4 is working as well as Universal Analytics.
And now when your Universal Analytics stops processing data in July 2023, you don’t have to worry about the collection of data being collected into your Google Analytics 4.
Read more: How to use Google Search Console
Video Tutorial – How to Setup to Google Analytics 4
That concludes this Google analytics for WordPress tutorial!
Again, this process is straightforward but so important in order for Google Analytics to keep collecting your data when Universal Analytics becomes obsolete, so you can continue measuring your websites performance, growth, user behavior and more!
Feel free to check out our full video tutorial below also explaining how to switch to Google Analytics 4.

