Do you use both HubSpot and MailChimp for your small business?
and want to learn how to connect HubSpot and MailChimp together to sync your data and other activities onto both platforms for free?
If so, this Zapier integration tutorial is for you!
We’re going to dive right in and show you just how easy it is to connect HubSpot and MailChimp together so you can streamline your business and processes.
How to connect HubSpot and MailChimp?
HubSpot and MailChimp are two of our favorite tools we often mention to small businesses wanting to grow their brand online.
In fact, MailChimp is our top email marketing software choice for small businesses.
They offer many easy-to-use features like email campaigns, landing pages, segmentation, and more and an incredible free plan with a generous amount of monthly email sends.
In addition to all this, you’re able to seamlessly integrate MailChimp with popular platforms, one of these being HubSpot.
If you’d like to learn more about MailChimp, make sure to read our How to use MailChimp for Beginners tutorial here.
HubSpot is an awesome CRM (customer relationship management), sales and marketing platform that we’re always raving about.
We love HubSpot as they provide a super jam-packed free plan that offers an incredible amount of features and contacts, and an unlimited number of users!
They’re also well-known for their integration capabilities.
Want to get started with HubSpot? Check out our tutorial on how to use HubSpot CRM here.
HubSpot offers an in-app integration called Datasync, where you can seamlessly sync your data with MailChimp, but in order to use Datasync, you’ll have to upgrade to at least the Operations Hub ‘Starter’ plan.
However, did you know you can still enable this HubSpot integration if you’re using HubSpot’s free CRM plan?
What is Zapier?
This is done by using the no-code automation and integration app called Zapier.
Zapier is used as a bridge to connect all different types of applications together with the aim to automate specific processes.
By the end of this Zapier integration tutorial, you’ll know how to connect HubSpot and MailChimp together to sync your data on both platforms.
Let’s dive in and find out how to simply connect and sync HubSpot with MailChimp using the free automations tool Zapier!
You can watch our beginner’s tutorial on How to use Zapier to automate and integrate your software with ease
1. Getting started with HubSpot and MailChimp
To get started, you’ll first need to sign in to your free HubSpot account.

Get started with HubSpot CRM for free here.
Once you’re inside your free HubSpot account:
- Click the ‘Marketplaces’ icon on your dashboard.
- Select ‘App marketplace’.
- Type ‘MailChimp’ into the search bar.
- Select the MailChimp app (see screengrab).
However, as previously mentioned, this app requires the operation hub starter (or higher) plan, however, we’re actually going to leverage Zapier to enable this app.
2. How to create a free Zapier account
In order to enable the Zapier app, you’ll need to create an account.
To do this:
- Type in Zapier.com on your browser of choice or click here.

That’ll take you to Zapier’s homepage (see screengrab).
- Click ‘Get started for free’.
- Simply type in your details or
- Sign up with Google, Facebook, or Microsoft
Sign up with Zapier for free here.
For the purpose of this HubSpot integration tutorial on how to connect HubSpot and MailChimp, we’re going to sign up with our Google account.
- Make sure you select the correct Google account.
- Select the role that best describes you.
- Choose how many employees are in your company.
- Click ‘Continue’.
We’re going to select ‘Business owner’ and ‘1-49’.
Read more: How to get started with Google Workspace
3. How to create a Zap
Now that you’ve completed the sign-up process, you’ll need to create your first Zap.
A zap is an automated workflow within Zapier that connects multiple apps together.

To create a Zap:
- Simply click ‘Create Zap’ on your Zapier account homepage.
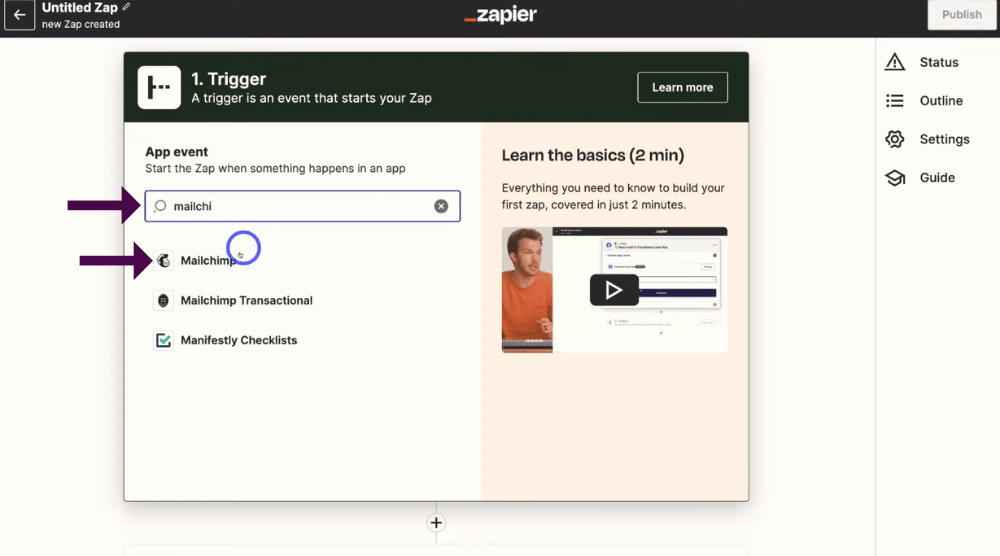
- Type the name of the app you want to connect with in the search bar.
- Select the correct app from the drop-down list.
For the purpose of this how-to connect HubSpot and MailChimp Zapier integration tutorial, we’re going to search for MailChimp (see screengrab).
Read more: How to connect MailChimp to WordPress
4. How to set up a MailChimp trigger and event
Within your Zap, you have triggers and you have events.
Your trigger is an event that starts your Zap.
So, in this case, MailChimp is the trigger, meaning that what happens in MailChimp will trigger something to also happen in HubSpot.

Once you’ve selected MailChimp, you’ll need to choose the event:
- Click the search bar below ‘Event’.
- Select any of the events from the drop-down menu (see screengrab).
- Click ‘Continue’.
For the purpose of this how-to connect MailChimp and HubSpot tutorial, we’re going to select ‘New subscriber’.
- Select ‘Continue’.
This means this new subscriber event will trigger when a new subscriber is added to a particular audience.
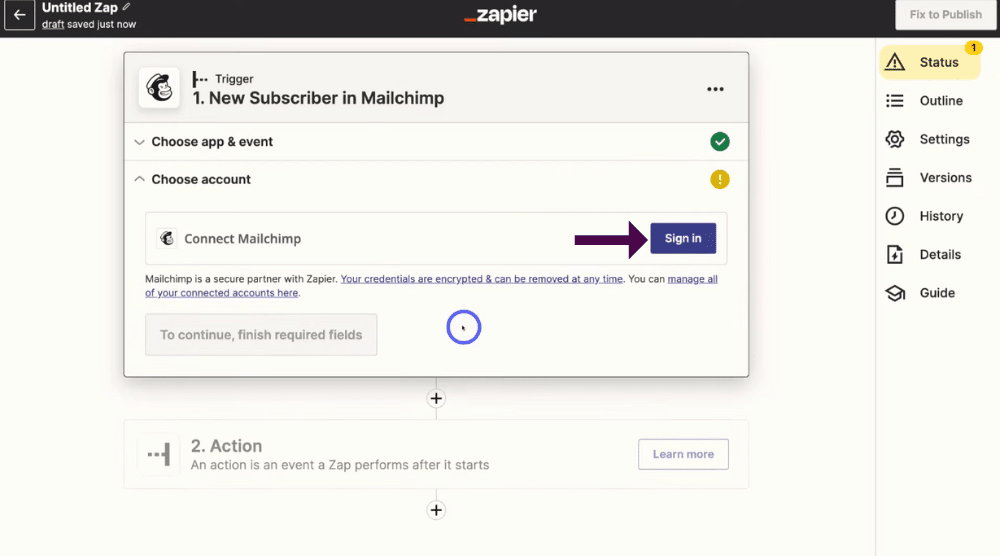
Next, you’ll need to sign in with MailChimp:
- Simply click ‘Sign in’ (see screengrab).
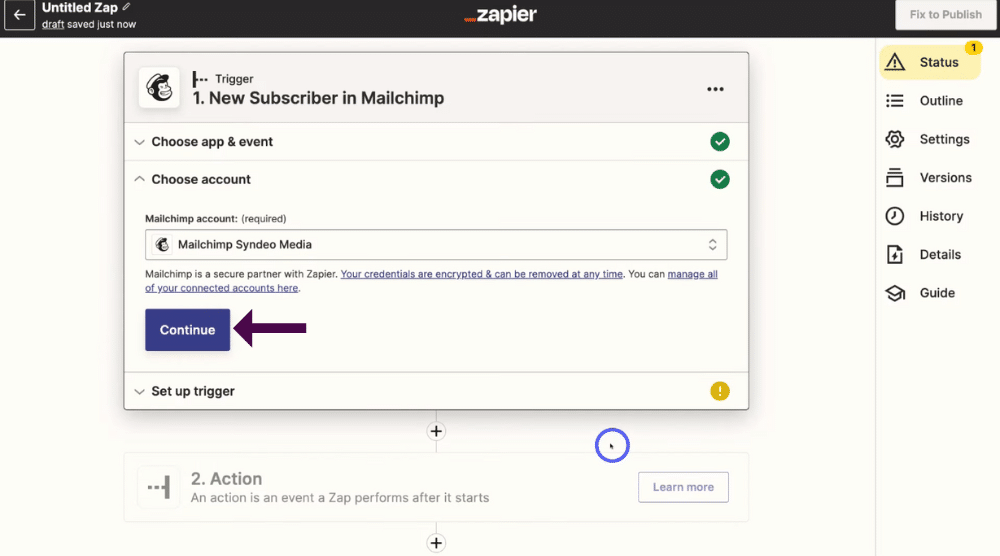
Once you’ve connected your MailChimp account:
- Select ‘Continue’.
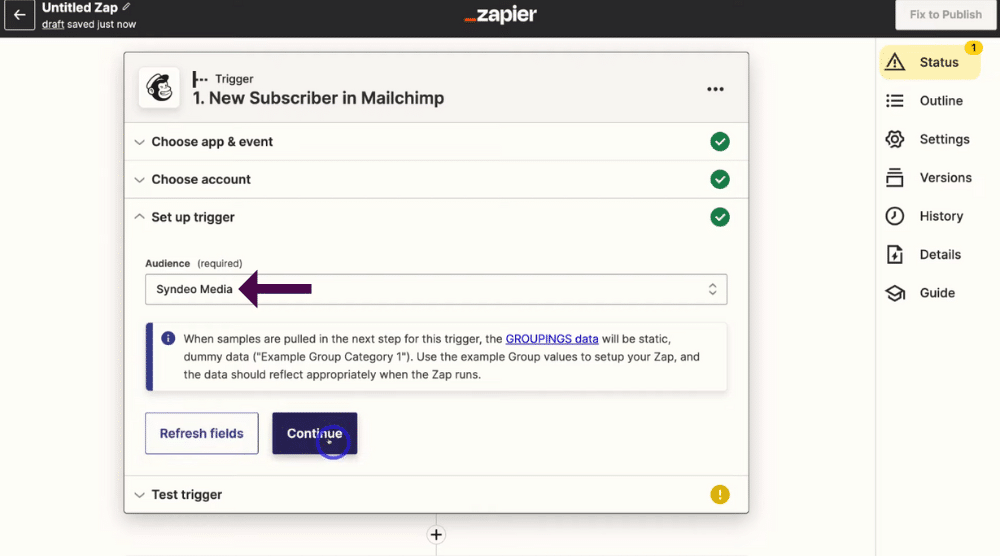
- Click the field below ‘Audience’.
- Make sure you select the correct audience (email list).
- Click ‘Continue’.
So to summarize, make sure you select the MailChimp app, sign into your MailChimp account and select the ‘New subscriber’ trigger to the correct audience (email list).

Next, you can test to see if your trigger is working correctly:
- Simply click ‘Test trigger’.
And as you can see, we found a subscriber! This means the test was successful!
Read more: How to create email automations with MailChimp
5. How to set up a HubSpot trigger an event
You’ll next need to set up your action.
An action is an event a Zap performs after it begins.
Now remember, you want to connect MailChimp with HubSpot in order to sync your data on both platforms.

To do this:
- Click ‘Continue’.

- Type in ‘HubSpot’ in the search bar below ‘App event’.
- Click ‘HubSpot’.
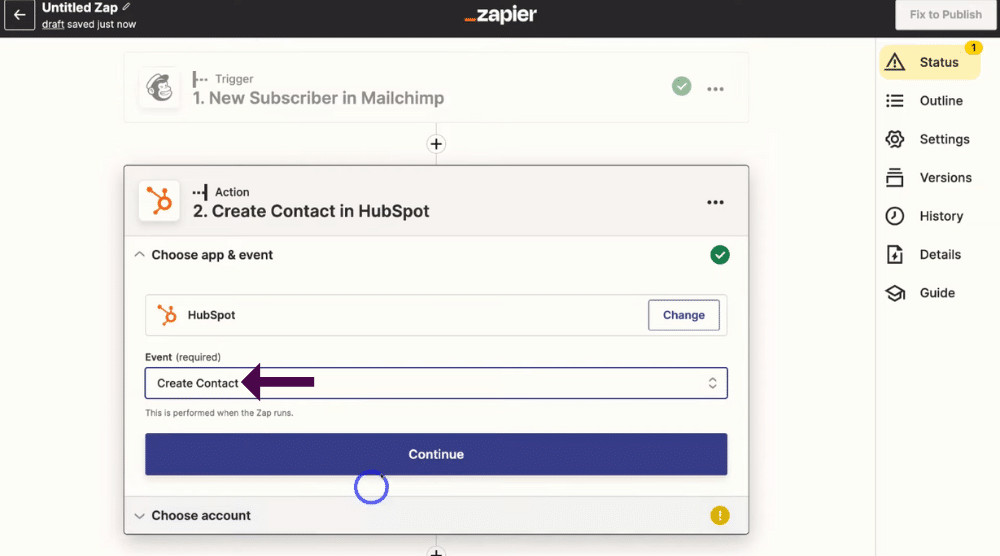
- Choose an event from the drop-down list of different event types (see screengrab).
Remember, you can create multiple zaps or connections between MailChimp and Zapier.
For the purpose of this how-to connect HubSpot and MailChimp tutorial, we’re going to click ‘Create contact’.
This will create a contact in HubSpot.
- Click ‘Continue’.
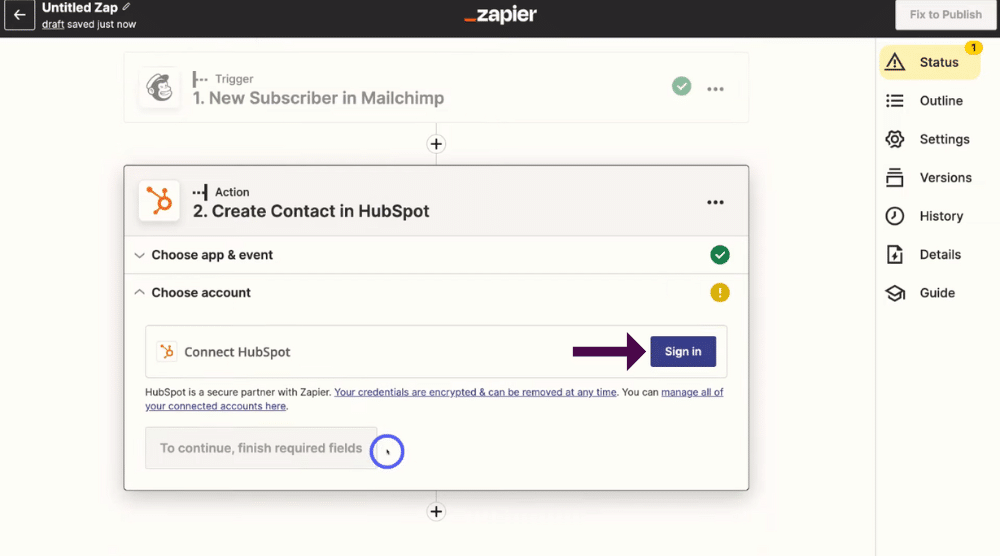
- Select ‘Sign in’ to sign in and connect with HubSpot (see screengrab).
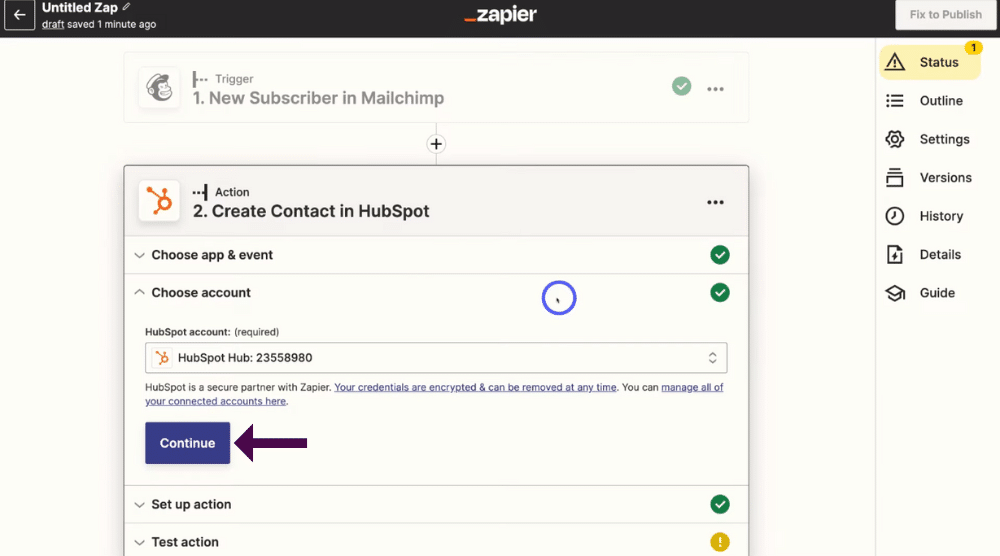
Once you’ve connected your HubSpot account:
- Click ‘Continue’.
- Navigate at the bottom & again click ‘Continue’

- Select ‘Skip test’ or
- Simply fill in some of this information (see screengrab).
- Click ‘Test action’.
However, for the purpose of his Zapier integration tutorial, we’re going to click ‘Skip test’.
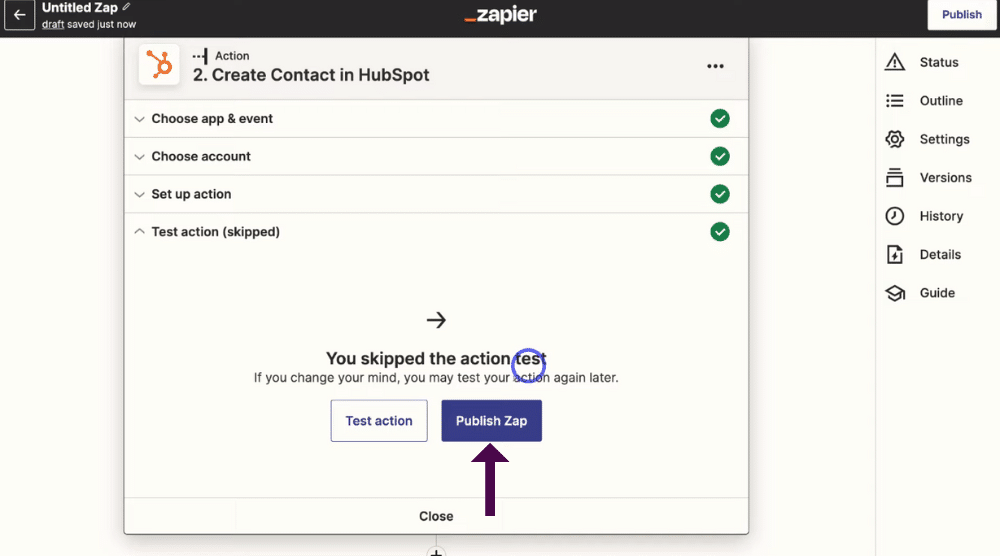
When you’re ready to publish your Zap and turn on the connection between MailChimp and HubSpot:
- Click ‘Publish Zap’.
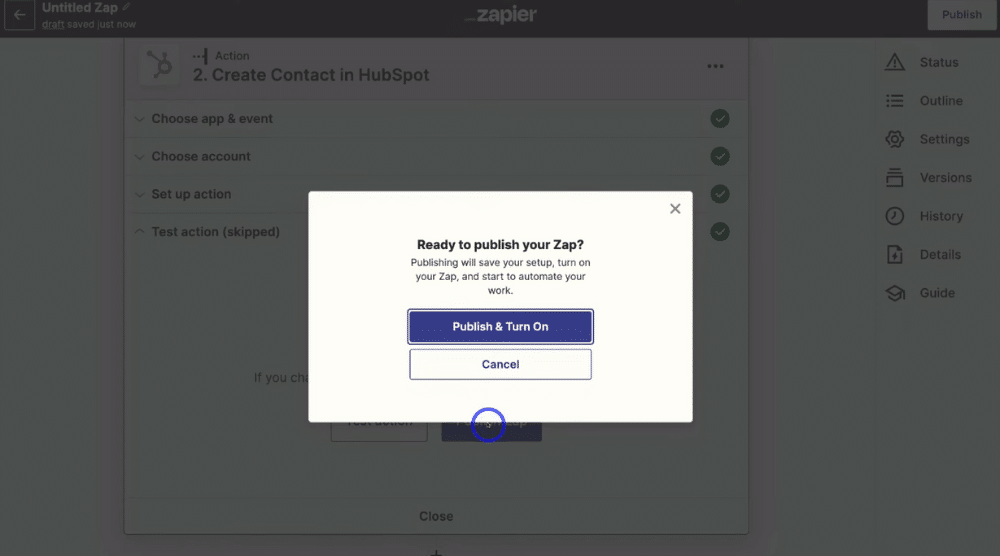
- Select ‘Publish & Turn On’.
As soon as you turn this on, this means that when a new subscriber is added to the email list you selected earlier (inside MailChimp), a new contact will be created within HubSpot!
Once you click ‘Publish & Turn On’, you’ll receive a confirmation pop-up page to let you know your Zap has been created (see screengrab).
You’ve now successfully connected HubSpot with MailChimp!
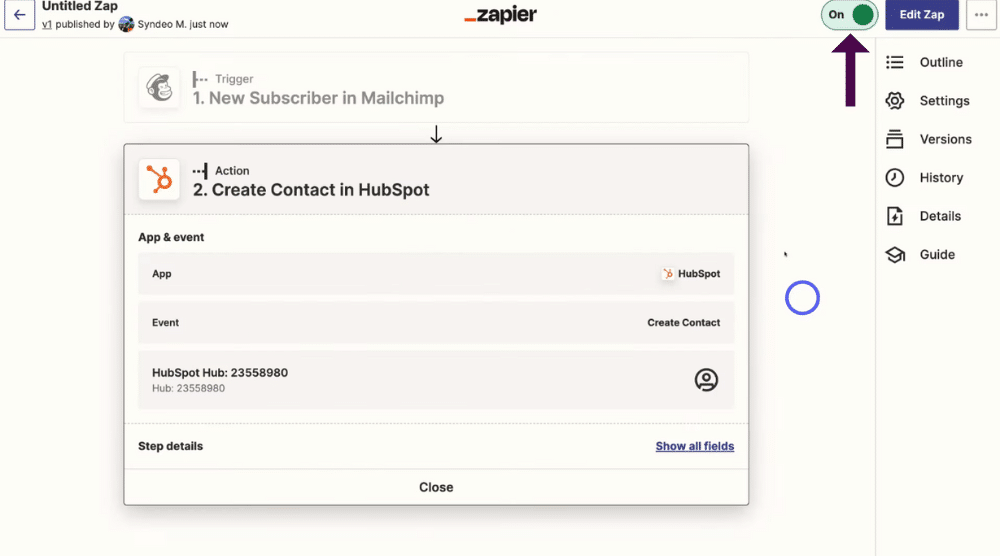
If you ever want to turn off this connection:
- Simply switch the ‘On’ button to ‘Off’ (see screengrab).
Remember, this is not the only event you can create when connecting MailChimp with HubSpot.
For example, let’s say you wanted to drive traffic to a landing page you built within MailChimp to capture new contacts interested in your services.
Those contacts will then automatically get added to a list that you created specifically for that landing page.
Now, because you’ve enabled this HubSpot integration with MailChimp when that person signs up, they’ll automatically get sent and added as a contact to your HubSpot CRM!
You’re then able to start engaging with that contact via HubSpot with the aim to turn them into a lead and a paying customer.
You can read our beginner guide on How to create a landing page in HubSpot
And it really is as easy as that!
That’s all you need to know on how you can use the free automation tool Zapier to connect HubSpot and MailChimp.
How to connect HubSpot and MailChimp – Video
Learning the simple process of how to connect HubSpot and MailChimp is truly invaluable to any business type and size.
As a result, you’ll be able to improve your email marketing activities, gain and foster relationships with potential customers, and reduce the time friction spent manually jumping between different platforms!
Check out our visual Zapier integration tutorial video below to further help you understand the process of how to connect MailChimp and HubSpot for free.

