Are you a new business owner and want to learn how to make an eCommerce website?
Or perhaps an existing business after a brand revamp and want to know how to create a free online store in 2025?
This free website-building option is for small businesses that have:
- Under 5 products to sell.
- Have physical products to sell.
- Need a responsive website built fast.
- Need a website that seamlessly integrates with other sales channels with ease.
In this eCommerce tutorial for beginners, you’ll learn how you can use a free online store website builder to create a professional eCommerce website.
That’s right – you can easily make an eCommerce website with absolutely no hidden costs or increasing monthly subscription costs!
Read more: My top 7 AI Website Builders for Small Businesses
How to make an eCommerce website?
We’re going to guide you through step by step the process of how to create a free online store in 2025 with Ecwid, one of our favorite online store website builders for small to medium size businesses.
With Ecwid, you’re able to quickly create and launch an impressive website in minutes, then simply list and sell your online products with ease for free!
Let’s jump right in and get started with Ecwid in this eCommerce tutorial for beginners.
Read more: Top 3 eCommerce website platforms for small businesses
What is Ecwid?
Ecwid is a powerful free online store builder tool ideal for eCommerce businesses just getting started.
You can simply either create a full website, or integrate Ecwid with your existing website built with Wix, Squarespace, Google Sites and more (all within a matter of minutes).
This means that if you already use a website builder and you just want to add an online store to your current website, you can easily do this through Ecwid!
Additionally, you can seamlessly connect your online store with Facebook, Instagram, Etsy, Amazon, and more in order to reach a larger audience online.
We absolutely love Ecwid for these amazing and flexible integration capabilities, and is (in our opinion) the best free online store website builder platform out there for eCommerce businesses!
With that said, let’s dive in and find out how to create a free online store in 2025 with this incredible tool.
Read more: Top 6 free website builders for small businesses
1. How to get started with Ecwid?
To get your online store up and running with Ecwid, you’ll first need to create an Ecwid account.

Get started with Ecwid for FREE here.
*The link above is an affiliate link, which means we will get a commission if you upgrade to a paid plan (with no extra cost to you). This helps support our education-based website and we thank you in advance!
2. Ecwid pricing plans
Before we show you how to sign up and sign into Ecwid, let’s quickly run through the different pricing options.

To do this:
- Simply head over to the Ecwid website on your browser.
- Click ‘Pricing’ in the top right-hand corner.
- On the left-hand side, you’ll see Ecwid’s free plan (see screengrab).
- Next to the free plan, you have the other 3 paid plans Ecwid offers and the main features within those plans.
The free plan is absolutely sufficient for small businesses, startups, and business owners, and is the plan we’re mainly going to focus on within this free online store builder and eCommerce tutorial for beginners.
However, before we continue, it’s important to mention that the free plan does have some limitations, one being that you’re only able to list up to 10 products on your online store.
If your eCommerce business offers more than 10 products, you’ll have to upgrade to one of the 3 premium paid plans.
Another limitation of the free plan with Ecwid is that it only works with physical products.
This means that if you want to sell any digital products, you’ll also have to upgrade.
As a general rule, we recommend starting with the free plan and then simply upgrading to one of the paid plans once your business and online store grows.
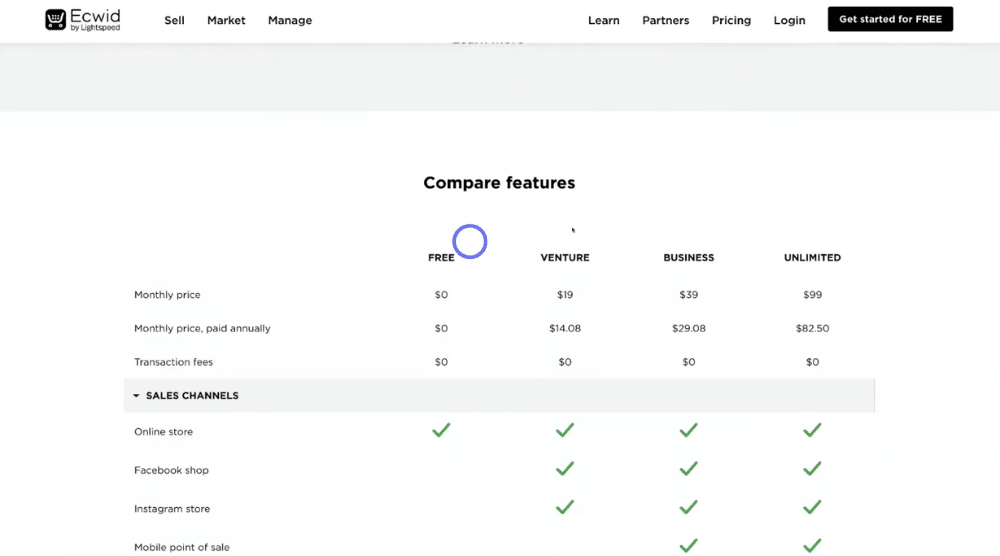
If you’d like a detailed list of features each plan offers so you can decide what plan you want to opt for:
- Scroll down the page below ‘Compare features’ (see screengrab).
As this tutorial is focusing on creating a free online store website, we’re going to dive into some of the key features within the free plan shortly.
Although you can only sell physical products (maximum of 10) on this plan, you can still create a stunning free online store website and embed that online store across other different platforms.
These are all pretty incredible features to offer on a free plan!
Read more: How to make an eCommerce website with Big Cartel
3. How to create a free account with Ecwid?
Now you’re ready to learn how to make an eCommerce website!

To get started:
- Click ‘Get started for FREE’ on Ecwid’s homepage.
Follow the simple steps to initially set up your account:
- Add in your business details and business name.
- Answer a few other simple questions when prompted.
And it’s as simple as that!
- You’ll then get redirected to your Ecwid account.
Let’s meet you inside your Ecwid account.
When you’ve signed up and signed into your free Ecwid account, you’ll arrive at your dashboard.
We’ve created a fresh account for an example jewelry business called ‘Gauld and Garrett’ for the purpose of this how-to-make eCommerce website tutorial.
Read more: How to use, set up and sell on Etsy
4. How to add products to your Ecwid online store?
Once you’ve created your Ecwid account for your brand, the first step to get your online store up and running is to add products to your website!

Follow the steps below to find out how:
- Select ‘Catalog’ on the left-hand sidebar.
- Click ‘Products’ from the drop-down menu.
- Under ‘Products’, you’ll see a bunch of sample default products created by Ecwid.
- Select this box to select all the default products (see screengrab).
- Click ‘Mass update’.
- Select ‘Delete selected’ from the drop-down menu or
- Click ‘Delete all sample products’ on the right-hand side.
- Click ‘Yes’.
That’ll delete all these sample default products, making your ‘Product catalog’ empty.
Now you’re able to add your own products!
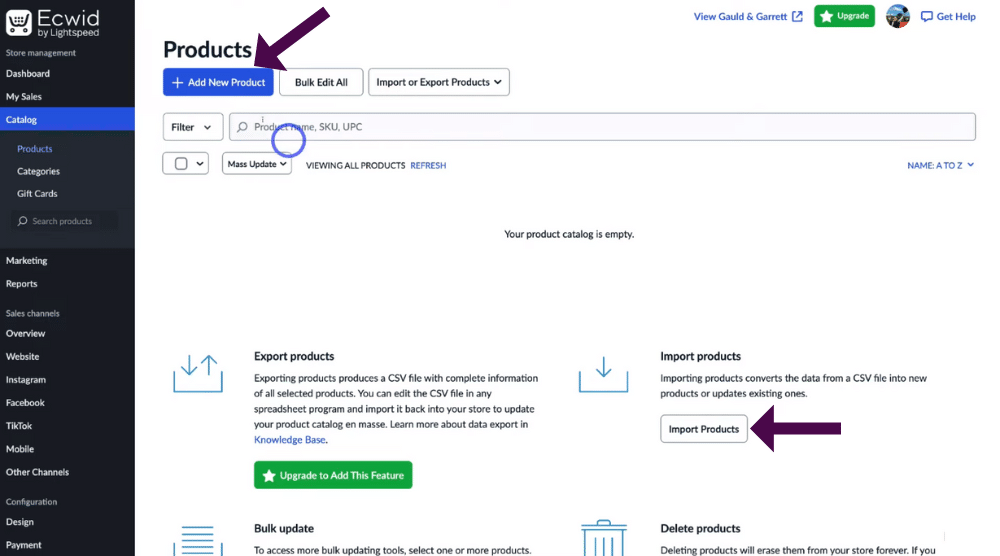
Additionally, if you have lots of products, you can bulk import these:
- Click ‘Import products’.
This will allow you to upload your products through a CSV file, which is ideal if you have a lot of products and want to save time by uploading them all at once!
However, as this is a free online store website eCommerce tutorial for beginners, we’re using the free plan which only allows you to upload 10 products for free.
Therefore, we’ll add our products using the first manual process shown above.
To add a new product manually:
- Click ‘+ Add new product’.
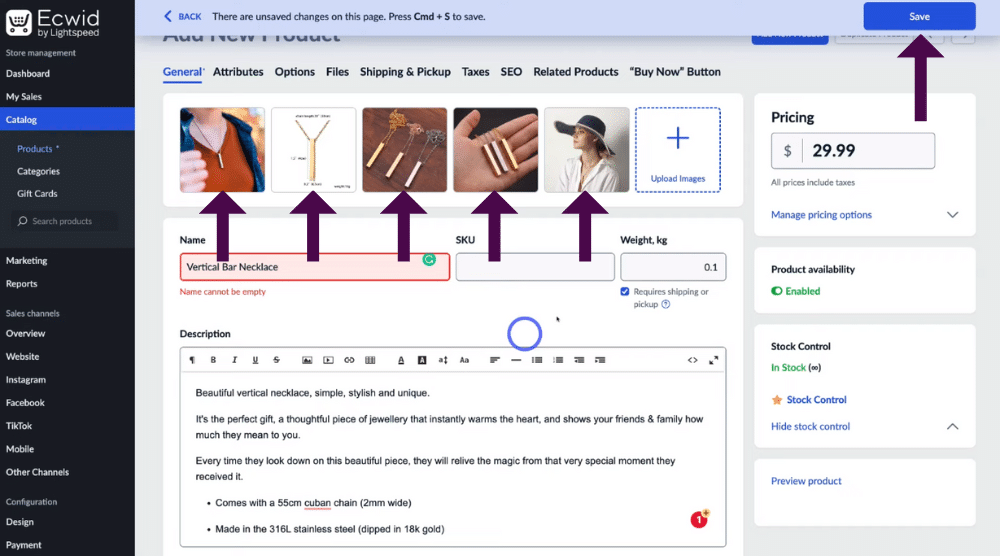
- Select ‘Upload Images’.
- Choose one or multiple images of your product from your computer.
- Click ‘Open’.
- Select ‘Save’.
This may take a few moments.
As you can see, for our first product, we’ve uploaded and added five images (see screengrab).
- Simply come down and name your product below ‘Name’.
We’re going to name ours ‘Vertical Bar Necklace’.
- Next to this, add in an SKU (stock keeping unit) number to your product if applicable to help you keep track of your stock.
- Add in the weight of your product in kgs below ‘Weight’.
For the purpose of this how-to-make eCommerce website guide, we’re going to type ‘0.1’ for our necklace product.
If you’re not sure about how much your product weighs, don’t worry too much (an estimate is fine).
- Tick or untick ‘Requires shipping or pick up’.
- Add the pricing point of your product below ‘Pricing’ on the right-hand side.
You should include all taxes in this price.
- Below ‘Description’, type in a description of your product.
We’ve just quickly added a brief description of our product for our necklace (see screengrab).
- Select the formatting options above your description to further customize your description.
Once you’re happy with your product description:
- Click ‘Save’ in the upper right-hand corner.
And it’s as easy as that to add and customize your first product!
5. Premium pricing options
If you do opt for a paid plan, you’re able to access and manage premium pricing options for your products that we’ll quickly cover now.

To access this:
- Click ‘Manage pricing options’ below ‘Pricing’ on the right-hand side.
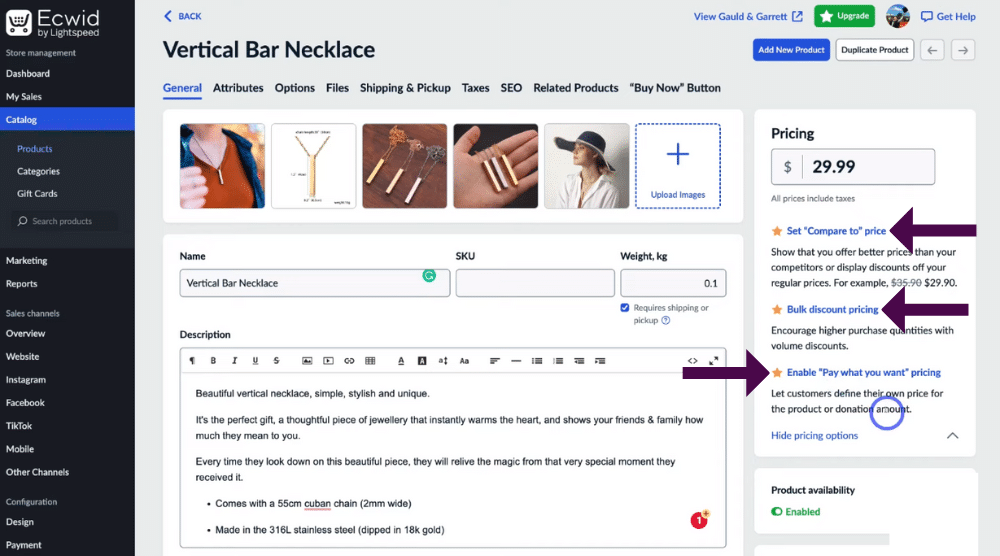
Here you’ll see three pricing options for paid plan members (see screengrab).
1) Set ‘Compare to’ price means your customers are more likely to buy your product as they’ll be able to see the sales price vs regular price!
2) Bulk discount pricing is perfect for people who need to buy a lot of products.
3) Enable pay-what-you-want pricing for donations.
If you opt for a paid plan, simply enable or disable any of these dynamic pricing options depending on your brand.
So for example, we would enable ‘Bulk discount pricing’ and ‘Set ‘Compare to’ price as a way to encourage more conversions.
However, as this tutorial is focusing on how to create a free online store in 2025 we won’t be upgrading to a paid plan and therefore won’t be able to use these features.
6. How to add product options to your online store?
Once you’re finished with the pricing of your product, you can add different types of the same product.

To do this:
- Click ‘Options’
- Select ‘+ Add New Option’.
- Under ‘Option name’ add the option name.
We want to create different color options for our necklace product, so we’ll name our option name ‘Colors’.
- Next to ‘Option name’, click the drop-down arrow next to ‘Input type’.
- Select ‘+ Add new value’.
- Under ‘Options values’ add in the first option for your product.
We’re going to type in ‘Rose Gold’ as that’s one of our necklace colors (see screengrab).
- Under ‘Price modifier’ you can modify the price if you have different prices for different values.
However, we want our necklace products to all be the same price.
Next, you can add in multiple different values:
- Simply click ‘+ Add new value’ again.
- Select ‘New value’.
- Type the name of your next value.
For the purpose of this tutorial, we’ve added a total of 3 values for our necklace product with different colors – Rose gold, gold and silver (see screengrab).
- Click ‘Save’ in the upper right corner once you’ve added in all your product options.
And just like that, we’ve saved our options for this particular product!
So take the time to think about your products and if those products have different options, colors, sizes, or types of that same product.
Read more: How to use WooCommerce
7. How to add product shipping details to your online store?
Once you’ve finished adding in your different product options, you can add and customize shipping details for your product.

To do that, follow these steps:
- Click ‘Shipping and pickup’.
- Under ‘Weight and dimensions’, simply type in the weight and dimensions of your product.
- Below ‘Shipping rates’, tick what shipping rate you want to use (see screengrab).
We recommend choosing the first shipping option ‘Use your store’s shipping methods’, however, we’ll dive into this more later on in this eCommerce tutorial for beginners.
8. How to enable related products?
‘Related products’ are those products that show at the bottom of the screen when a customer is looking at a particular product to buy.
This is a great way to promote other products, and increase overall sales for your online store!

To turn this feature on:
- Click ‘Related products’ at the top of the screen.
- Select ‘Enable’.
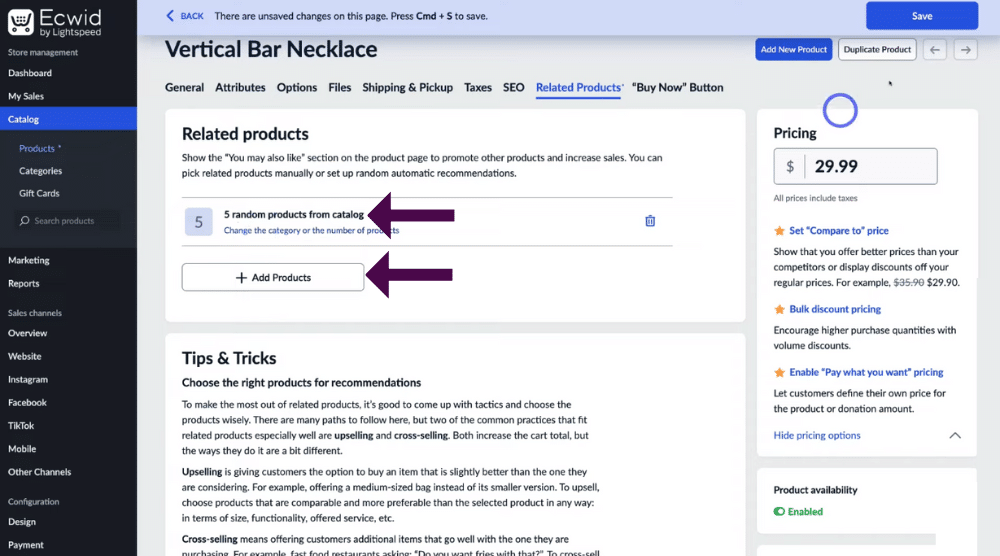
- Click ‘+ Add products’ to add specific products you want to show at the bottom of the screen or
- Choose to keep the ‘5 random products from catalog’ select (see screengrab).
We’re going to choose the second option.
- Click ‘Save’.
9. How to embed your products elsewhere?
This dynamic feature within Ecwid lets you embed your product directly onto the sidebar of other websites at the same time so that people can buy your product on another site!
For example, this would be perfect for if you had a blog and wanted to list your products on your blog.
Although this sounds super technical and hard, it’s actually super easy to do.

All you have to do is:
- Click ‘Buy Now’ Button’.
- Select ‘Embed product’.
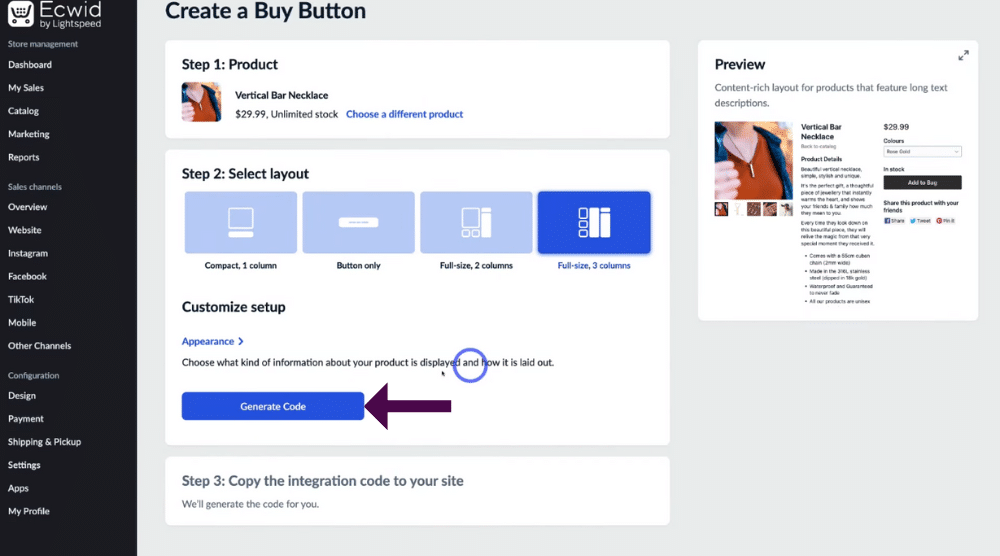
- Choose the type of layout you want to show (see screengrab).
- Click ‘Appearance’ to customize the appearance of your layout.
- Select ‘Generate code’.
After clicking ‘Generate code’ you will be able to see the code that you can embed on your other websites.
However, we’re going to leave that for now and continue with this eCommerce tutorial for beginners on how to create a free online store in 2025.
Read more: WooCommerce vs Shopify for eCommerce
10. Duplicating products
Now you’ve added your first product, you can add another product!

To do that:
- Head back to ‘General’.
- Click ‘+ Add new product’.
Alternatively, you can duplicate your product if you have multiple similar products.
- Simply click ‘Duplicate product’.
By Duplicating this product, means you’re duplicating the settings, images, descriptions, and everything else you added for that original product.
- Simply change the sections relevant to the new product only.
Once you’ve added all your products:
- Navigate back to your products page to see your list of products.
Take the time and add your additional products following the same process as above before moving on to the next step.
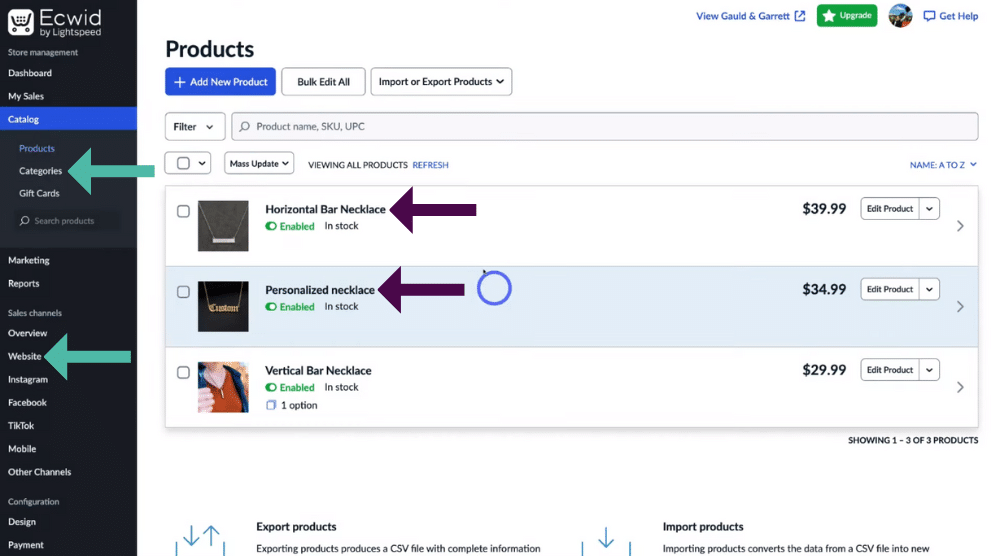
As you can see, we’ve added two more products (see screengrab).
Within these products, you can create ‘Categories’ to organize your products:
- Simply click ‘Categories’ on the left-hand sidebar.
However, remember you’re only able to add up to 10 products within the free plan.
- Navigate down to ‘Sales channel’ on the left-hand sidebar.
- Here you’ll see your website ( we’ll show you how to customize this soon)
- Below this, you’ll also notice other channels you can link and add your products to.
However, the next important step to creating your online store is setting up payments.
11. How to set up payment options

To set up different types of payment methods your customers can choose from to buy your products:
- Click ‘Payment’ on the left-hand sidebar.
- Under ‘Current payment methods’, you can see we have ‘Pay by cash’ enabled (see screengrab).
This is a great option for local businesses selling products online, as this means that if customers choose this option, they can come into your physical store to pay in cash and pick up their product.
- Below this, you’ll see other online processing payment methods such as Stripe, Afterpay and PayPal.
- Simply click ‘Connect and Enable’ to enable any of these online payment methods.
PayPal is the easiest to set up if you already have a PayPal account for your business.
We recommend definitely setting up PayPal as an online payment method for your store as it’s the easiest to set up and used all around the world!
You can read our beginner’s guide on How to use PayPal
- Below ‘PayPal’, click ‘+ Add Manual Payment method’ if you want to set up a manual payment option.
- Under this, you’ll find other payment options relevant to your country that you can set up and connect.
Make sure you take the time to think about and add all the different payment options you want to provide for your customers.
It only takes a couple of clicks to set each of these up!
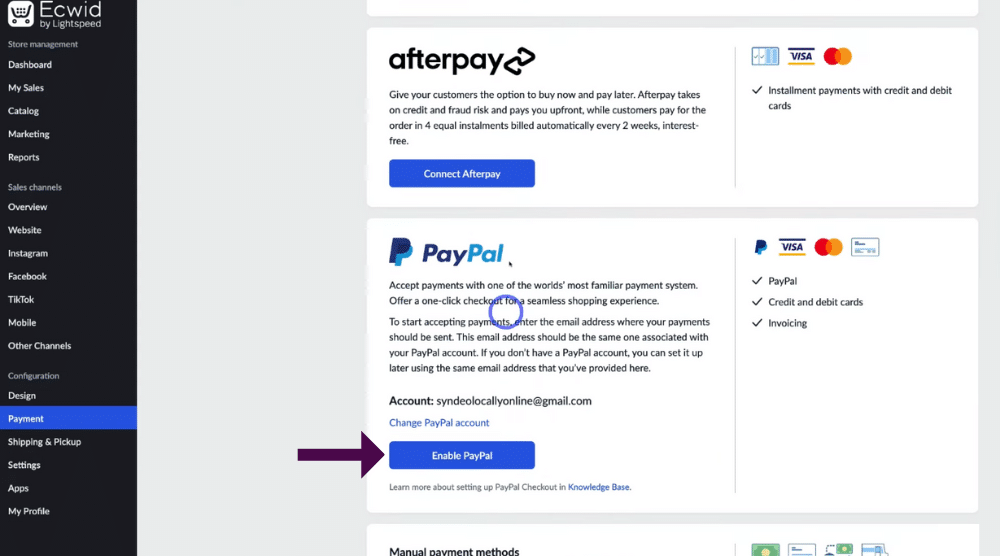
We want to enable PayPal as an option for our customers, so we’re going to select ‘Enable PayPal’.
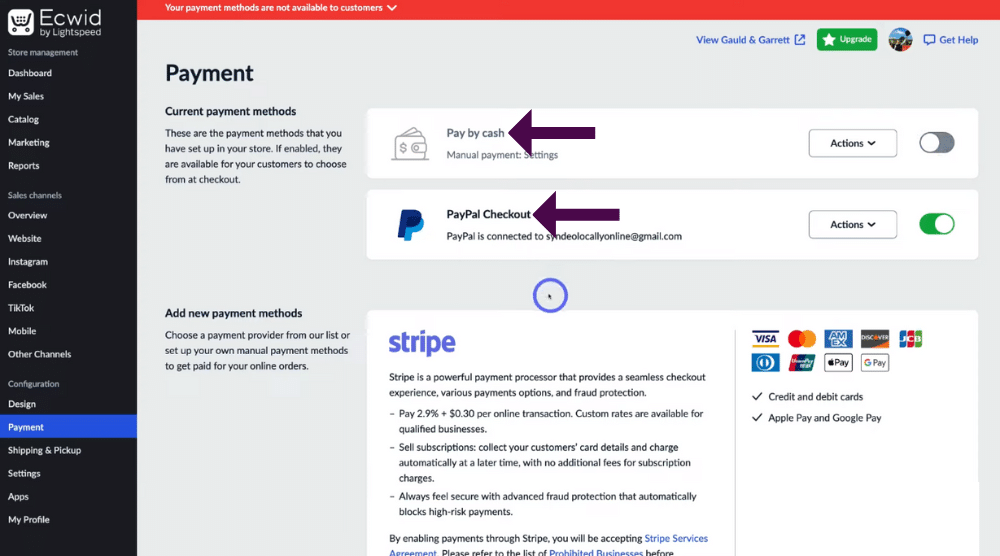
And as you can see, now PayPal has been added to our ‘Current payment methods’ along with ‘Pay by cash’ at the top of the screen.
However, as we’re a global jewelry business and sell our products all over the world, we’re going to disable the ‘Pay by cash’ option by simply clicking the green button next to ‘Pay by cash’.
Again, make sure you take the time to connect the different payment options relevant to you and your business.
- Click ‘Shiping & pickup’ on the left-hand sidebar
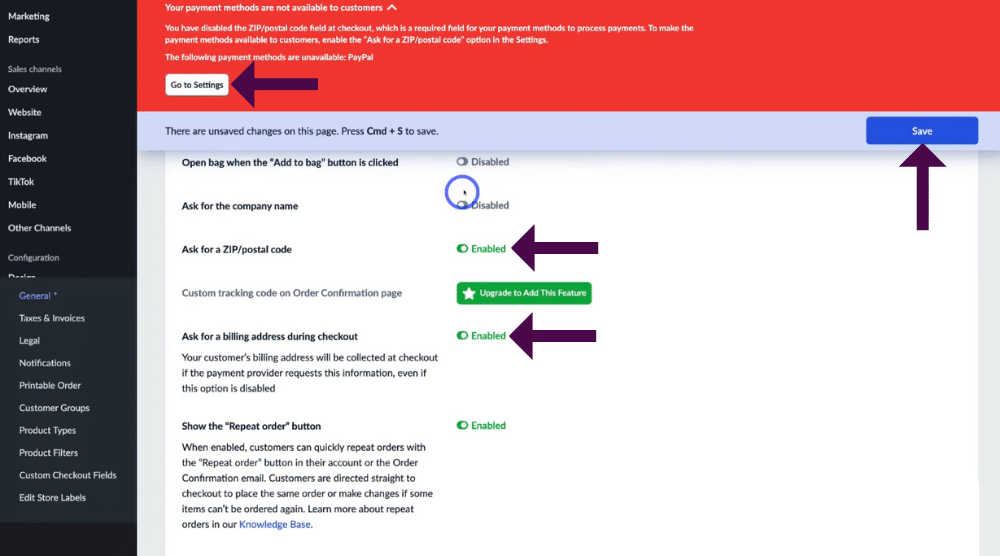
If you see this red pop-up message at the top of the screen, this means your payment methods are not available to customers (see screengrab).
To fix this:
- Click the drop-down on the red pop-up message.
- Select ‘Go to settings’.
- Click the ‘Disable’ button next to ‘Ask for billing address during check out’ and ‘Ask for ZIP/postal code’ to enable both options.
You should see a green ‘Enabled’ text next to these.
- Click ‘Save’.
Read more: How to use Stripe to collect online payments
12. Shipping and pickup
Once you’ve finished setting up and connecting your payment options relevant to your business, you can add your shipping preferences.

To do that:
- Click ‘Dashboard’ on the left-hand sidebar.
- Select ‘Shipping & pickup’ on the left-hand sidebar.
- Navigate back down to ‘Shipping and pickup’.
It’s important to note that all businesses will have different shipping requirements, depending on your business and what shipping options you want to offer your customers.
- Click ‘+Add shipping’ below ‘Shipping’.
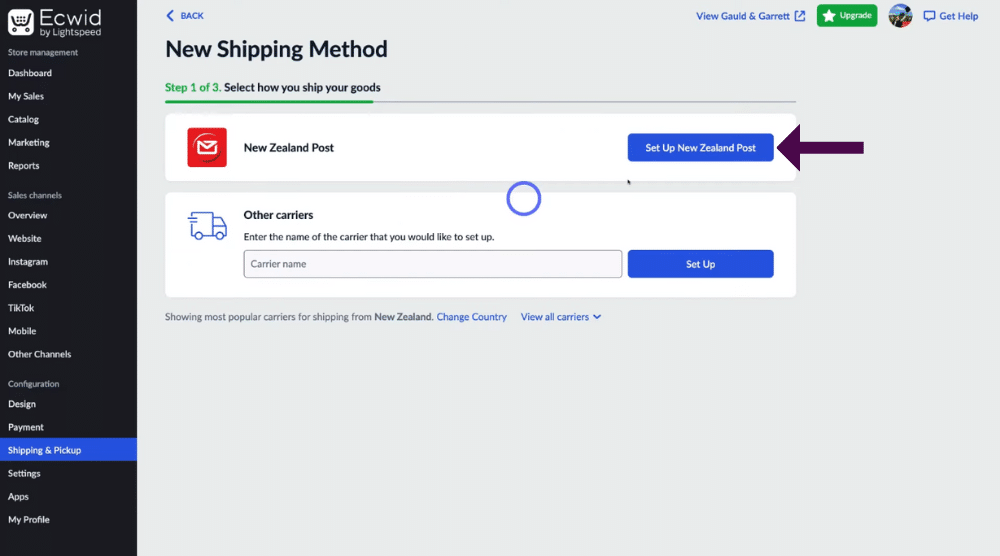
- Add in the carrier name in the search bar you want to use for your shipping.
- Click ‘Set up’.
We’re going to set up ‘New Zealand post’ as our carrier as we’re a New Zealand business.
However, depending on the location of your business, you might see other options at this point.
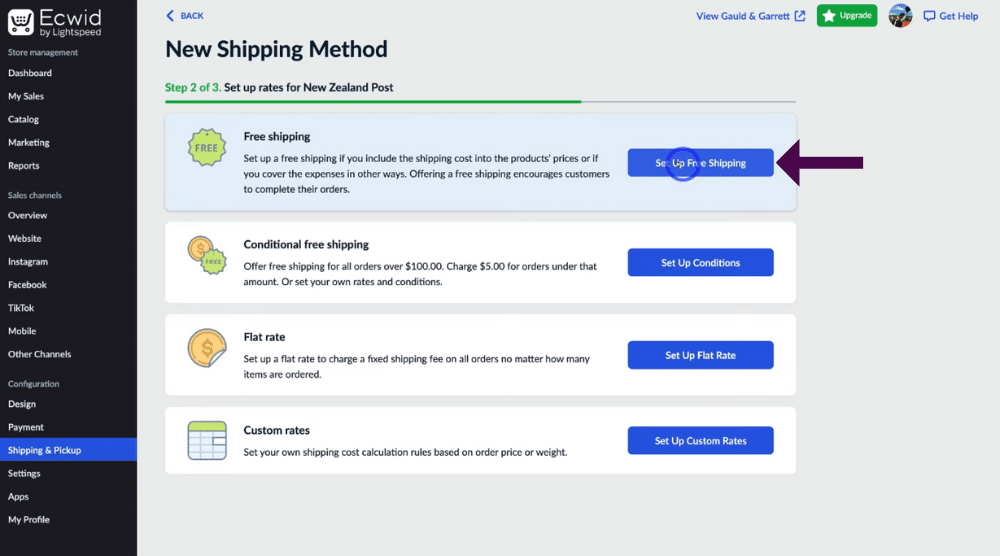
- Choose the shipping costs and rates from these options (see screengrab)
We’re going to select ‘Set Up Free Shipping’ as our shipping price is included in the price of our product.
- Click ‘Save and finish’ at the bottom.
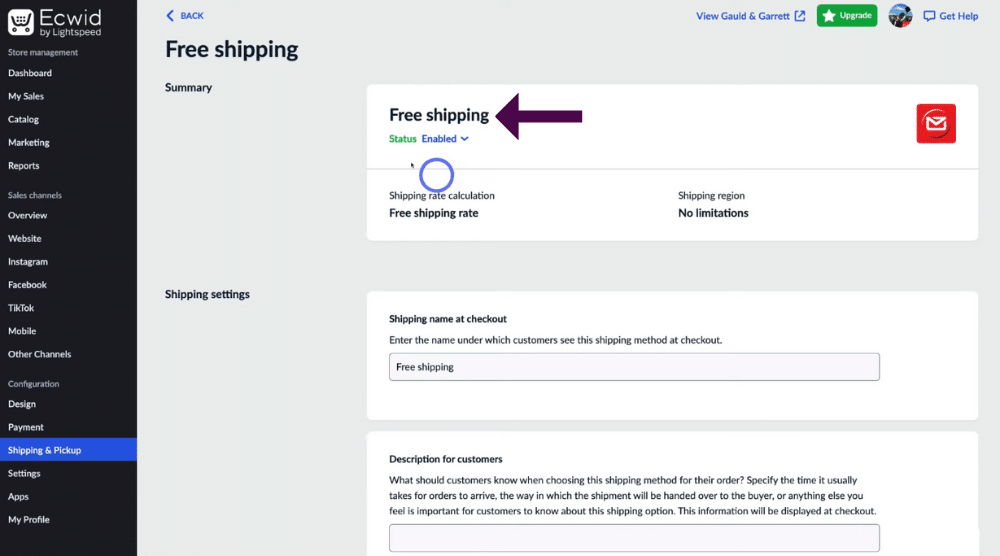
And as you can see, our free shipping method has been added! (see screengrab).
If you’d like to add other shipping options:
- Simply click ‘Back’.
- Click ‘+ Add shipping’ and repeat this process.
Read more: How to set up recurring payments in PayPal
13. General settings

Once you’re happy with your shipping options:
- Click ‘Settings’ on the left-hand sidebar.
- Select ‘General’ from the drop-down menu.
- Fill in your company name and email under ‘Company name and email’.
- Type in your company address below ‘Company address’.
We advise taking the time to make sure all this information is both filled in and correct (see screengrab).
- Add all your social media accounts below ‘Social media accounts’.
Additionally, you can close your storefront for full maintenance at any time.
To do this:
- Click ‘Close Storefront for Maintenance’ below ‘Social media accounts’.
This is great if you want to customize your online store before you start selling your products.
You can then always open your storefront at any time.
14. How to integrate apps into your online store?
Next, in this eCommerce for beginners tutorial, we’ll show you one of the BEST features we love about Ecwid, its app integration capabilities!
For example, if you wanted to start doing dropshipping, you can actually integrate Ecwid with specific dropshipping apps to start selling products from other websites like Alibaba, AliExpress, and more!
You can then sell those products on your online store through Ecwid!
Ecwid offers a huge array of different types of apps within its app marketplace such as design, dropshipping, catalog and order management, shipping accounting, and more.

To access external apps to then integrate with Ecwid:
- Click ‘Apps’ on the left-hand sidebar.
- Simply find the app you’re looking for within the categories on the left-hand side or
- Type in the name of the app you want to use in the search bar.
You won’t be disappointed with the number of apps you can integrate with your Ecwid to create a free online store.
Read more: Best website for online store
15. How to customize your storefront
Now that we’ve covered the core steps in setting up your eCommerce website, you’re ready to start customizing your store!

To do that:
- Click ‘Website’ on the left-hand sidebar.
- Head over to ‘Site appearance’.
- Click ‘Edit’.

This will take you to your default online storefront (see screengrab).
In other words, this is what your website will look like to your customers currently.
You can see at the top, you have these default headings ‘Your store’, ‘About’, ‘Location’, and ‘Contact us’ sections.
As this is a single-page website, simply navigate down to view all those different sections throughout this page.
To customize your online store:
- Click ‘Themes’ on the left-hand side bar.
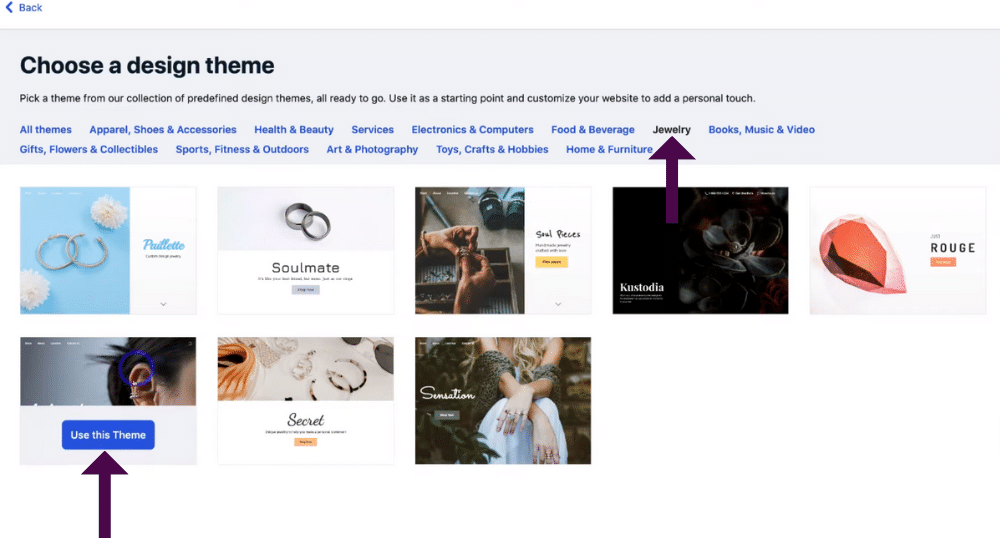
Here you can select the type of theme that best suits your brand and business.
- Simply pick the theme category that best suits your business from the list provided.
As we’re a jewelry business, we’re going to select ‘Jewelry’.
When you’ve chosen a template you like that’s relevant to your business:
- Click on the template.
- The theme will automatically install and replace the default theme.
We like the look of this template (see screengrab).
Take the time to scroll through your chosen theme and make sure you’re happy with its look and feel of it.
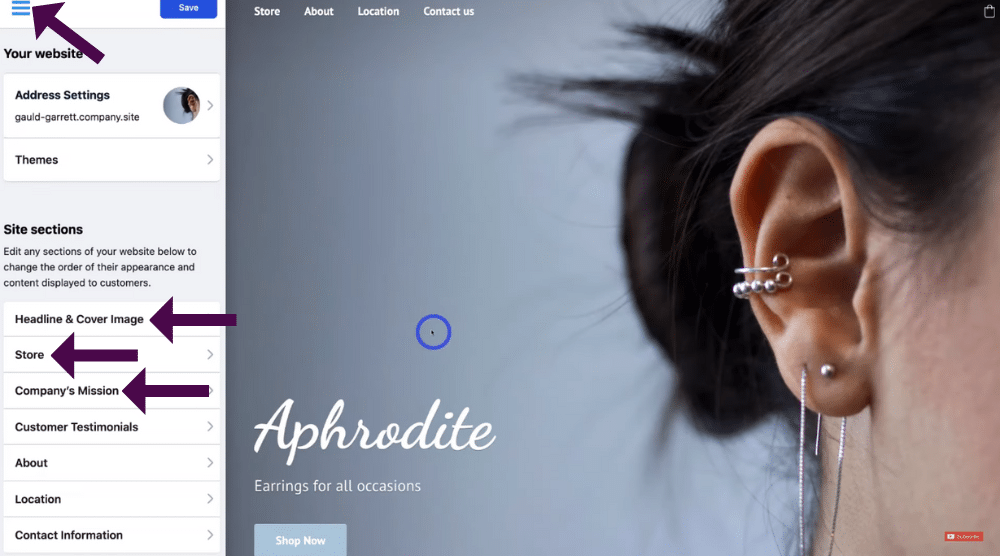
- Simply navigate to the left-hand side.
- Under ‘Site sections’ you can edit specific sections of your website (see screengrab).
To begin:
- Click ‘Headline & Cover Image’.
- Under ‘Headline’ change the default headline to your own business name.
- Add a description below ‘Description’ if you want.
- Simply select a layout you like the look of below this.
We like the look of this ‘Full screen’ layout (see screengrab).
- Under ‘Background’, you can change the default background to one of your choice.
- Disable the call to action button ‘Shop now’ if you want.
- Change the button name for your call to action under ‘Button label’.
- Below this, customize the typography under ‘Typography’.
- Next, click ‘Store logo’.
- Select ‘Upload logo’ to upload your store’s logo.
Don’t have a logo for your store?
Check out our tutorial on how to make a logo for free using Canva.
- Under ‘Store Logo’ click ‘Add scroll arrow’ to disable this option if you want.
- Click ‘Top menu’ to customize that top menu mentioned earlier.
- Within ‘Top menu’ below ‘Phone’, click the drop-down menu to choose where you want your phone number to display on a phone.
- Below ‘Social media links’, click the drop-down menu to select where to add your social media links on your website.
Remember, these links are the ones you added earlier within your general settings.
- Under this, you can disable or enable the option to show your location, business hours, navigation and more on your online store .
And it’s as easy as that to change and customize each of these different sections!
Once you’ve customized your ‘Headline & Cover Image’ section, make your way through the other sections and fully customize these.
- Click ‘Store’ on the left-hand sidebar below ‘Headline & Cover Image’.
- Under ‘Thumbnail size’, select ‘Small’, ‘Medium’ or ‘Large’ .
These are the thumbnail images of your product.
We’re going to select ‘Medium’ as it looks cleaner.
- Choose your preferred ‘Thumbnail ratio’ below this.
We’ll select ‘One by one’.
- Additionally, make your way through these other customization options below
Once you’re happy with how everything looks:
- Simply click ‘Save’.
- Select ‘Back’.
- Click ‘Company’s mission’ on the left-hand side bar.
You’ll notice a default company mission here .
- Change this to match your business and brand.
- Disable or enable the ‘Show section’ button.
We recommend taking the time to go through each of these sections to fully customize your storefront!
Additionally, you can change the position of each website section.
To do this:
- Click ‘Arrange sections’ at the bottom of the left-hand side bar.
- Simply drag and drop each different section above or below a different section .
Once you’ve made your way through each section and personalized the sections to your liking:
- Click ‘Apply’.
- Select ‘Save’.
- Click the three lines at the upper left-hand side of the page.
- Select ‘View website’ or
- ‘Back to Store Dashboard’.
And that’s how to create a free online store in 2025 and seamlessly customize that stunning eCommerce online store with Ecwid!
16. How to Embed your online store?
Once you’ve added your products, chosen your theme and customize that theme, you’re ready to embed your free online store website storefront across other websites.

To do this, simply:
- Click ‘Website’ on the left-hand sidebar of your store dashboard.
- Scroll down and find ‘Add your store to one more website’.
- Click ‘Pick platform’.
This is perfect if you already have an existing website through popular website builders like WordPress, Wix, Weebly, Squarespace, Google Sites and more.
You can read our beginner’s tutorial on How to create an online store with Google Sites
You’re able to seamlessly integrate Ecwid to embed your online store directly into all the web pages of these websites.
This means you can use this free online store builder to sell your products across other free and paid website builders.
Basically, you can actually sell your products on your existing website!
You can have a look at How to create an online store with Wix
However, Ecwids integration capabilities aren’t limited to website builders only.
There are other channels you can use in conjunction with Ecwid, however, you do need to upgrade to a paid plan in order to integrate with some of these online marketplace channels.
For example, with Ecwid you can easily connect your store with Google Shopping, TikTok, Amazon and eBay, Facebook, Instagram, Facebook Messenger, and Facebook Shop.
There are also all these other apps that you can leverage!
However many of these features are only available on a paid plan.
Read more: How to connect Shopify to Facebook Shop
17. View the website
Next, you should test your website and online store to see what your website visitors see when they land on your website.

To do this:
- Click ‘Dashboard’ on the left-hand sidebar.
- Select your website name below the ‘Greetings’ heading to view your website.
Simply make your way through your new storefront website to make sure you’re happy with how it looks.
We then recommend actually making your way through the customer journey process of purchasing a product from your store.
Follow the steps below:
- Select one of your products.
- Look through the different pictures of that product.
As you will be able to see, all the recommended products are down at the bottom.
- Select a specific color from the drop-down menu.
- Click ‘Add to bag’ on a product.
- Select ‘Go to checkout’.
- Add in your details.
- Click ‘PayPal checkout’.
And that is basically the journey your customers will take when landing on, scrolling through, and buying a product from your online store that you created for free!
That’s everything we wanted to show you in this eCommerce tutorial for beginners on how to make an eCommerce website with a free online store builder, Ecwid.
How to make an eCommerce website – Video guide
It really is that easy to create and leverage this free online store builder to create a professional and stunning free online store website for your eCommerce business!
Ecwid is truly one of our favorite online platforms for small business owners, as it’s super simple to set up, and has amazing integration features and abilities with so many of our other favorite online website builders and channels.
If you’d like to learn more about how to create a free online store in 2025, feel free to watch our full eCommerce tutorial for beginners video explaining this process below.
