In this Instagram reels tutorial, we’re going to walk you through the easy process of how to create Instagram reels for professionals.
By the end of this tutorial, you should be able to make simple and short videos to help you grow your online business!
How To Use Instagram Reels?
Did you know that business Instagram reels are up there with one of the best ways for your business and brand to naturally reach both your current audience and potential customers in 2023?
Basically, if your business isn’t already creating business Instagram reels, you should be!
We are going to show you how to use Instagram reels using either Instagram itself or a video content-creating tool called Invideo.
We will then walk you through how to upload and post those Instagram reels on Instagram and Facebook so you can gain more customers on both platforms and ultimately expand your audience.
Trust us, it really isn’t as complicated and scary as you think!
Let’s get stuck in and find out how to use business Instagram reels.
Read more: How to use Later for social media management.
What Are Instagram Reels?
Before we get started, it’s important to clarify what Instagram reels are and why these reels are important for your small business.
Instagram reels launched on the popular social media platform Instagram in 2020 as a way for users to make, edit and post fun, short and entertaining videos (with a maximum length of 90 seconds) to then be shared with other Instagram users.
Although the initial purpose for the feature was for people to create personal and entertainment content, there has now been a huge shift in people creating and leveraging these reels with the goal to grow their community and business.
Essentially, businesses all around the world are now learning how to make Instagram reels to increase both their brand engagement and social media presence online!
So, how exactly does it work?
Basically, if you start creating both engaging and relevant reels with your content, your reels will gain views from other users with an interest in what your business is offering due to the Instagram algorithm.
As a result, people will organically find out about your business and brand online through your business Instagram reels.
Now despite what you may first think, you don’t need to be a tech-nerd to learn how to make Instagram reels.
We are here to tell you that virtually anyone can take advantage of Instagram reels to create beautiful vertical format videos in just a few minutes.
Read more: How to use Buffer for social media management .
How To Create Business Instagram Reels?
With that said, let’s launch into how to use Instagram reels!
1. How to Create An Instagram Business Account

The first step in creating business Instagram reels is to create an Instagram business account.
This is where you can post all your business reels instead of using your personal Instagram account.
If you currently don’t have an Instagram business account, check out our Instagram business tutorial here.
We suggest reading that tutorial first, then simply jumping back in here to continue with this Instagram reels tutorial.
Read more: How to drive leads with TikTok marketing videos
2. How to Create Business Instagram Reels (Within Instagram)
Once you’ve set up your Instagram business account, you’re ready to start creating your reels!
To get started:
- Pre-record and save your reel video content simply through your phone camera.
Again, remember the maximum length of your reel is 90 seconds.

Once you’re ready to upload your reel to your account:
- Login to your Instagram business account.
- Click the ‘Home’ icon on your account in the lower left-hand corner.
- Select the ‘+’ icon at the top.
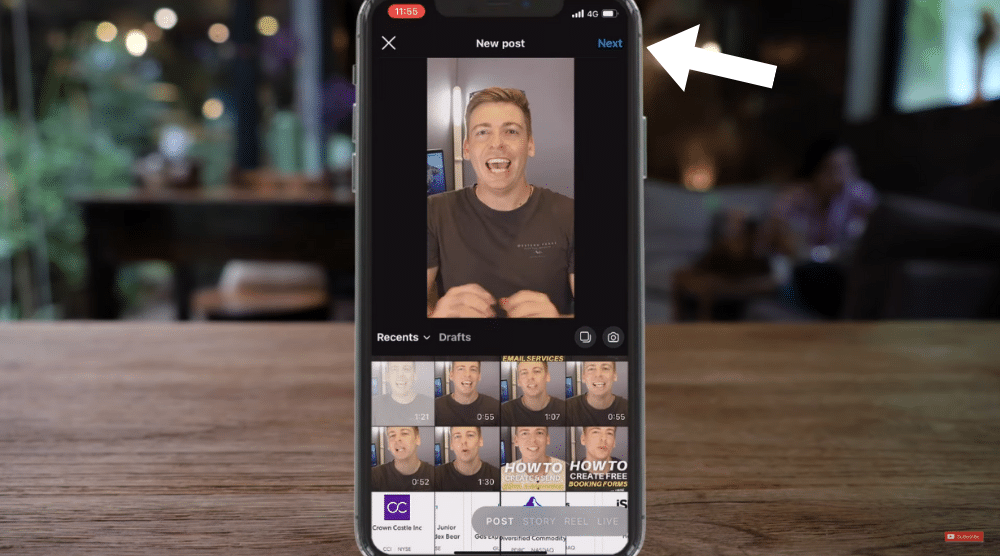
- Choose the video that you want to use in your reel from your phone (see screengrab).
- Click ‘Next’ in the upper right-hand corner.
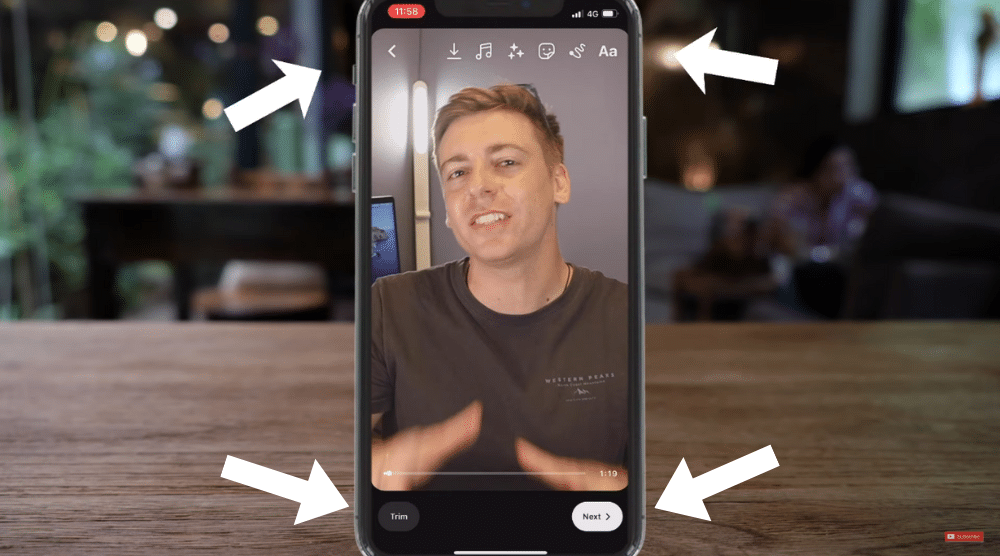
This takes you to where you can get stuck in with editing your Instagram reels with some basic customization options (see screengrab).
- Select ‘Trim’ down the bottom of your reel to make it shorter if you like.
- Click the second icon from the left at the top of your screen to download your reel onto your phone.
- Next to that, click on the ‘Music’ icon.
- Here you can add music, voiceover or sound effects to your reel (see screengrab).
When you’ve finished customizing the music and audio within your reel:
- Click ‘Done’.
- Select the ‘Filter’ icon next to ‘Music’ to add filters if you like (see screengrab).
- Click the ‘Stickers’ icon next to ‘Filter’.
Here you can simply add a sticker or emoji to your reel.
- Simply use the search bar to type a keyword related to the type of element that you want to add to your video (see screengrab).
- Next to ‘Stickers’, click the ‘Draw’ icon to draw anything you like on your video.
- Finally, select the last icon, the ‘Text’ icon to add text to your reel.
As you can see, a bunch of different text formats will pop up here (see screengrab).
So take the time to customize and tailor these customization options to create a professional and beautiful rell that suits you and your brand!
Once you’ve finished editing the look of your reel:
- Click ‘Done’.
- Select ‘Next’.
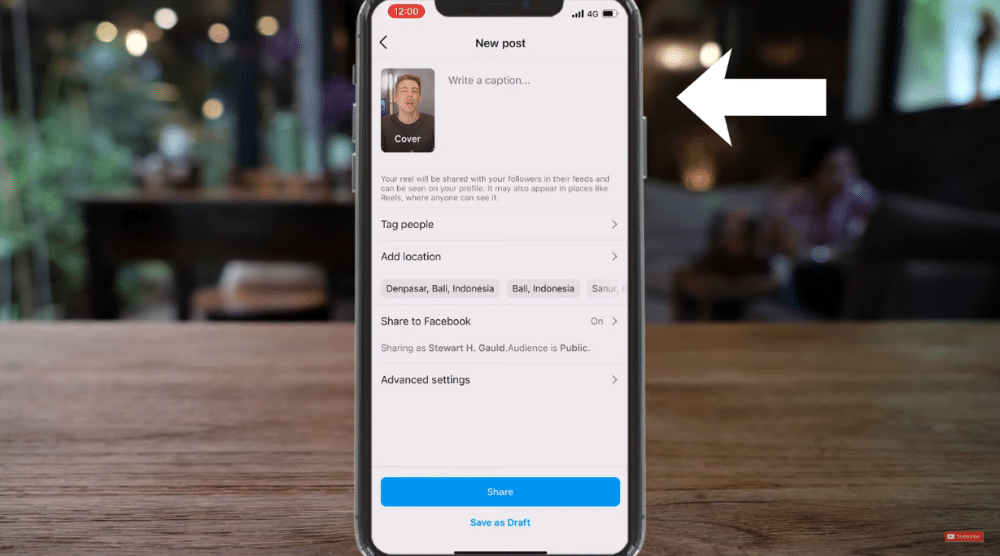
Here you’ll want to add a caption and a call-to-action for your reel (if you have one) (see screengrab).
Your call to action for your reel is simple. What do you want people to do once they’ve watched your reel?
- Below this, you can also tag people or add a location (see screengrab).
- Next, click ‘Share to Facebook’ to connect your Instagram business account with your Facebook business page.
This means your reel will be shared on both Instagram and Facebook, allowing you to reach more people and more potential customers!
You can read the blog to know How to create a Facebook business page
When you’re happy with your finished business reel:
- Click either ‘Share’ or ‘Save as draft’.
If you choose ‘Save as draft’, this will simply save your reel to allow you to post it later.
Now, this method of creating, editing, and sharing your reel all through Instagram is fairly straightforward and basic, covering everything you need to know about Instagram reels for beginners.
However, if you’re after more customizations or editing options for your Instagram business reel, we suggest using our favorite powerful and easy-to-use video editing tool called Invideo!
By using a tool like Invideo, you can create business reels (and other types of videos beneficial to your business) in just a few minutes, then simply publish these across your different channels.
Read more: Top 5 ways to create powerful business videos
What is Invideo?

Invideo is an incredible video content maker and editing tool that lets you easily create professional and stunning videos.
They offer thousands of customizable video templates and millions of stock images, allowing literally any business type and size to create unique videos for their business and brand.
You’re even able to create videos in Instagram’s vertical format, so you don’t have to muck around with resizing your content!
We love and use Invideo nearly every day to create video content for our different social media channels.
However, let’s continue with this tutorial on how to create Instagram reels for business.
3. How To Get Started With Invideo

Follow the steps below to find out how to get started with Invideo:
- Head over to Invideo on your browser to sign up or sign in.
That’s going to take you to Invideo’s homepage (see screengrab).
*The link above is an affiliate link, which means we will get a commission if you sign up to Invideo (at no extra cost to you). This helps support our education-based website and we thank you in advance!
Additionally, use our code ‘SG40’ for a 40% off discount code (exclusive discount for our audience)!
If you don’t already have an Invideo account, check out our complete Invideo beginners guide here where we walk you through an extensive overview of all the features of this incredible platform, as this Instagram reels tutorial will just cover the basics of this platform.
4. Invideo Pricing

One of the things we love about Invideo is that they provide a fully free plan where you’re still able to create and download your video for free! (see screengrab).
This means you can test out the software for free to see if you like it (as much as we do!) before deciding if you want to continue using Invideo.
However, it’s important to note that when you download your video on the free plan, there will be a watermark that you can’t get rid of unless you upgrade to the ‘Business’ or ‘Unlimited’ plan before downloading your video.
If you opt for a paid plan, you’re able to access additional exclusive features, such as Invideos new app where you can create and edit your video content right from your phone!
How easy is that?
So go ahead and sign up or sign in and we’ll meet you inside Invideo, where we will walk you through how to use Instagram reels within Invideo.
Read more: Top 10 must have digital tools for small businesses.
5. How to Create Instagram Reels With Invideo

Once you’re inside your Invideo account, you’ll notice on your homepage a huge amount of suggested templates that you can build from (see screengrab).
Additionally, you’re able to create a business reel from scratch.
For the purpose of this Instagram reels tutorial, we’re going to show you how to create a business reel from one of the templates Invideo offers.
To do this:
- Head over to ‘Filters’ on the left-hand side under.
- Under ‘Aspect ratio’, select ‘Portrait’.
Portrait videos are vertical videos that are perfect for Instagram and Facebook reels, as they’re the right format.
- Invideo will then offer thousands of pre-made portrait video templates that you can simply choose then build from (see screengrab).
We suggest you take the time to preview all the different video templates to see which you like.
Alternatively, you can filter the relevant type and industry templates based on the business video reels that you want to create so you don’t have to spend a huge amount of time looking through unrelated templates.
To do this:
- Click ‘Filters’ again.
- Under ‘Filters’, select the correct ‘Type’ or ‘Industry’.
Alternatively:
- Click the search bar in the top right hand corner.
- Simply type in a keyword related to your business.
For example, let’s say we’re a consulting business.
- Type in ‘Consulting’ in the search bar.
- Select a relevant suggested keyword (see screengrab).
We’re going to select ‘Consulting’.
Invideo will then show us all their available consulting templates that we can use and build from! (see screengrab).
You can read more on How to create video ads with Canva
To choose a template you like for your business:
- Simply click on the template you like.
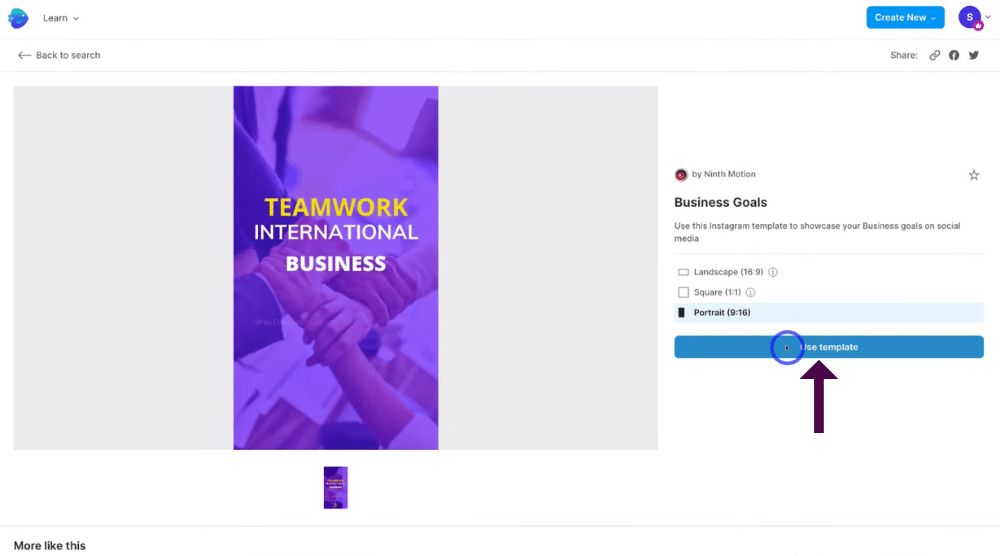
- Come down and click on ‘Use template’.
- Give Invideo a moment to load your chosen template.
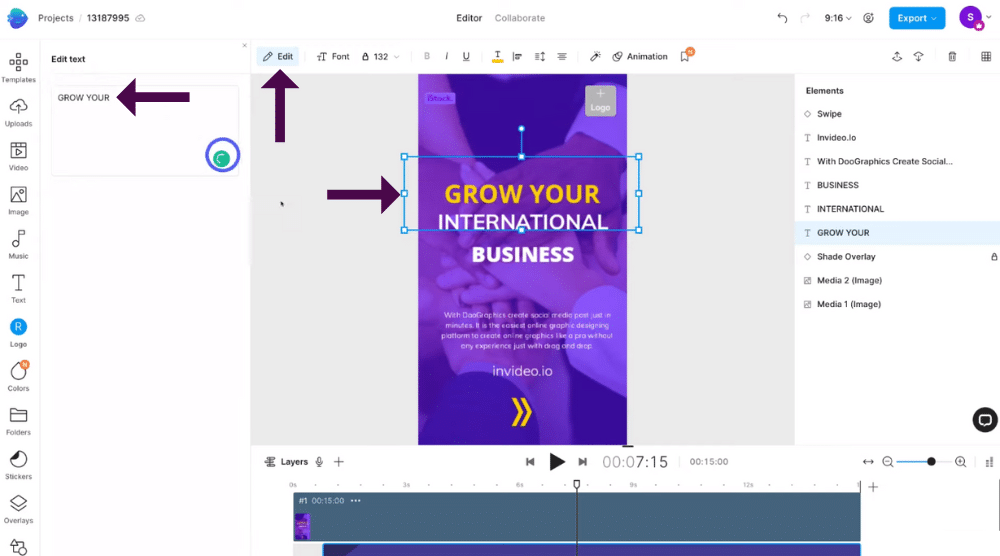
We like the look of this video here (see screengrab).
You’re then able to customize your video.
You can do this by:
- Clicking each of the different elements you want to edit.
That’s going to generate these formatting options (see screengrab).
- Click ‘Edit’.
For example, we can change our selected element, this text to ‘Grow your’ (see screengrab).
Simply follow this same process to change each text element on your template.
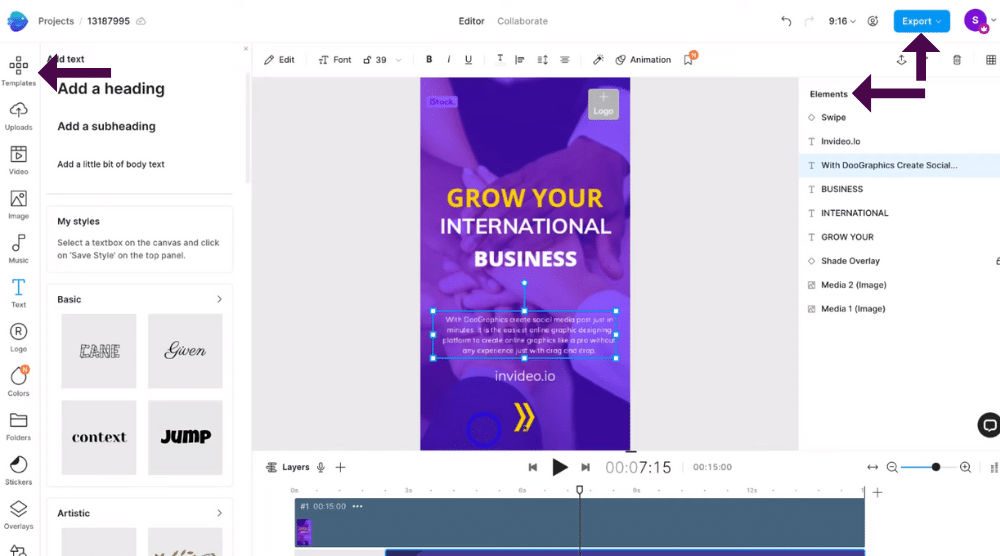
To choose another template to add or replace your current template:
- Navigate over to the left-hand side.
- Click on ‘Templates’ and simply select another template.
Alternatively, you can further customize your video template through the left-hand side bar:
- Simply click ‘Uploads’ to upload your own photos and videos that you want to use to create your videos.
- Select ‘Video’ to access stock videos.
- Below this, click ‘Image’ to add stock images to your content.
- Click ‘Music’ to add music to your video.
- Select ‘Text’ if you’d like to add additional text elements to the template.
You’ll also notice additional options below on the left-hand sidebar (see screengrab).
One of the many reasons why we love Invideo is that you can use all these free templates, stock photos and images and elements in your own video.
To view all elements within your video:
- Navigate over to the far right-hand side on Elements which is in the video (see screengrab).
If you want to preview your video before exporting it:
- Press the ‘play’ icon below your video.
Once you’re happy with your new video and business Instagram reel, you’re ready to export it:
- Click ‘Export’ in the top right corner.
- Select ‘Export’ again.
Your video should automatically download, however it is doesn’t:
- Click ‘Download’.
Once you click on Download you can view your downloaded video on the left-hand side bottom.
You can then preview your downloaded video before you upload this video to Instagram as a reel.
And I’m happy with this video!
Once you’ve uploaded your reel, you can then follow the steps at the beginning of the tutorial to add captions, a call-to-action, location, people and more.
We’ve made very little customizations to our video before using it as a reel.
We suggest you really take the time to explore, personalize and create your reel from Invideo’s pre-made templates.
Alternatively, you can create your video from scratch either within Instagram itself or by using a powerful and easy to use video editing platform like Invideo or similar.
And that is it for this tutorial on how to use Instagram reels for your business!
Read more: How to connect Twitter to Instagram
Instagram Reels For Business – visual video tutorial
Now you know everything there is to know about Instagram reels for business, including how to make, edit and post your reels directly through Instagram or through the popular video content platform Invideo.
Creating Instagram reels for your business is truly so important for any business in order to get discovered online and gain a loyal community and following.
Get started with Instagram reels for your business NOW!
Watch our video tutorial on how to create business Instagram reels below.

