In this updated Facebook Business Page tutorial, we’re going to take a deep dive into the process of how to create a Facebook Business Page in 2023, so your business can grow online!
Facebook is, of course, a powerful social networking platform that allows users to connect with friends and family.
However, in more recent years, Facebook has become a hugely influential and dominant business platform that over 200 million businesses all around the globe are leveraging to grow their brands!
Think about it….with over 2.91 billion users worldwide, Facebook allows you to reach a wider target audience, which as a result leads to more people discovering your brand.
In other words, if your business isn’t already on Facebook, you’re missing out on getting potential clients!
Additionally, you can immerse in both paid and organic marketing activities across Facebook, Instagram and more.
Read more: How to use Meta Business Suite
How to create a Facebook Business Page for your business?
So, how does it all work?
To make the most out of Facebook for business and all its incredible features, you’ll first need to create a professional Facebook Business Page.
We’re going to break down and guide you through the individual steps of creating and setting up a professional Facebook Business Page for your business and brand!
Let’s get stuck into this beginner’s tutorial explaining how to create a Facebook Business Page!
Read more: How to use Facebook Business Suite App
1. Getting started – Facebook Business Page
Before we dive into this Facebook Business Page tutorial, it’s important to note that we’ve already explained this process in the past.
However, Facebook is forever changing and updating its interface, including what you can do within your business page!
Therefore, we will show you how to create a Facebook page in 2023 for your business.
You’ll learn how to get up and running with your Facebook Business Page, as well as how you can make crucial optimizations to get the most out of your Facebook Business Page and drive your business to online success!
Let’s dive right into it!
2. How to create a Facebook page
To get started:
- Simply head over to Facebook.
- Follow the prompts and sign into your personal Facebook account.
Don’t have a personal account?
You’ll need to create one before continuing with this Facebook Business Page tutorial.

Once you’ve logged into your personal Facebook profile:
- Click ‘See All’ on the left-hand sidebar (see screengrab).
- Select ‘Page’ under ‘Create’.

- Under ‘Create a page’ on the left-hand side, type your page name in the ‘Page name’ field.
Your page name is the name of your business page and should be the name of your business.
For the purpose of this Facebook page tutorial, we’re going to create a Facebook Business Page for an example jewelry business named ‘Gauld and Garrett’.
Once you’ve added your business name:
- Simply navigate down and click ‘Category’.
- Type the category your business operates in within the ‘Category’ field.
This is where you can test the different keywords related to your business.
You can read our beginner’s guide on How to do Keyword research
You’ll also have the option to add multiple categories, however, we recommend choosing just one that best represents your brand.
Since our example business is a jewelry shop, we’re going to click ‘Jewelry and watches shop’.
Next:
- Type in a brief description of your business under ‘Bio’ (see screengrab).
- Click ‘Create page’ at the bottom of the page.
3. Add business details
Now that you’ve created the name of your Facebook Business Page, you can add information specifically related to your business.

To do that:
- Under ‘Website’, add your current website for your business.
Don’t have a domain name or a website?
Check out our article on how to choose the right domain name for your business.
Simply type in your business phone number under ‘Phone number’.
- Add your business email below ‘Email address’.
The email address we added is an example of Gmail we’re using for the purpose of this Facebook Business Page tutorial.
You can learn more on How to create a free business email with Gmail
When you’ve added your contact details for your business:
- Add an example location of your business under ‘Location’.
- Tick your relevant operating hours under ‘Hours’.
We’ve added all our relevant details here as an example (see screengrab).
Click ‘Next’ at the bottom of the page.
4. How to brand your Facebook page
Once you’ve taken the time to add your business details, you’re ready to add some branding to your business page!
This can be done by adding a profile photo and cover photo specific to your business and brand.
We’ll start by showing you how to add a profile photo to your Facebook Business Page.
This is where you should add your business logo.

You can do this by:
- Selecting ‘Add profile picture’.
- Choose your business logo.
- Click ‘Open’.
Here is the business logo we created for our example jewelry brand (see screengrab).
Don’t have a logo for your business (or if you want to change or revamp your logo to complement your business page), did you know you can easily create one for free?
5. How to create a free logo or profile picture with Canva
Canva is an incredible free online design tool that allows you to create any type of design or graphic that you want.
Specifically, we’re going to show you how to create a logo within Canva that you can then use as your profile picture for your business page.

Follow the simple steps below to find out how:
- Simply sign up or sign into Canva.
- Within Canva, type ‘Logo’ in the search bar on the Canva homepage (see screengrab).
- Click ‘Logo’ from the drop-down menu.

Canva will then generate thousands of fully customizable logo templates you can then choose from!
- Simply choose one of these templates or
- Click ‘Create a blank logo’.
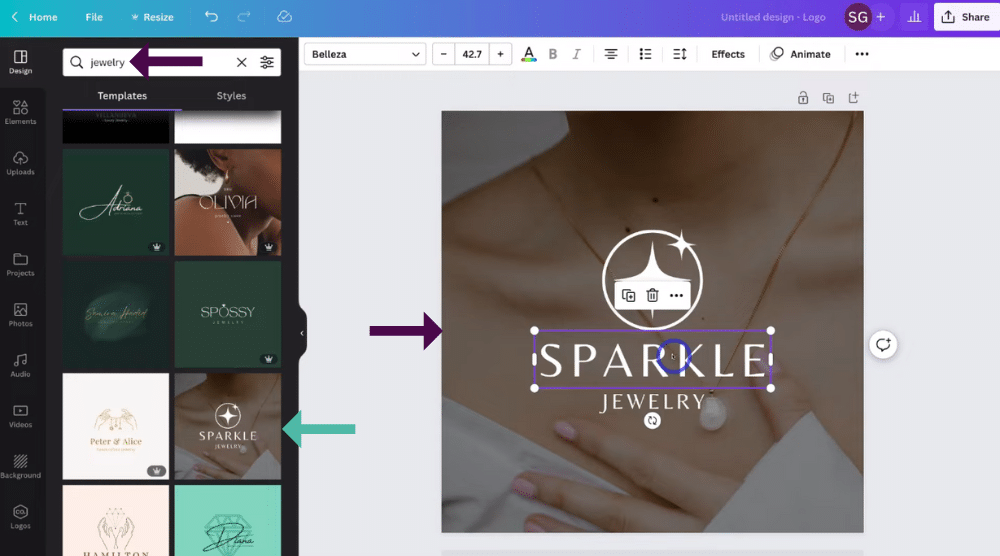
- Under ‘Templates’, type in a keyword related to your business in the search bar.
As our example business is a jewelry business, we’re going to select ‘Jewelry’.
We suggest taking the time to look at all the relevant templates Canva has generated, choosing one that best suits your business, and then simply customizing that template to your liking!
For example, we picked this logo and will change the text element to our business name (see screengrab)
If you want to learn more in-depth about how you can make the most out of Canva to create a logo for your business for free, check out our article on how to make a logo for free with Canva.
However, let’s head back and continue this the how to create a Facebook Business Page tutorial.
6. How to create a cover photo with Canva
Now you’ve added your logo as your profile picture, you’ll need to add a cover photo for your Facebook Business Page.

To add a cover photo:
- Click ‘Add cover photo’ on your Facebook Business Page below ‘Add profile photo’.
- Select your cover photo.
- Click ‘Open’.
Don’t have a cover photo?
Don’t worry!

You can also create a professional cover photo through Canva in just a few minutes.
- Head back to Canva.
- Type in ‘Facebook cover’ to the search bar within Canva.
- Select ‘Facebook cover’ from the drop-down menu.

- Click ‘Photos’ on the left-hand sidebar.
- Type in a keyword related to your business
For us, we typed in ‘Jewelry’.
- Simply choose an image you want to use for your cover photo.
As you can see, we chose this image (see screengrab).
Once you’re happy with the image you’ve chosen:
- Click ‘Share’ in the top right-hand corner.
- Select ‘Download’.
- Click ‘Download’ again to download your Facebook cover photo.
And that’s how you download both a profile picture and cover photo for your Facebook Business Page!
7. How to add an action button
Once you’ve added a profile photo and cover photo, you can further customize your Facebook Business Page by adding in an action button.
An action button is your primary CTA (call to action).
Basically, you need to decide what you want your customers or potential customers to do when they arrive on your Facebook Business Page.
You can customize your action button at the top of your page in order to tell people how to engage with you.

To add an action button:
- Make sure you’re on your Facebook Business Page.
- Click ‘Add action button’ below your profile and cover photo.
- Select ‘Try it’.
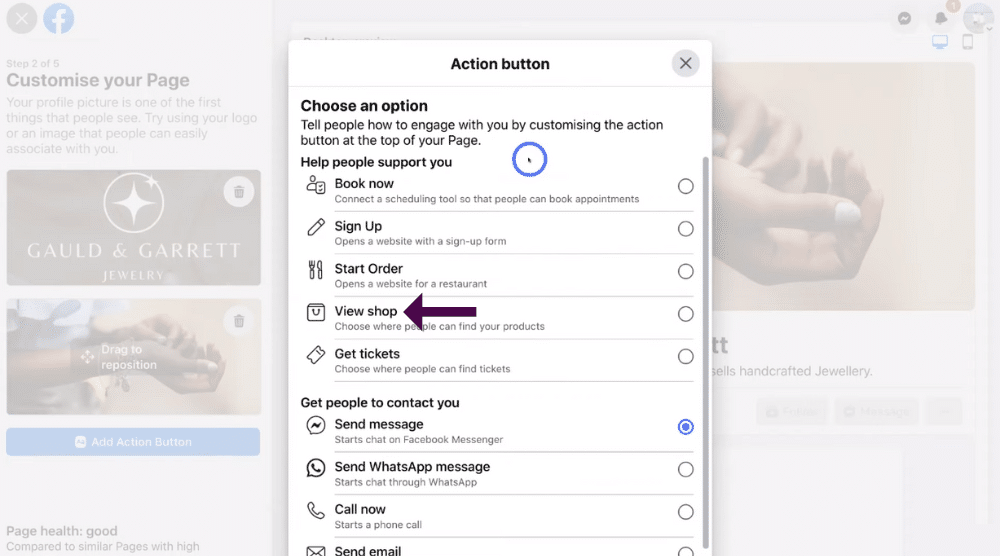
Here you’ll see different options for your action button (see screengrab).
- Choose the best option for your business type and industry.
We’ll run through a few of these options below:
1) Book now.
You can connect a scheduling tool like Calendly and would be the best option if your main call to action is getting people to book appointments.
All you’d need to do is simply link your appointment form to your action button, meaning people can simply click the action button to book an appointment.
You can read our beginner’s guide on How to use Calendly
2) Sign Up.
This is where you can link a signup form (or an order page on your website) as your action button.
This is ideal for restaurants that want people to order from their website as the main action.
3) View Shop.
You can connect your shop with your Facebook Business Page, which is great for any online store that wants its action button to take visitors directly to their shop.
You can read on How To Connect Shopify to Facebook Shop
4) Send a message.
This automatically opens up Facebook messenger as the action button, and page visitors are then able to message you directly on messenger.
5) Send a WhatsApp message.
You can connect WhatsApp to your Facebook Business Page, allowing visitors to send a message through WhatsApp.
6) Call now.
This allows people to call you from their phone and is an ideal call to action for service-based business where you want to drive phone calls.
Additionally, there are all these different options down here such as ‘Send Email’, ‘Contact Us’ and more.
As we’re creating a jewelry Facebook Business Page, we’re going to choose ‘View shop’ as our call to action.
This is because we have an online store, so the main action we want our Facebook Business Page visitors to do is click ‘View Shop’, so they can look at and buy our products!
Not sure what the best CTA is for your business?
Just choose one that you think is best suited for now, you can always choose this later.
Once you’ve chosen the most appropriate action button as your CTA, you’ll just need to add some additional information about that action button before moving on to the next stage.
To do that:
- Scroll down and click ‘Next’.
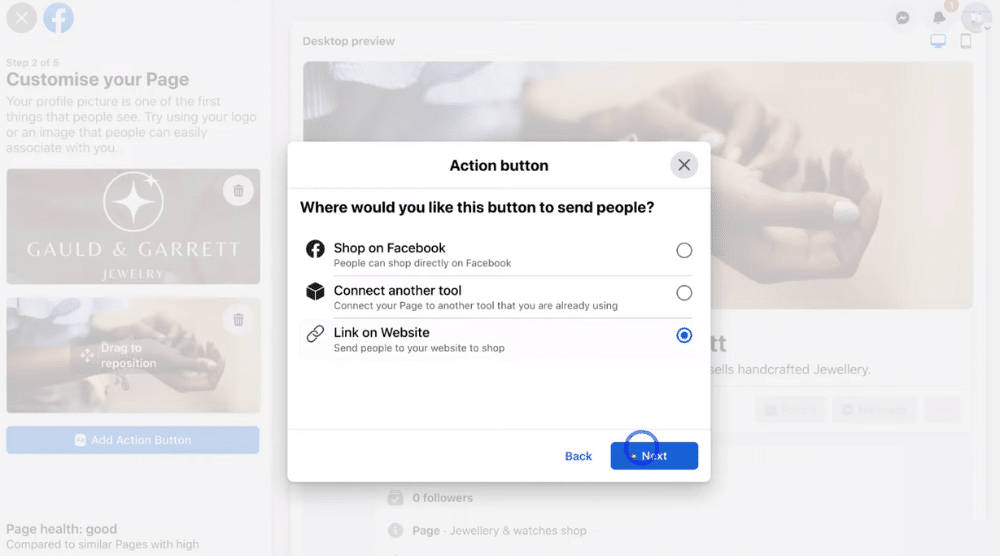
- You can then choose where you want to send Facebook Business Page visitors that click on your action button (see screengrab).
Let’s continue with our jewelry store business as an example.
As our example is an eCommerce business, we need to decide whether we want people to shop on our Facebook shop, connect another tool or link our website.
For the purpose of this how-to create a Facebook Business Page tutorial, we’ll link our online store to our Facebook Business Page.
This means that when a potential customer clicks on the action button, they’ll be redirected to our online store.
To add your website link as your action button:
- Click ‘Link on Website’.
- Select ‘Next’.
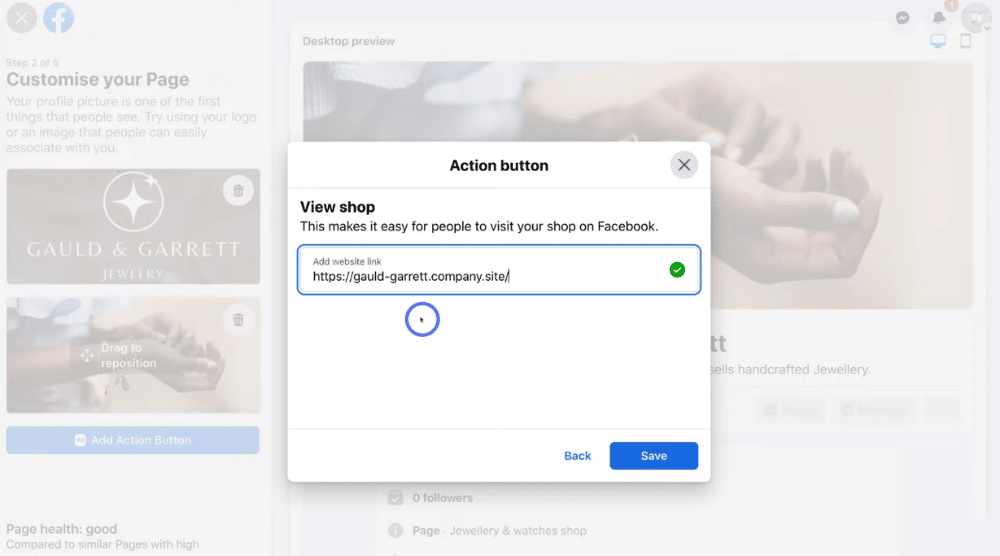
- Paste your website link (see screengrab).
- Click ‘Save’.
Do you want to create a Facebook Business Page for your online store, but don’t have an eCommerce website (online store) to sell your products on?
Watch our complete beginners tutorial on how to create an online store for your business for free using one of our favorite eCommerce platforms Ecwid.
If you’re not an online store, or if you added an alternative action button, it’s important to add the right information that Facebook requires (relevant to your CTA button).
Let’s say you want people to call through to your business.
You’d click ‘Call now’ as your action button, then add your business phone number when prompted.
Once you’ve finished adding in an action button relevant to your business:
- Click ‘Next’.
8. How to connect WhatsApp to Facebook Business Page

Once you’ve finished setting up your action button, you’ll be asked if you use WhatsApp for your business (see screengrab).
This is so you can connect your WhatsApp number with your Facebook Business Page, meaning that your customers can easily reach you via WhatsApp.
Don’t know how to use WhatsApp for business?
Read our step-by-step guide on how to use WhatsApp business.
However, for the purpose of this how-to create a Facebook Business Page tutorial, we’re going to click ‘Skip’.
This is because we don’t have a WhatsApp number for our example jewelry business.
However, we strongly recommend you do add your WhatsApp number if you use WhatsApp for business!
More and more businesses around the world are now using WhatsApp as a professional business messaging platform to communicate with contacts, customers, and their audience.

Once you’ve connected WhatsApp to your Facebook Business Page:
- Click ‘Invite Friends’ to allow your friends to follow your Facebook Business Page.
For the purpose of this Facebook Business Page tutorial, we’re just going to skip this part.
- Select ‘Next’.
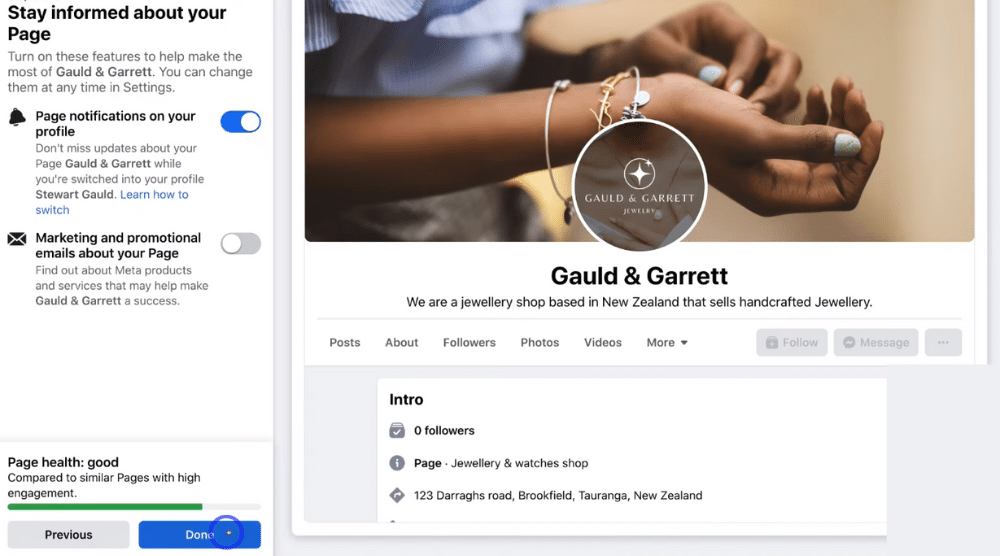
- Simply enable ‘Page notifications on your profile’ (see screengrab).
- Keep ‘Marketing and promotional emails about your page’ disabled.
- Click ‘Done’.
You’ve now finished all the core steps to setting up your Facebook Business Page!
The next steps are to ensure your Facebook Business Page is correctly set up, so you can get the most out of it and drive your business to success!
9. How to add page users
Did you know you can add additional people to help you manage your Facebook Business Page?

Follow the steps below to find out how:
- Click ‘Manage’ (see screengrab).
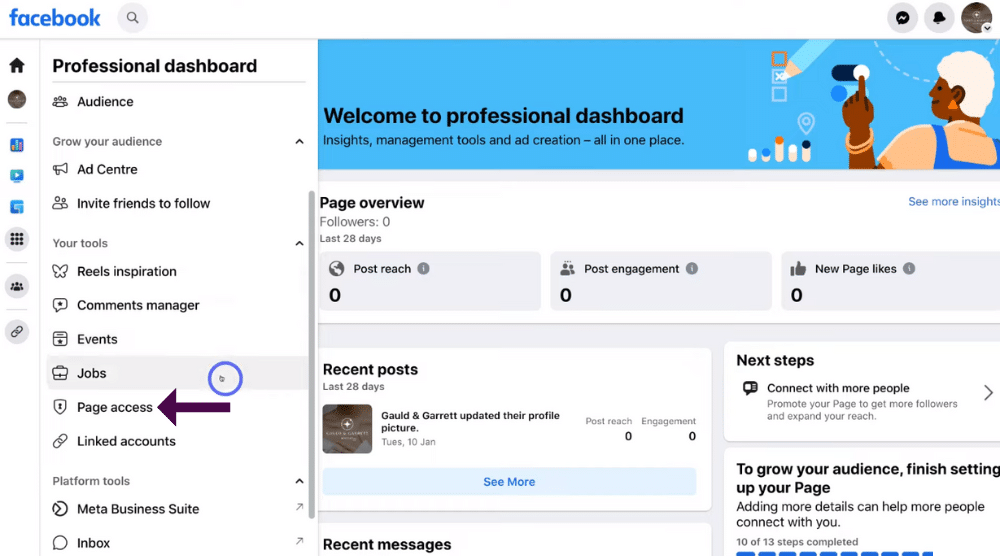
- Navigate over to the left-hand side.
- Scroll down the left-hand side of the page.
- Click ‘Page access’.
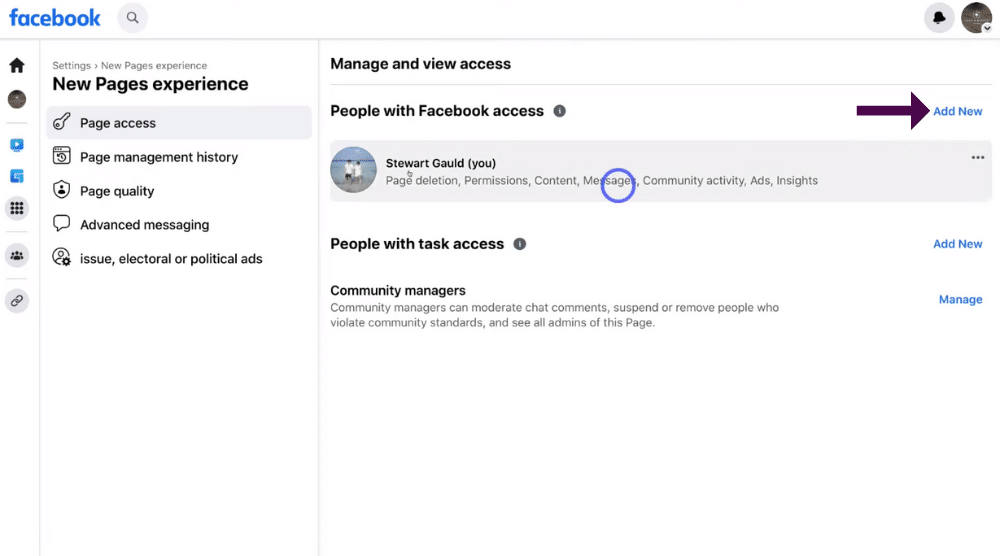
- Select ‘Add new’ on the right-hand side of the page.
- Simply type in any user you’d like to help manage your page.
- Click ‘Settings’ (see screengrab).
Read more: How to add admin to Facebook Business Page
10. How to add a username
Now we’re ready to pick a username for our Facebook Business Page!
Your Facebook username is an easy way for people to find your Facebook Business Page, so keep this in mind when creating a username for your page.
We recommend adding your exact business name as your username, as this will heighten your visibility and discoverability on Facebook.

Want to change the name of your Facebook Business Page?
- Select ‘Edit’ next to ‘Name’.
- Simply type in a new Facebook Business Page name.
However, we selected our business name ‘Gauld and Garrett’ as our Facebook Business Page name earlier, so we’re not going to change that.
To add a username:
- Click ‘Edit’ next to Username.

- Type in a username relevant to your business.
- Simply click ‘Save changes’.
Don’t worry too much if you find your exact business name has already been taken!
Simply type in variations similar to your name until you receive the green tick, which means your username is available.
11. How to connect an Instagram business account
Once you’ve chosen your username, you’re then able to connect your Instagram business account with your Facebook Business Page.

To get started with this process:
- Simply click ‘Linked accounts’ under the ‘Settings’ left-hand sidebar.
- Make sure you click ‘Instagram’ on the left-hand sidebar.
- Select ‘Connect account’ (see screengrab).
Don’t have an Instagram business account? Check out our Instagram business account tutorial where we help you set up and create one.
Learn more about how to connect Facebook with Instagram here.
Under ‘Linked accounts’, you’re also given the opportunity to connect your WhatsApp account if you haven’t already done this.
As previously mentioned, WhatsApp enables customers and potential customers to get in touch with you via WhatsApp.
12. Professional dashboard
Your professional dashboard is the place where you can further optimize your Facebook Business Page.
However, before you do this, it’s important to take a quick look at your Facebook Business Page profile to make any final edits, and check everything is looking exactly the way you want it to look!
To edit your business page profile:
- Click ‘Settings’ again.
- Select your profile picture on the very left-hand sidebar.

- Click ‘Edit bio’, ‘Edit details’, ‘Add hobbies’ or ‘Add features’ if you want to add anything or make any changes.
Once you’ve done that, you’re ready to optimize your Facebook page!
To do that:
- Click ‘Professional dashboard’ on the left-hand sidebar to take you to the professional dashboard.
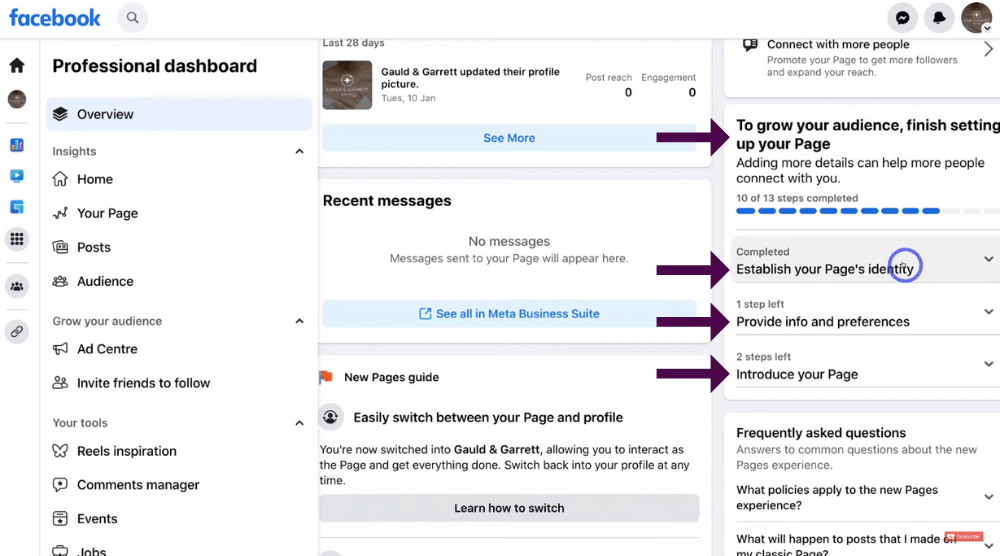
- Head down to ‘To grow your audience, finish setting up your page’ (see screengrab).
This is where you’ll see if your page is fully optimized or if you need to finish setting up your page.
As an example, you can see that with our Facebook Business Page, we’ve completed the ‘Establish your page’s identity completed’ part of setting our page up.
However, we still have one step to complete within ‘Provide info and preferences’ (see screengrab).
- Click on the section where you have incomplete steps to finish setting up your page.
- This will show you in more detail what you’ve already completed and what you still need to do.
For us, remember we didn’t add our WhatsApp details, so that’s why ours is incomplete.
- Follow the prompts and complete the steps required specific to your Facebook Business Page under each heading.
We also have two incomplete steps under ‘Introduce your page’ that we will need to complete in order to fully optimize our page.
Take the time to go through each of these headings and incomplete steps, follow the prompts, and complete each one thoroughly so you’re able to get the most out of your Facebook page!
13. Inbox (messages)
Additionally, you’re able to set up and manage your inbox so you can get messages from both Facebook and Instagram.
It’s important to note that you can also set up automated messages for your Facebook Business Page through your inbox!

To set up your inbox:
- Scroll down the left-hand ‘Settings’ sidebar.
- Click ’Inbox’ to take you to your page inbox.
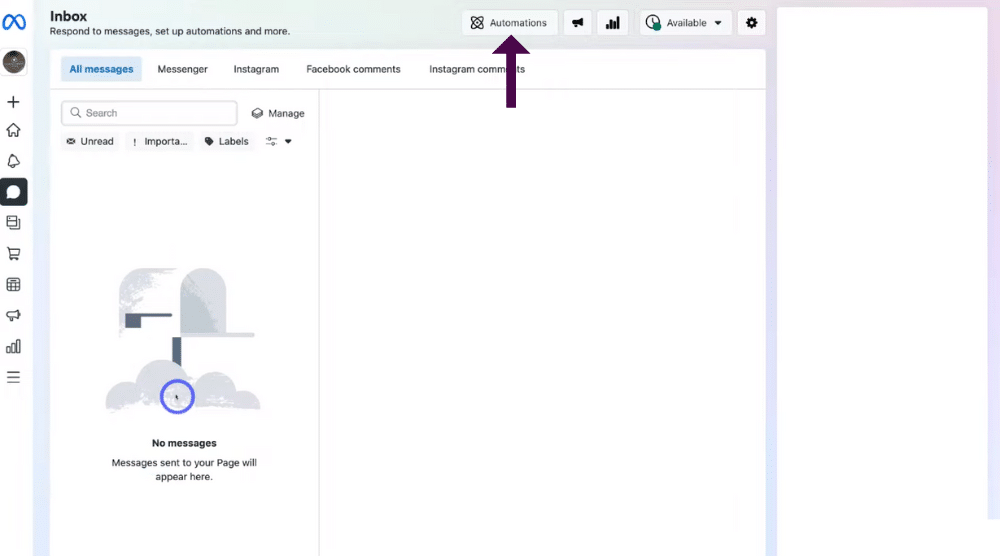
Now when you click ‘Inbox’, the interface will look a little bit different (see screengrab).
This is because Facebook is trying to shift all its business-related activities into Facebook’s Meta business suite.
Within your inbox, you’re able to see ‘All messages’, ‘Facebook messages’, and ‘Instagram messages’ as separate lists (if you connected Instagram to Facebook earlier).
Additionally, you can set up message automations, meaning that when someone messages you for the first time, they’ll receive an automatic reply from you.
This is a primary automation you should set up, especially when you’re just getting started.
To set this up:
- Click ‘Automations’ at the top of the page.
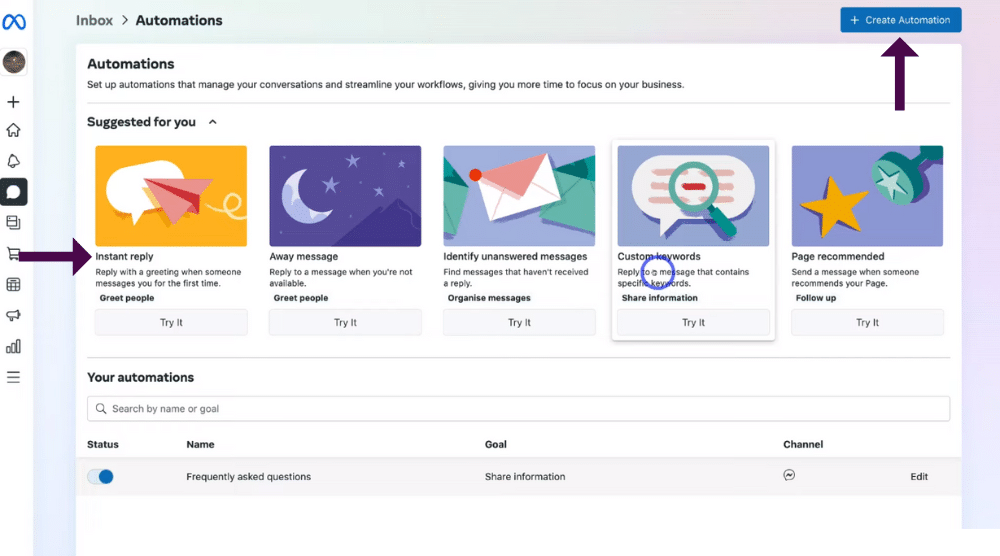
- Select ‘Create Automations’ or
- Choose ‘Instant reply’ (see screengrab).
- You can also add more advanced automation replies from the other options shown if you like.
Want to learn more about Facebook’s Meta business suite, and how you can make the most of their features to help you manage your Facebook Business Page? Click here to find out more.
As previously mentioned, make sure you take the time to set up your business page based on everything we’ve just explained!
Head back to your Facebook Business Page to access your professional dashboard, Meta business suite, and your general settings (under ‘Manage’) of Facebook Business Page – point arrows to each of these headings please)
14. Facebook Business Page – an extension of your brand
Remember, your Facebook Business Page is not only a way for people to find your business and brand through Google.
It’s also an extension of your brand.
Having a high-quality Facebook page will help immensely with both SEO (search engine optimization) and Google ranking.
Therefore, you should add your business page to your website and any other online assets that you have!
Once you’ve completed the initial setup of your page, you can start creating posts for your Facebook Business Page.
Simply add videos or posts, or promote your products or services on your page.
Additionally, think of your Facebook Business Page as an opportunity to talk about your business or the industry you operate in.
Make sure you invite your friends to like and follow your Facebook Business Page so more people find out about you.
It may take some time, but we promise that if you regularly create and publish relevant content, your page will slowly grow organically!
However, that’s all we wanted to share in this updated Facebook Business Page tutorial.
We’ve covered everything you need to know about how to create a Facebook Business Page in order to increase brand awareness and credibility for your online business.
Video tutorial – How to create a Facebook page (2023)
That concludes this updated Facebook Business Page tutorial in 2023!
Feel free to watch our full video tutorial, where we dive into how to set up and create a Facebook Business Page to help your business ultimately grow and succeed online.
